• using Ethernet cable and wireless connectivity

    Home » Forums » Networking – routers, firewalls, network configuration » using Ethernet cable and wireless connectivity

    Author
    Topic
    #2703331

    I have a Windows 11 laptop that I really use as a desktop (and I will soon be purchasing a new desktop.) I have an Ethernet cable connecting my router and laptop. At bootup, my Edge browser connects wirelessly.

    How do I change the priority such that Ethernet connectivity has priority and is used when I bootup?

    I would still like the ability to connect wirelessly if I have to, but have that king of connectivity be 2nd priority.

    Thank you for your help.

    southieguy


    Viewing 3 reply threads
    Author
    Replies
    • #2703357

      How do I change the priority such that Ethernet connectivity has priority and is used when I bootup? I would still like the ability to connect wirelessly if I have to, but have that king of connectivity be 2nd priority.

      Not sure how to get to WiFi adapter listed in Control panel Network connections in Windows 11, but in other windows it is control netconnections entered into a Run box.
      Right click the WiFi connection and select Properties
      On the Networking tab of the WiFi Properties select the Configure button to open the Properties for your WiFi adapter.
      Click the Advanced tab of your Adapter’s Properties
      In the Property block on that Advanced tab scroll down and select Disable Upon Wired Connect. While this is highlighted click the Valve box and select Enabled.
      Click OK button on all open windows to save your settings.
      Reboot and the WiFi should not connect when it detects an Ethernet (wired) connection.

      BTW: You can change the priority of network connection, but the above is easier and achieves the same results you want.

      Like I said, this works for Windows 7 – 10, but not sure about Windows 11.

      HTH, Dana:))

      1 user thanked author for this post.
      • #2703405

        Dana,

        Tried to follow what you laid out but couldn’t seem to “get it.”

        Maybe if you let me know how to do the last part of your reply:

        “BTW: You can change the priority of network connection, but the above is easier and achieves the same results you want.”

        Thank you,

        southieguy

    • #2703374

      WinKey+R, enter ncpa.cpl and press Enter to open the “Network Connections” panel.

      Works for Windows 7 — 11.

      1 user thanked author for this post.
    • #2703752

      ried to follow what you laid out but couldn’t seem to “get it.” Maybe if you let me know how to do the last part of your reply: “BTW: You can change the priority of network connection, but the above is easier and achieves the same results you want.”

      I would try my first posting now that n0ads showed how to access those connections in the control panel (Thanks n0ads).

      Since you asked  and others following this thread may want to know how, here are the instructions to change network priority for Windows 10 and earlier versions).  If  the network connections in the control panel of Windows 11 are similar to Windows 10, I suspect that the commands to set network priority in Windows 10 will work in Windows 11.

      Set Network Priority in Windows 10

      Network priority of different adapters (Ethernet, WiFi, Bluetooth, etc.) of which setups up before the other is controller by the Interface Metric which is a number.  The lower the number the higher priority, so an adapter with an Interface Metric of 5 will start before an adapter with an Interface metric of 25.  Windows default setting is to have this Interface metric set automatically by Windows (usually the first adapter used in Windows gets the highest priority).

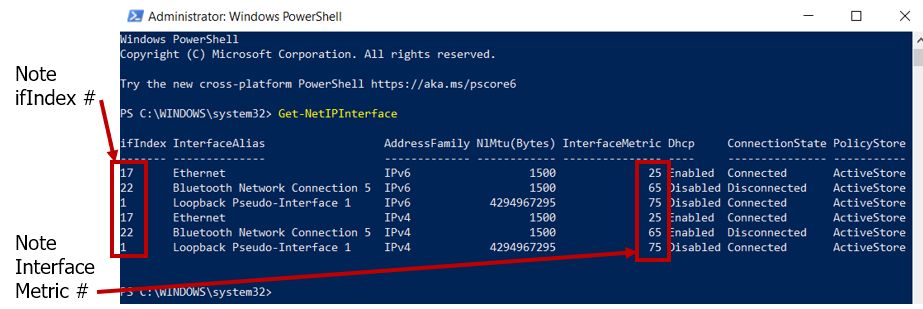
      To see what Interface Metrics you currently have AND learn the Index number assigned to each network adapter:

      Open an Administrator Windows PowerShell
      At the prompt enter

      Get-NetIPInterface

      And press the Enter key.
      The results will look like the screenshot below:

      InterfaceMetric

      Note that the adapter will be listed twice, one for IPv4 and one for IPv6.  Although listed twice the adapter will have the same ifIndex number which is how the system identifies that adapter.  Record that ifIndex number for each adapter as this number is used in changing the priority for that adapter.  If you have IPv6 disabled or not in use for an adapter then it will not be listed and that adapter will have only the IPv4 setting.  In the screenshot there is no WiFi listed because I have WiFi turned off on this PC.  Note the InterfaceMetric number for each adapter.  Lowest number is highest priority.   That means the Ethernet IPv4 and IPv6 adapters have higher priority (25) than the Bluetooth IPv4 and IPv6 adapters (65).  If you have WiFi the Interface Metric numbers will indicates that adapter’s priority with respect to the other adapters InterfaceMetric numbers.

      If I want the Ethernet adapter to have a higher priority than the WiFi, then the WiFi InterfaceMetric number must be higher than the Ethernet InterfaceMetric.

      Ignore the Loopback as this is an internal network that Windows uses for internal functions and should have the highest InterfaceMetric number with the lowest priority.

      If you desire to change the priority of an adapter, you change the Interface Metric value for that adapter.

      Example:  If the WiFi Interface Metric is 5, the Ethernet Interface Metric is 25, and the Bluetooth Interface Metric is 65; and I want the Ethernet to have a higher priority than the WiFi, changing just the WiFi Interface Metric to 45 will do that and make the Ethernet a higher priority than the WiFi while keeping the WiFi higher than the Bluetooth.

      To change the Interface Metric of a network adapter you use a PowerShell command ran in the same Administrator Windows PowerShell.

      The command below is based upon the network adapter being listed for both IPv4 and IPv6 and changing both InterfaceMetric numbers at the same time to the same setting.

      Set-NetIPInterface -InterfaceIndex "ifIndex #" -InterfaceMetric "NewInterfaceMetric #"

      Replace ifIndex # in the quotes with the ifIndex number you recorded for the adapter you are changing the InterfaceMetric of.  Value must be in quotation marks.

      Replace NewInterfaceMetric # in the quotes with the new InterfaceMetric number you want to assign to this adapter.  Value must be in quotation marks.  The InterfaceMetric number should be a multiple of 5 from 5 to 95.
      Note the spaces in the command.
      Press Enter key to run the command.

      Example: Change the Ethernet (ifIndex = 17) InterfaceMetric to 5 would use the following command:

      Set-NetIPInterface -InterfaceIndex "17" -InterfaceMetric "5"

      Upon reboot the network adapters will connect based upon the priority you set with the Interface metric numbers.

      HTH, Dana:))

      2 users thanked author for this post.
    • #2703797

      I have an Ethernet cable connecting my router and laptop. At bootup, my Edge browser connects wirelessly.

      How is this possible? Either your laptop uses ethernet or wifi. Edge has no provision to change connection type.

      Windows defaults to ethernet if a cable is used, no need to change anything.

      If you are not getting internet when the cable is connected then you have another issue.

      cheers, Paul

      1 user thanked author for this post.
      PL1
    Viewing 3 reply threads
    Reply To: using Ethernet cable and wireless connectivity

    You can use BBCodes to format your content.
    Your account can't use all available BBCodes, they will be stripped before saving.

    Your information: