
|
Patch reliability is unclear, but widespread attacks make patching prudent. Go ahead and patch, but watch out for potential problems. |
|
In this issue SOFTWARE: How to use your Gmail account for more than just Gmail Additional articles in the PLUS issue • Get Plus! FREEWARE SPOTLIGHT: No Crappy Passwords — Secure passwords, no password book MICROSOFT NEWS: Microsoft’s fall Surface event PATCH WATCH: 22H2 — Windows 10 edition
SOFTWARE How to use your Gmail account for more than just Gmail
By Lance Whitney With the Gmail website or app, you can add access to non-Gmail accounts. Those of you who have a Gmail account likely use the Gmail website or app to view and work with your Google email. But both the site and the app are more versatile than you may think. With either one, you’re able to add a non-Gmail account, such as one for Outlook or Yahoo. Here’s how this plays out. If you’re reading this far, I’ll assume you already have a Gmail account. If not, it’s easy enough to snag one. Go to the Gmail website and click the button for Create an account. Add your name, a username, and a password. Click Next. Gmail will tell you if the username you selected isn’t available and prompt you to cook up a different one. You’re then taken to your account page, where you can view incoming mail. Using the Gmail website
The default layout is a familiar one. Your inbox and other folders appear on the left, your messages on the right. Click a specific message to view it. Click the left or right arrow in the upper-right corner to jump from one message to another. Click Compose to create a new email, and then send it. You can also tweak the overall layout and design. Click the Settings icon (the one that looks like a gear) at the upper right. From here, you’re able to choose a different density for the text, choose another theme, and turn on a reading pane. To help you organize your messages and keep your inbox less cluttered, Gmail uses both categories and labels. The program automatically adds certain messages to one of four existing categories—Social, Updates, Forums, and Promotions. But you can manually add a message to any category yourself. To further arrange and sort your messages, you’re also able to create your own labels and move a message to a specific label. Adding a non-Gmail account
Otherwise, using Gmail as an email program is fairly rudimentary. Rather than dwell on the basics that many of you already know, let’s look at one of its more hidden capabilities — specifically, the one to add a non-Gmail account. To do this, click the Settings icon and then click the button for See all settings. Select the heading for Accounts and Import. In the section for Check mail from other accounts, click the link for Add a mail account. Type the email address for the account you wish to add. Click Next (Figure 1).
Linking an account
The next screen offers you a choice — linking your non-Gmail account through Gmailify, or importing its messages. If you no longer use the account and simply want to access its messages in Gmail, choose the option to import the emails. But if you want to add an active account so it’s still accessible outside of Gmail, choose the option to link it. Linking means that your latest messages are synced both ways between Gmail and the account itself. However, there is a key difference between the two options. If you import the messages, you can add them from as many non-Gmail accounts as you’d like. But if you link the account, you can link only one non-Gmail account through Gmailify. Let’s first try the linking route, so choose that option (Figure 2).
You’re prompted to sign in to the account you wish to link. After you sign in, Gmail requests access to the account. Click Yes as your response (Figure 3).
A message tells you that the account has been linked. Using this process, I was able to link an account for my Outlook email address. Separately, I also was able to link a Yahoo address. However, I couldn’t link my Microsoft 365 domain address because Gmailify doesn’t support that type of account. Using multiple inboxes
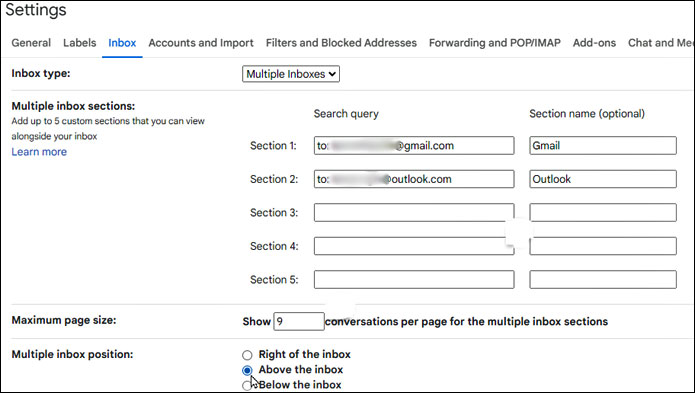
To check the other account, go to your Gmail inbox. You should see new messages for both accounts in your inbox. However, you may not want the messages from both accounts lumped together in a single, unified inbox. That’s easy enough to change. Go back to Settings and select the heading Inbox. Click the dropdown menu for Inbox type, and change the setting from Default to Multiple Inboxes. Next, you need to specify a “search query” to create two inboxes for your two accounts (Figure 4). In the first field, type to: followed by the address of your Gmail account (e.g., to: john.doe@gmail.com). Type a section name, such as Gmail. In the second field, type to: followed by the address of your non-Gmail account (e.g., to: john.doe@outlook.com). Type a section name, such as Outlook or Yahoo. Next, decide where the two inboxes should appear — to the right of the regular inbox, above the inbox, or below the inbox. Click the Save Changes button at the bottom.
Return to your inbox; you’ll see the two separate inboxes as well as the unified inbox (Figure 5).
Choose the Send to address
You can send email from your Gmail address as well as from your linked address. Create a new email, and then click the From field. You’ll see that both your Gmail address and the address for your linked account appear, allowing you to choose either one (Figure 6).
Importing mail from a non-Gmail account
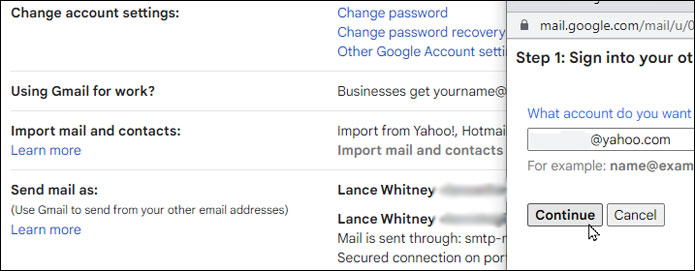
Next, let’s try importing email from another account. Again, this is an option you’d use if the other account is no longer active, because adding messages this way doesn’t support two-way syncing with Gmail. In short, all you really want to do is capture that old email. To do this, go back to Settings and select the heading for Accounts and Import. In the section for Import mail and contacts, click the link for Import mail and contacts. In the pop-up window, type the email address for the account you want to import and then click Continue (Figure 7).
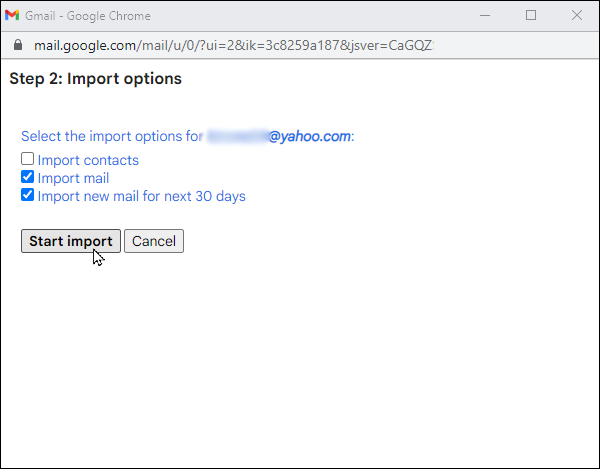
Sign in to the account you wish to import. You’ll be asked for permission to grant access to that account’s mail and contacts. Tap Agree. At the window for Import options, all three items are checked — Import contacts, Import mail, and Import new mail for next 30 days. Uncheck any you don’t want. For example, I unchecked the box for Import contacts because I wanted only to import mail. Then click the button Start import (Figure 8).
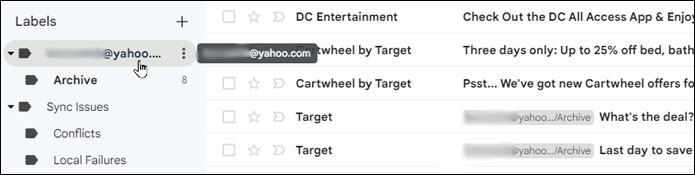
Click OK to close the window. Return to your inbox. Depending on how many messages are being imported, you may need to wait several hours or longer for all of them to show up. To see the messages imported so far, go to the Labels section on the left, and click the label for the account name (Figure 9).
Remove a non-Gmail account
You can sever Gmail’s ties to a non-Gmail account. Go back to Settings and the Accounts and Import section. To remove a linked account, click the Unlink option next to it. You’re asked to decide whether you want to keep a copy of the imported messages or have them deleted. To stop an imported account from importing further, click the Stop option next to it. The imported messages and labels remain, though you can manually delete them if you wish. Using the Gmail mobile app
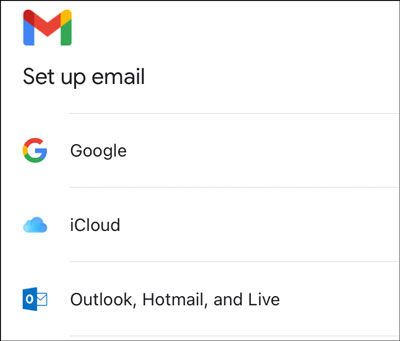
Now let’s segue to the Gmail mobile app to see how you can add non-Gmail accounts on your mobile device. The good news is that the process is much easier than on the website. Plus, the basic steps are the same, whether you’re using the app on an iPhone/iPad or an Android device. Open the Gmail app on your phone or tablet. Tap your profile image at the top and select the option for Add another account (Figure 10).
At the next screen, choose the type of account you wish to add, such as iCloud, Outlook, Office 365, Yahoo, or Other (Figure 11).
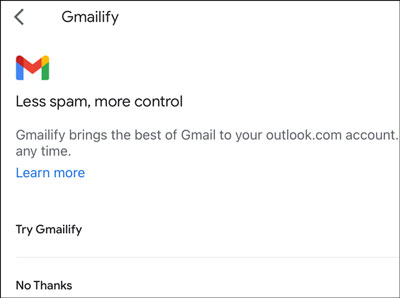
For an Outlook or Yahoo account, the app suggests using Gmailify. But you can more easily add accounts without going through Gmailify, especially if you want to add more than one. Say No Thanks to Gmailify (Figure 12).
Next, enter the username and then the password or authentication for the account you wish to add. Create a name for the account. The new account then appears in the app with its inbox and messages. New messages will appear in your inbox, and any changes you make will sync between the app and the account itself (Figure 13).
To add other accounts, tap the profile icon at the top and follow the same steps. Once you’re finished, switching from one account to another is quick and easy. Just tap your profile icon and choose the account you wish to access (Figure 14).
To manage an account, tap the option for Manage accounts on this device (as shown in Figure 10). To hide the account, turn off its switch. To remove it completely, tap Remove from this device (Figure 15).
Adding a non-Gmail account to Gmail is a handy option if you use the Gmail site or app as your primary program and want to access different accounts. Adding several accounts is easier in the mobile app than on the website, but either one will give you the ability to juggle multiple accounts in a single place.
Lance Whitney is a freelance technology reporter and former IT professional. He’s written for CNET, TechRepublic, PC Magazine, and other publications. He’s authored a book on Windows and another about LinkedIn.
The AskWoody Newsletters are published by AskWoody Tech LLC, Fresno, CA USA.
Your subscription:
Microsoft and Windows are registered trademarks of Microsoft Corporation. AskWoody, AskWoody.com, Windows Secrets Newsletter, WindowsSecrets.com, WinFind, Windows Gizmos, Security Baseline, Perimeter Scan, Wacky Web Week, the Windows Secrets Logo Design (W, S or road, and Star), and the slogan Everything Microsoft Forgot to Mention all are trademarks and service marks of AskWoody Tech LLC. All other marks are the trademarks or service marks of their respective owners. Copyright ©2022 AskWoody Tech LLC. All rights reserved. |
|||||||||||||||||||||||


Plus Membership
Donations from Plus members keep this site going. You can identify the people who support AskWoody by the Plus badge on their avatars.
AskWoody Plus members not only get access to all of the contents of this site -- including Susan Bradley's frequently updated Patch Watch listing -- they also receive weekly AskWoody Plus Newsletters (formerly Windows Secrets Newsletter) and AskWoody Plus Alerts, emails when there are important breaking developments.
Get Plus!
Recent Topics
-
SendTom Toys
by 45 minutes ago
-
Add shortcut to taskbar?
by 1 hour, 50 minutes ago
-
Sycophancy in GPT-4o: What happened
by 10 hours, 39 minutes ago
-
How can I install Skype on Windows 7?
by 9 hours, 22 minutes ago
-
Logitech MK850 Keyboard issues
by 4 hours, 7 minutes ago
-
We live in a simulation
by 1 day ago
-
Netplwiz not working
by 11 hours, 22 minutes ago
-
Windows 11 24H2 is broadly available
by 1 day, 13 hours ago
-
Microsoft is killing Authenticator
by 51 minutes ago
-
Downloads folder location
by 1 day, 19 hours ago
-
Remove a User from Login screen
by 15 hours, 17 minutes ago
-
TikTok fined €530 million for sending European user data to China
by 1 day, 10 hours ago
-
Microsoft Speech Recognition Service Error Code 1002
by 1 day, 10 hours ago
-
Is it a bug or is it expected?
by 1 day, 15 hours ago
-
Image for Windows TBwinRE image not enough space on target location
by 1 day, 9 hours ago
-
Start menu jump lists for some apps might not work as expected on Windows 10
by 9 hours, 25 minutes ago
-
Malicious Go Modules disk-wiping malware
by 1 day, 23 hours ago
-
Multiple Partitions?
by 2 days ago
-
World Passkey Day 2025
by 30 minutes ago
-
Add serial device in Windows 11
by 3 days, 8 hours ago
-
Windows 11 users reportedly losing data due forced BitLocker encryption
by 1 day, 9 hours ago
-
Cached credentials is not a new bug
by 3 days, 13 hours ago
-
Win11 24H4 Slow!
by 3 days, 13 hours ago
-
Microsoft hiking XBox prices starting today due to Trump’s tariffs
by 3 days, 10 hours ago
-
Asus adds “movement sensor” to their Graphics cards
by 3 days, 15 hours ago
-
‘Minority Report’ coming to NYC
by 3 days, 12 hours ago
-
Apple notifies new victims of spyware attacks across the world
by 4 days ago
-
Tracking content block list GONE in Firefox 138
by 3 days, 23 hours ago
-
How do I migrate Password Managers
by 3 days, 7 hours ago
-
Orb : how fast is my Internet connection
by 3 days, 9 hours ago
Remembering Woody
