
|
Patch reliability is unclear, but widespread attacks make patching prudent. Go ahead and patch, but watch out for potential problems. |
|
ISSUE 17.9.0 • 2020-03-02
The AskWoody PLUS Newsletter
In this issue LANGALIST: How to tell if software truly needs updating BEST OF THE LOUNGE: Speeding up an older laptop PATCH WATCH: Questions on controlling Windows 10 updating OFFICE: Managing multiple email accounts in Outlook BEST UTILITIES: Freeware Spotlight — KillEmAll LANGALIST How to tell if software truly needs updating
By Fred Langa There are four types of useful version-checking tools that can help determine exactly which patches and updates are actually worthwhile or important — and which you can safely ignore. Fully automatic updating apps and services should be avoided — they might needlessly destabilize your system by chasing pointless, trivial updates. Conflicting information from version checkers
AskWoody subscriber Peter Matthews is getting mixed signals from various version-checking and auto-patching apps. His note:
I share your frustration with these “updating helpers.” Many of them deliberately inflate their numbers to impress you with how hard they’re working. For example (and as you surmised), they may count each separate sub-component of an app as it if were stand-alone software in need of individual management. Worse, in my opinion, is their common reliance on build numbers as a sign of “needs updating.” For example, if you’re happily running, say, version X.x.x.xxxxx6 of some particular software, it’s highly unlikely that upgrading to version X.x.x.xxxxx7 will do anything meaningful for you. In fact, replacing a smoothly functioning app for no reason other than a trivial bump in version/build number runs the risk of doing more harm than good. The solution? Employ a hybrid mix of automated and manual updating. Version-checking tools can be a great help (I use them myself, as you’ll see) — but only in advisory roles. View their recommendations with skepticism, and don’t let them automatically handle any updating or patching. Instead, see what they recommend and then apply your own common sense as to whether the suggested upgrades make sense and are really needed. Sometimes it’s easy. For example, whole-number upgrades — say, version 6.x to 7.x — are almost always significant and worth further investigation. Build number increments of one or two decimal places to the right (e.g., version x.1x to x.2x) may also be worthwhile — especially if they involve significant security or bug fixes. But you’ll want to see what’s inside the new build before installing it. I’ll show you how in a moment. Build numbers that trail way off into the weeds usually represent very minor bug fixes that affect few users. If your installed version X.x.x.xxxxx6 is running fine, you can in almost all cases safely ignore version X.x.x.xxxxx7 — and similarly small incremental upgrades. So far, I’ve focused on apps, but there’s more to updating than that, of course. In fact, a PC will typically be running four basic kinds of software (with some overlap):
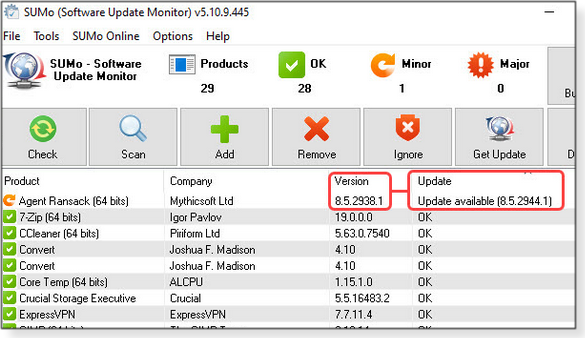
I’ve never found any version-checker/updater tool that can handle that range of code — not even close. So to check the four kinds of software, I use four kinds of version-checking/-updating tools. That might sound like a lot, but the monthly process usually involves only a few routine clicks and a coffee break’s worth of time. Here’s what works reliably for me. Once a month or so, I run the following tools in this order: 1) Windows Update: No surprise here. I use it to keep the operating system and associated Microsoft software, such as MS Office, up to date. If a particular month’s patches make sense for my setup — i.e., Microsoft isn’t trying to force an upgrade to a new Windows version before I’m ready — and if Susan Bradley and other experts have given the all-clear, I’ll let Windows Update do its thing. 2) OEM/vendor/integrator update tools: I use these to check for brand- and model-specific updates. Because my main PC is currently an HP, I use HP’s Support Assistant. Dell customers would use its SupportAssist, Lenovo owners would use Lenovo System Update, and so on. These tools are free and usually do a fairly good job of keeping your PC’s drivers and ancillary OEM software in spec. 3) Component-/hardware-maker updaters: These tools verify that the OEM tools (above) haven’t missed or delayed important mainboard or major subsystem updates. My current PC has an Intel CPU and a separate NVIDIA graphics subsystem, so I use Intel’s Driver & Support Assistant and NVIDIA Update. (The equivalent AMD tools are available on the Drivers and Support page.) The OEM/system integrator’s tools (item 2) should find and flag major component-level drivers and other software that need updating. But I’ve found that some components — especially semi-autonomous hardware such as plug-in Wi-Fi or Bluetooth modules — may get posted by the hardware maker (Intel, for example) well before they show up on the PC vendor’s site. In any case, it takes literally only a minute or two to run the extra version checkers — so why not? 4) General version-checker app/service: This is the last act. I use these tools to scan my PC for any obsolete versions and as a final check. I currently use SUMo, KCsoftwares’ Software Update Monitor (free/paid; site). But I don’t use its built-in updating feature; rather, I let it show me what software it thinks needs updating. Then I decide whether any proposed upgrade makes sense or not. There’s an easy way to check what’s inside almost any proposed software update. Reputable software vendors post a change log or version history on their support sites. These lists should describe what’s new or different in every released build. Here’s a real-life example. Figure 1 shows a SUMo scan I ran for this article. It shows that my installed copy of Mythicsoft’s Agent Ransack (a disk-searching tool; free; info) is at version 8.5.2938.1. But SUMo reports that a new version, 8.5.2944.1, is now available. The app labels this a “minor” update — and it is. It’s surely down in the “who cares?” category and not worth the upgrade.
However, just to be sure, I checked Agent Ransack’s version history page. It confirms that the most recent update is indeed very minor, correcting a small number of problems that have never cropped up on my system. Therefore, as suspected, I don’t need this update. Sometimes, as Peter describes, SUMo will flag subcomponents of an app as needing separate updating, even if there’s no good way to do that. It’s frustrating to see the SUMo output cluttered with uncorrectable issues, but it’s still good information — an app that contains non-updateable parts may harbor uncorrectable security flaws. Once you’re aware that’s what’s going on with this type of app, and if you accept whatever risks may be involved in continuing to use uncorrected or uncorrectable problems, you can tell SUMo to ignore the offending app from then on. The problem will still be there, but you’ll no longer be nagged about it. Similarly, if you’re running an older (but still properly working) app that’s been replaced by a new whole-number upgrade containing features you don’t want or need, you can tell SUMo to stop nagging you about that, too. But no matter what tools you use to check for updates, you don’t have to fly blind; you don’t have to accept whatever the software publisher pushes out the door; nor do you have to needlessly delay potentially useful updates. Using the four updating tools, you’ll know in advance what really needs patching and what doesn’t. And you only need to run through this process once a month or so. Ultimately, you’ll know that your system is fully, properly, and to your satisfaction up to date — without the needless churn of chasing build numbers.
Fred Langa has been writing about tech — and, specifically, about personal computing — for as long as there have been PCs. And he is one of the founding members of the original Windows Secrets newsletter. Check out Langa.com for all Fred’s current projects. Best of the Lounge Speeding up an older laptop
One of the first things computer owners consider when looking for a performance boost is bumping up the installed RAM. It’s especially helpful with tasks that consume lots of system resources. Plus member LHiggins queries the Lounge about whether a six-year-old ThinkPad X230 would benefit from more RAM. The forum members generally agree that additional RAM should help. But they also provide other useful considerations to revive a sluggish PC. And then there’s the age-old question of whether it’s simply better to buy a new machine. MOBILITY Near Field Communication (NFC) is used by iPhones and other devices for close-proximity data sharing. Swapping photos and files — even paying a bill at the register — can be easily managed by “bumping phones.” But would you use this technology to unlock and start your wheels? Are there possible security issues involved? Plus member Alex5723 poses this question and provides a link to an article about Apple’s new “beta” CarKey feature. Maintenance Plus member wavy is slowly bringing a newly built computer to life. Planning ahead, wavy is pondering whether to change backup applications. Forum members are all too happy to suggest their favorites. Windows 7 Plus member Nibbled To Death By Ducks is receiving extended support (ESU) for a Windows 7 system. Unexpectedly, the machine started a patch-installation procedure, and Nibbled received a never-before-seen message: “Windows is cleaning up … .” Was ESU to blame? Or was something else at play? Surprisingly, the discussion drifts into defragging solid-state drives. What say you? SPREADSHEETS Lounger WSjjni was having trouble getting Google Sheets to correctly sort by date. After some back and forth with other forum members, this issue was stamped “Resolved!” MAINTENANCE It’s well documented that you don’t want or need to defrag a solid-state drive. But Plus member rosie wants to know whether the same holds true for running chkdsk. Readers responded … yes and no. An SSD’s structure is not the same as that of a “spinner” hard drive. So can both answers be true? Find out in this informative post. UTILITIES As one can imagine, moving 40,000 images and videos from one computer to another is a time-consuming task — especially if there are multiple instances of some files. Plus member aquatarkus asked fellow Loungers for opinions on good de-duplication tools. Various apps were suggested, but aquatarkus came up with a workable solution. If you’re not already a Lounge member, use the quick registration form to sign up for free. PATCH WATCH Questions on controlling Windows 10 updating
With the end of free support for Windows 7, there’s a spate of new Win10 users. One of the most common questions I see from this group is how to manage the monthly updating task. Over its many revisions — culminating with Version 1909 — Windows 10 has come a long way toward making the patching experience more agreeable to rank-and-file users. But the key is to follow some important guidelines. Here are my rules for making Win10 updating as pain-free as possible.
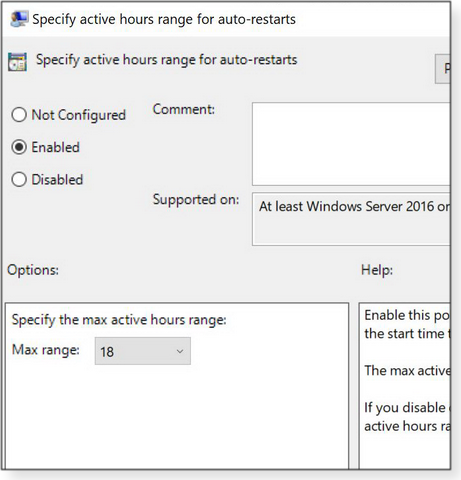
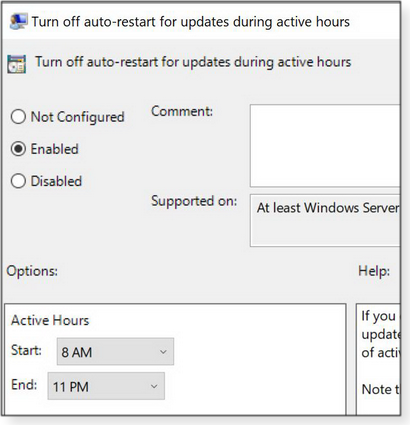
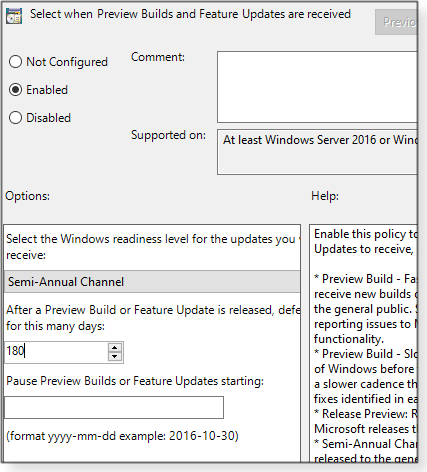
My final rule is to select either manually paused updates or automatic updating via Group Policy. Using Windows Update’s Pause updates … option is quick and easy, but you need to reset it each month. Using Group Policy (gpedit) will lock in deferral settings until you change them. Use the following steps to change automatic-update settings through Group Policy:
Together, these Group Policy settings automatically push off updates to a time when all patch side effects have been identified and we declare the updates safe to install. A reminder for Windows 7 users and Server 2008 R2 admins planning to go without new patches (i.e., you’ve not signed up for extended support): the following six critical vulnerabilities do not appear to have active or widespread attacks at this time. Currently, only SQL server and Exchange are threatened by in-the-wild attacks (more info).
Windows update news: Microsoft pulled back special security update 4524244. The company recommends uninstalling it if you jumped the gun. Microsoft also released a separate Adobe Flash Player update, 4537759, Microsoft has started cranking out optional preview updates again. They include:
(For complete patching information, see the Windows 10 update history page.) On February 25, Microsoft released preview update KB 4537819 for … Windows 8.1! In addition, optional Microcode updates were released on February 25 in the form of KB 4494451 for Windows 1803 and Server 2016. The patch impacts Intel Microcode bugs for CPU models Denverton, Sandy Bridge, Sandy Bridge E and EP, Valley View, and Whiskey Lake U. (Who makes up these CPU names?) At this point, you should be on Win10 1809 or newer. So you can comfortably ignore the patch. Later this month, I’ll be discussing my backup and recovery strategy for Windows 10 devices. Stay tuned. February’s patch summary
The reported issues with lost user profiles (more info) are not widespread, and I have not come across the problem on any of the Win10 machines I manage. If you have been impacted, it’s unlikely the preview updates contain a fix.
Windows 10
Servicing-stack updates
Cumulative Windows 10
.NET Framework There are no new .NET security updates this month, as noted in the .NET blog. The following are optional “quality” patches. Windows 8.1/Server 2012 R2
Skip optional preview update KB 4537819. Windows 7/Server 2008 R2 SP1
If you signed up for Extended Security Updates (ESU), don’t forget to install KB 4538483 from the Microsoft Update Catalog download site before attempting to add new security fixes. Server 2012
Windows Server 2008 SP2
Office security and non-security updates
February’s updates fix several remote-code-execution and security feature–bypass vulnerabilities. I recommend installing the Office updates at this time. Office 2016 Office 2013 SP1 Office 2010 SP2 The following Office non-security enhancements and fixes were released February 4. Office 2016 Office 2013 and 2010 There are no new non-security updates for Office 2013 and Office 2010. The Patch Watch updating guide
It’s a new month of patching. Once again, here are our current recommendations for patching Windows and Office. They may change as Microsoft evolves its updating process.
Stay safe out there.
In real life, Susan Bradley is a Microsoft Security MVP and IT wrangler at a California accounting firm, where she manages a fleet of servers, virtual machines, workstations, iPhones, and other digital devices. She also does forensic investigations of computer systems for the firm. OFFICE Managing multiple email accounts in Outlook
These days, it’s not uncommon to have several email accounts. Keeping them all under a single email-client umbrella makes the task of managing those accounts almost as easy as working with just one. Here’s a typical scenario: You have one email account for your business, a second account for personal mail, and possibly more accounts under Gmail, Yahoo Mail, Outlook.com, your Internet service provider (ISP), or some other Web-based service. (Adding a new email account is easy; getting rid of old accounts … not so much.) Almost any good email client such as Mailbird (paid), Thunderbird (free/donation), and eM Client (free/paid) will support multiple accounts. But I’m focusing on Outlook because it’s familiar to millions of workaday folks and it comes with Office 365. The process of adding multiple accounts to one mail client can be a bit time-consuming, but after the work is done, you’ll have a one-stop spot for viewing and managing all your email. I’m using the latest version of Microsoft Outlook included with an Office 365 subscription, but the basic steps should be similar in any version of Outlook from the past few years. Adding additional accounts
I’ll assume you already have one account set up in Outlook — perhaps one based on your Microsoft account. Let’s start by adding a Gmail account, which you typically access through a browser. (Who doesn’t have a Gmail account?) In Outlook, click File in the toolbar and then Add Account (under Account Information). In the simple dialog box that opens, enter your Gmail account’s email address. To let Outlook automatically set it up, click the Connect button. You’ll next be prompted to enter your email-account password. If a message pops up telling you that the account has been successfully added, click Done. (See Figure 1. You’ll have to forgive the blurred-out account info in the following illustrations.) That’s it! You should be good to go! Note: The account will be either IMAP or POP, depending on how your Gmail settings are configured (more info).
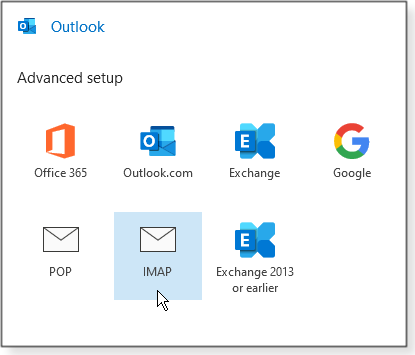
Now open the inbox for your new account to ensure you’re able to receive mail. Select Send/Receive in the Outlook toolbar and then click the circle icon on the left end of the ribbon. (You can also click the small circle icon at the left end of Outlook’s blue title bar.) To check that outgoing mail is working, click the New Email button and then compose and send a message to your other account. Again, some accounts will take more work to set up in Outlook, either because it can’t set up the account automatically or because you want to use other settings (e.g., IMAP instead of POP). For example, when I click File/Add Account and enter a Comcast.net email address ([name]@comcast.net), Outlook immediately opens the Advanced setup screen. In this instance, I’ll select the IMAP option (see Figure 2).
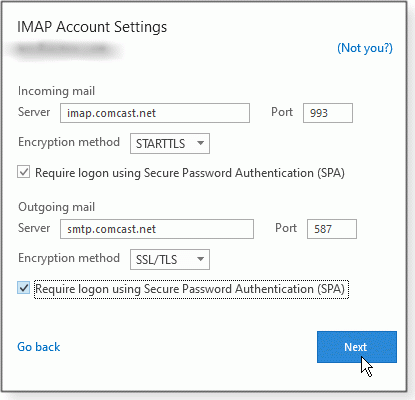
The older POP protocol won’t keep your email synchronized between devices, but it’s common to nearly every email service. I suggest trying IMAP first to see whether the mail service supports it. For the next step, you’ll need to know the POP/IMAP server and port settings for your mail account. Typically you’ll find that information on the email service’s support pages. Enter the information into Outlook and click Next (see Figure 3). Enter the password for your account when prompted and click Connect. Again, check that Outlook can send/receive mail to and from the newly added account.
Finally, let’s add one more account. Maybe you use an Exchange or Office 365 account for business. Click File/Add Account, enter your business email address, and click Connect. If Outlook detects and automatically sets up the account, you’re golden. If not, select the option for Office 365 or Exchange in the Advanced setup window and follow the prompts. Managing multiple accounts in Outlook
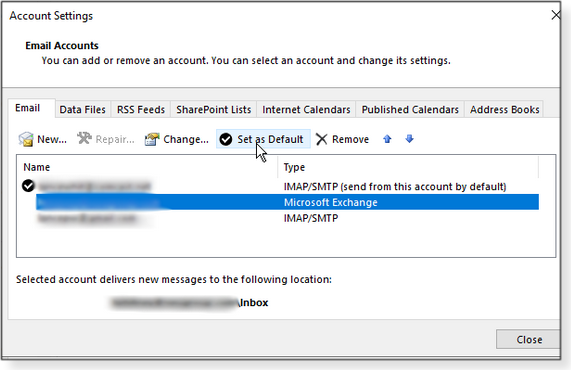
So you now have three or more accounts set up in Outlook. How do you juggle them all? First, notice that each account appears on the left pane with its various folders: Inbox, Sent Items, Junk Mail, etc. Simply click the folder to view the messages it contains. Although all accounts are visible and accessible, one will be designated as the “default” — typically the first account set up in Outlook. With some Outlook setups, the default account is the one that opens when you launch Outlook and will be the first choice in the From list when composing a new message. To change the “default” account, click File/Account Settings/Account Settings (no, that’s not an error). In the Email Accounts section, select an account and click Set as Default (see Figure 4). Close the Account Settings window.
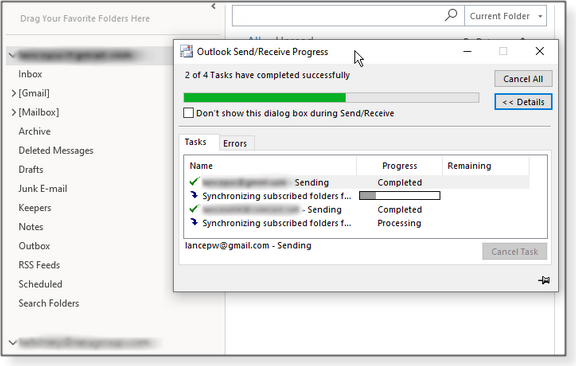
Back in the main Outlook screen, you can reorganize your accounts by, say, priority — i.e., put the most frequently used accounts toward the top of the list. Simply click an account and drag it above or below other accounts. You can also drag accounts and folders into Favorites. Conveniently, if you place more than one “Inbox” folder into Favorites, Outlook automatically appends the account’s email address, so you can easily tell one from another. In most cases, new emails will automatically appear in your inboxes — but not always. To check that messages are arriving and departing properly, click Send/Receive in the toolbar and the Send/Receive All Folders option in the ribbon. A progress box will open, as shown in Figure 5.
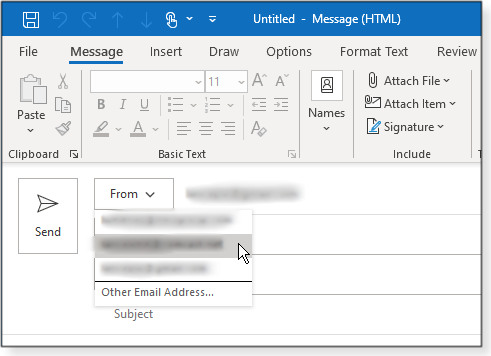
You can send mail from one account but use the “From” address for one of your other accounts. For example, you might want to ensure that the recipient replies to one of your other accounts — say, your personal account rather than your business account. Setting a different “From” address is easy in Outlook: simply click the New Email button, then click the From button and select the account you want to show up as the “from” address in the sent message (see Figure 6).
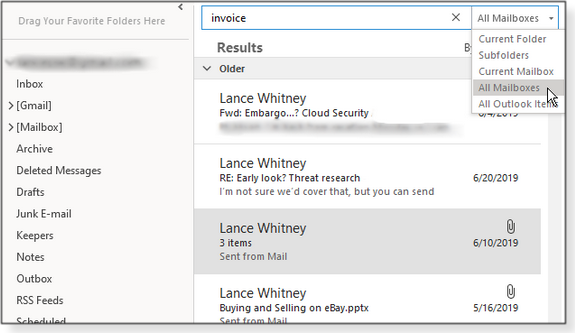
One of Outlook’s strengths is its search function. You can, for example, look across all your accounts for a particular message. To do so, check that the search box (top of the middle pane) is set to All Mailboxes and then type in your search term. Outlook will show you results from each account (see Figure 7).
Outlook offers numerous other search tools in the Search toolbar section. For example, you can quickly filter for emails with attached files by clicking the Has Attachment button. And while you’re making changes to Outlook, now’s a good time to review its many settings (File/Options) to tailor the app more to your particular preferences and workflow.
Lance Whitney is a freelance technology reporter and former IT professional. He’s written for CNET, TechRepublic, PC Magazine, and other publications. He’s authored a book on Windows and another about LinkedIn. Best Utilities Freeware Spotlight — KillEmAll
Computer troubleshooting typically means careful diagnosis and working through one solution at a time. But there are occasions when you have to take an ax to the problem. At our computer shop, we often see machines that are totally infested with malware. Just getting a malware-cleaning tool to run can be a challenge when you’re constantly bombarded with bogus popups, malicious anti-virus apps, and fake system cleaners — all running in the background. When the stuff really hits the fan, we load up one of our favorite utilities: KillEmAll. It comes from d7xTech.com, known for its extremely useful paid and freeware tools for computer techs and system administrators. The name pretty much says it all: KillEmAll terminates everything running in the background that’s not a critical Windows process, leaving you free to start your troubleshooting and repair tasks. To follow along with my description of this app, head over to our OlderGeeks site and grab a copy. KillEmAll is, of course, portable — so keep a copy on your flash drive of service apps. Once it’s downloaded and unzipped, simply launch KillEmAll.exe. Now, wait! Read the popup warning carefully before punching that Ok button! (See Figure 1.)
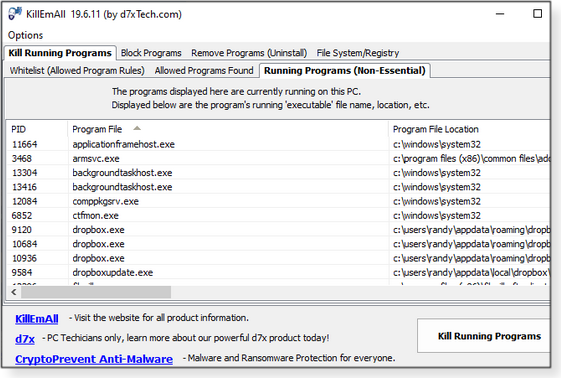
If you’re still reading this, good on you. We’ll wait a bit while those who blithely click “Ok” open their Web browsers again and reload this article. Hey, welcome back! As I said before … wait! — don’t click Ok. Instead, this time click Cancel. If you clicked Ok before, you’ll now know how incredibly fast this program closes everything except Windows’ critical functions. At some point, you will want to reboot your computer, as it closed any cloud-based programs as well. Okay — we’re now ready to look at some of KillEmAll’s other features. On the Kill Running Programs tab, the app shows all background programs it’ll stop — once allowed to do so. (Notice that when you click a tab on the top row, you’re given sub-tabs related to the parent tab.) Oddly, the third sub-tab, Running Programs (Non-Essential), comes up first.
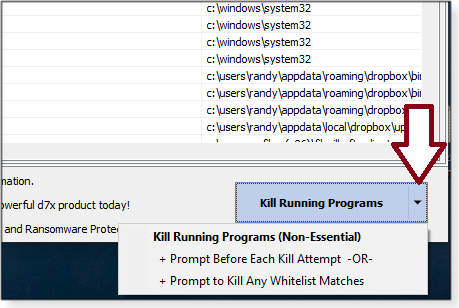
The utility does not have to kill everything in one go. Click the down arrow next to the Kill Running Programs button, and you’re given the option to choose whether a particular process or white-list item is terminated.
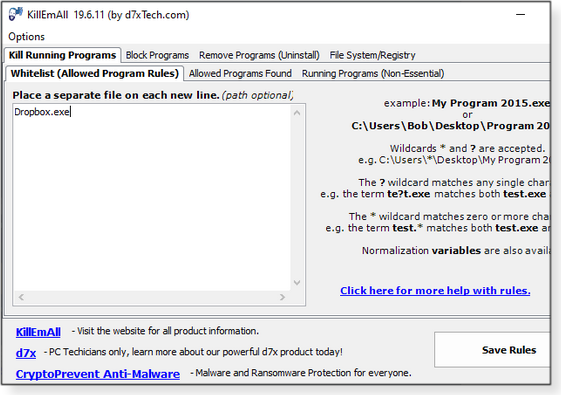
The white list is the first tab under Kill Running Programs. As shown in Figure 4, I’ve added Dropbox.exe. Using wildcards allows for a ton of white-list options. If you want to browse for an executable program file, click the arrow next to Save Rules and choose Add New/Normalized Rule. Don’t forget to click Save Rules when you’re finished.
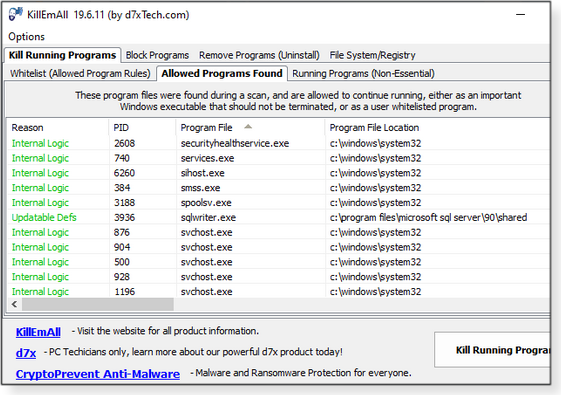
On the second sub-tab, Allowed Programs Found, you’ll see a list of what’s allowed to keep running (Figure 5). Anything added to your whitelist will also appear here.
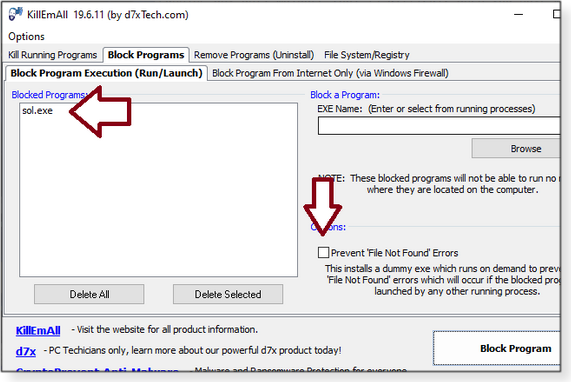
The next parent tab is Block Programs. When troubleshooting a system, there will be apps you don’t want to run — at any time. And that applies beyond troubleshooting. Have an employee who plays too much Solitaire? Add the game to the blocked list (see Figure 6). KillEmAll can even add a dummy EXE file in the blocked software’s place. Then, if another program calls that file, you won’t get a file-not-found error.
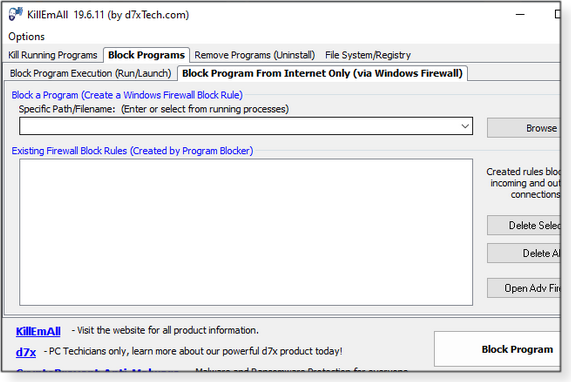
A related function is Block Program From Internet Only (via Windows Firewall). It doesn’t block programs, but it will prevent them from using the Internet (Figure 7). Think of it as an easy way to edit the Windows Firewall rules.
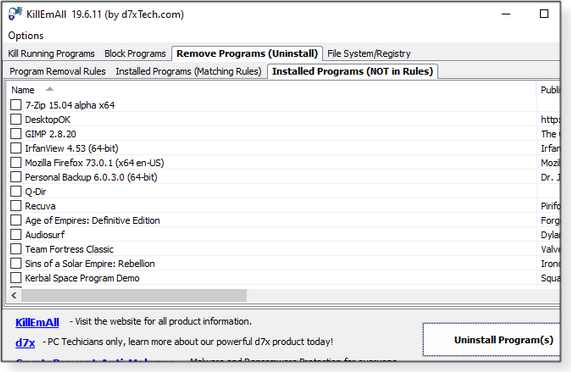
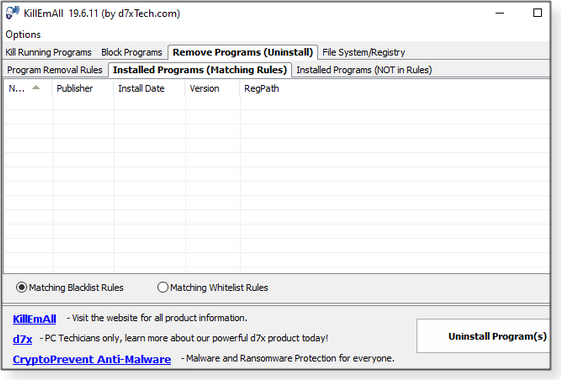
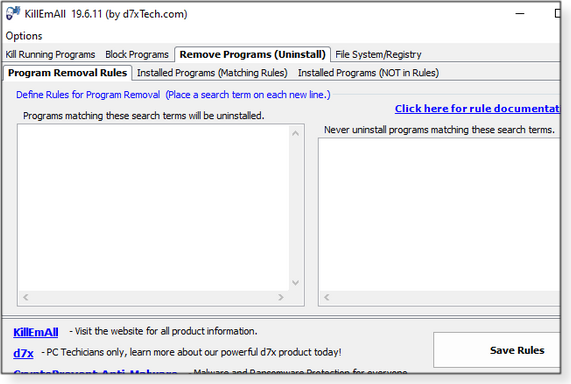
The Remove Programs (Uninstall) main tab provides some real power over junkware programs. Its three sub-tabs let you create and manage custom rules for uninstalling apps (Figures 8, 9, and 10).
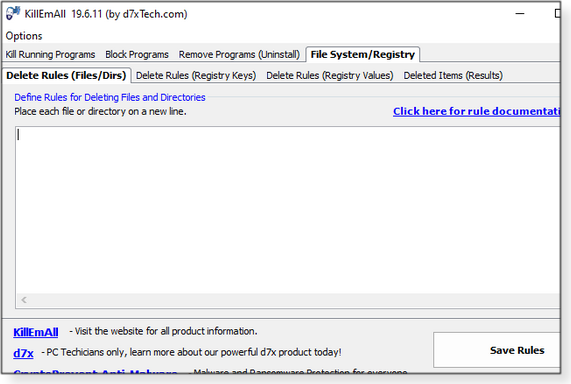
For a free utility, KillEmAll’s final tab, File System/Registry and its sub-tabs (Figure 11) offer some extraordinary options for deleting system files. This is definitely the power-user zone. Use it with extreme caution.
Under FileSystem/Registry, you’ll find the “Click here for rule documentation” link. The information it provides is fairly technical, but you should try to read it. It’s where your inner geek will be unleashed, letting you work some real magic. There’s too much detail to go into here; we’ll leave it to you to experiment on your own. You’ll be amazed. There you go. An incredible piece of free software. Be sure to check out d7xTech.com‘s other cool tools. Okay … Now you can click the Ok button! Happy Computing!
Deanna and Randy McElveen are celebrating over 20 years in the computer business, ten years running OlderGeeks.com, and more than 26 years of putting up with each other. Their computer store is in a small town in the Missouri Ozarks. Believing that happy customers are always the best advertisement, they hope to do it for another 20 years. Publisher: AskWoody LLC (woody@askwoody.com); editor: Tracey Capen (editor@askwoody.com). Trademarks: Microsoft and Windows are registered trademarks of Microsoft Corporation. AskWoody, Windows Secrets Newsletter, WindowsSecrets.com, WinFind, Windows Gizmos, Security Baseline, Perimeter Scan, Wacky Web Week, the Windows Secrets Logo Design (W, S or road, and Star), and the slogan Everything Microsoft Forgot to Mention all are trademarks and service marks of AskWoody LLC. All other marks are the trademarks or service marks of their respective owners. Your email subscription:
Copyright © 2020 AskWoody LLC, All rights reserved. |


 By Susan Bradley
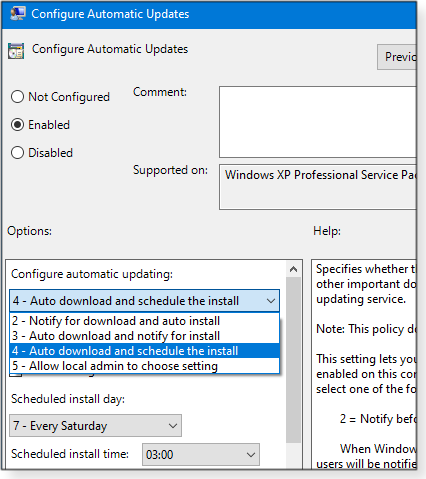

 What to do: I’m green-lighting the February updates for business systems. Consumers should feel free to install them, too — providing you have good backups and follow the Win10 updating rules listed above. (See our online
  By Lance Whitney
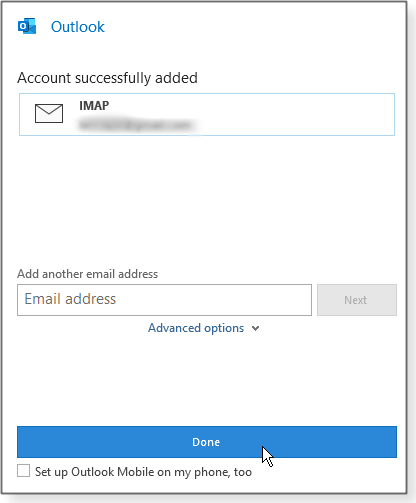
 By Deanna McElveen
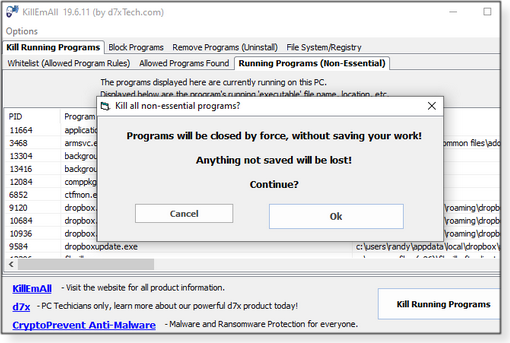

Plus Membership
Donations from Plus members keep this site going. You can identify the people who support AskWoody by the Plus badge on their avatars.
AskWoody Plus members not only get access to all of the contents of this site -- including Susan Bradley's frequently updated Patch Watch listing -- they also receive weekly AskWoody Plus Newsletters (formerly Windows Secrets Newsletter) and AskWoody Plus Alerts, emails when there are important breaking developments.
Get Plus!
Recent Topics
-
Is it a bug or is it expected?
by 1 hour, 4 minutes ago
-
Image for Windows TBwinRE image not enough space on target location
by 5 hours, 57 minutes ago
-
Start menu jump lists for some apps might not work as expected on Windows 10
by 6 hours, 42 minutes ago
-
Malicious Go Modules disk-wiping malware
by 5 hours, 34 minutes ago
-
Multiple Partitions?
by 2 hours, 45 minutes ago
-
World Passkey Day 2025
by 14 hours, 17 minutes ago
-
Add serial device in Windows 11
by 1 day, 5 hours ago
-
Windows 11 users reportedly losing data due forced BitLocker encryption
by 2 hours, 11 minutes ago
-
Cached credentials is not a new bug
by 1 day, 10 hours ago
-
Win11 24H4 Slow!
by 1 day, 10 hours ago
-
Microsoft hiking XBox prices starting today due to Trump’s tariffs
by 1 day, 7 hours ago
-
Asus adds “movement sensor” to their Graphics cards
by 1 day, 12 hours ago
-
‘Minority Report’ coming to NYC
by 1 day, 8 hours ago
-
Apple notifies new victims of spyware attacks across the world
by 1 day, 21 hours ago
-
Tracking content block list GONE in Firefox 138
by 1 day, 20 hours ago
-
How do I migrate Password Managers
by 1 day, 4 hours ago
-
Orb : how fast is my Internet connection
by 1 day, 6 hours ago
-
Solid color background slows Windows 7 login
by 2 days, 8 hours ago
-
Windows 11, version 24H2 might not download via Windows Server Updates Services
by 2 days, 7 hours ago
-
Security fixes for Firefox
by 1 day, 7 hours ago
-
Notice on termination of services of LG Mobile Phone Software Updates
by 2 days, 19 hours ago
-
Update your Apple Devices Wormable Zero-Click Remote Code Execution in AirPlay..
by 3 days, 4 hours ago
-
Amazon denies it had plans to be clear about consumer tariff costs
by 2 days, 19 hours ago
-
Return of the brain dead FF sidebar
by 2 days, 6 hours ago
-
Windows Settings Managed by your Organization
by 1 day, 9 hours ago
-
Securing Laptop for Trustee Administrattor
by 11 hours, 49 minutes ago
-
The local account tax
by 2 days, 8 hours ago
-
Recall is back with KB5055627(OS Build 26100.3915) Preview
by 3 days, 17 hours ago
-
Digital TV Antenna Recommendation
by 3 days, 10 hours ago
-
Server 2019 Domain Controllers broken by updates
by 4 days, 5 hours ago
Remembering Woody
