
|
Patch reliability is unclear. Unless you have an immediate, pressing need to install a specific patch, don't do it. |
Office Q&A: Image wrangling in Word 2010

Office Q&A: Image wrangling in Word 2010
We include pictures in everything — from blog posts to annual reports to letters to Grandma.
But easy as it is to insert pictures into a doc, we’re often flummoxed by how to keep them exactly where we want them. This article explores a few of the maddening Word picture-placement issues our readers (and editors) have faced.
Fixing text flow disrupted by an added picture
- “When I add a picture to my page, it makes a mess of my text formatting, adding lots white space around the picture. And when I add text or try to reformat it, the picture moves to a new place on the page. How can I fix that?”
Word deals with all pictures — including photos, diagrams, drawings, clip art, charts, and WordArt — in one of two ways: as inline with text or as a floating image.
Inline images are treated as if they’re another character in your text, so you might notice lots of space above any figure you simply insert inline. (See Figure 1.) When surrounding text moves, so does the inline illustration. There’s no way to make an inline image stick to one spot on a page.

Figure 1. When you insert a picture inline with text, it moves wherever the text moves.
Images classified as floating, on the other hand, are linked to an object anchor — wherever the anchor appears, the image appears, too. You can locate a floating image (and its anchor) within a paragraph or next to a paragraph marker, but you must use the Wrap Text tool (click the image and select the Format/Picture Tools tab; or right-click the image) to choose how to flow text around the image. Wrapping options include Square, Tight, Through, Top and Bottom, Behind Text, and In Front of Text, as shown in Figure 2. (You can also select In Line with Text.)
 Figure 2. Choose any option in the Wrap Text list except In Line with Text to make your picture a floating image that you can keep anchored on the page.
You must choose one of these text-wrapping options to place an image exactly where you want it. If you don’t, Word defines an image as Inline with Text by default.
Also by default, object anchors are hidden. Revealing the anchors will make it easier for you to see exactly where Word has anchored the pictures in your document. This way, if one unexpectedly moves to the next page, you’ll be able to see where the image was anchored and move it so it stays on the page where you want it to appear.
To show anchors, click the File tab and select Options/Display (see Figure 3). In the Always show these formatting marks on the screen section, click the Object anchors check box. Then click OK. (To hide anchors, you might have to uncheck “Show all formatting marks.”)

Figure 3. Reveal or hide image anchors in the Word Options dialog box.
Floating images keep jumping around. Why?
- “Sometimes, when I add a picture to my page, it stays where I put it. But other times it jumps to the next page. It’s incredibly annoying.”
Image anchors are tied to paragraphs. If you add new text or images above an anchored paragraph, it might be displaced to a following page — and its associated image will naturally go with it. You can change the placement of an anchor — and move the picture back to the page where you want it to appear — by right-clicking a picture, choosing Cut, and then pasting the picture into the new location.

Figure 4. Move an anchor by cutting the image and placing it back where you want it on the page.
When you move an image (and its anchor) to a new location, remember to reapply a Wrap Text setting so it still floats. If you don’t, Word will insert the image as an inline object and you’ll no longer see the anchor. Yes, it’s frustrating.
A mirage image — it’s there, then gone
- “When I insert a picture on the Word page, it disappears! I see just a picture frame for a second and then nothing. What’s going on?”
When you first add a picture to your Word page, Word treats it by default as an inline image — it’s considered just another character on the page and is treated like any other text. Not only can this make your line spacing funky, but if your Paragraph attributes are set to a specific line height, your picture can disappear from the page. (And it could pop up in an unexpected place when you print.)
If you have a problem with the picture disappearing or you see only a sliver of your image or there’s just a picture frame (but no picture), check your Paragraph settings. Select the Home tab and then click the dialog launcher (the tiny box-and-arrow) in the bottom-right corner of the Paragraph group. In the dialog box that pops up, click the Line spacing drop box and change the setting from Exactly to either Single or Multiple, as shown in Figure 5. This should fix the appearance problem, but you might also want to apply a Wrap Text setting.

Figure 5. Check your paragraph line-spacing setting to ensure images always appear.
What to do with those roaming captions?
- “The captions that I add to figures often wind up getting bumped to the next page, while the image stays at the bottom of the previous page. How can I keep the pictures and captions together?”
In Word, the way to make captions stick depends on the type of picture — inline or floating — placed on a page. If it’s an inline picture that’s formatted as part of the text, add a caption by clicking the References tab and choosing Insert Caption in the Captions group. This displays the Caption dialog box (see Figure 6), where you choose your label and add descriptive text that will stay with the image as it flows with the text in your document.

Figure 6. For inline pictures, choose Insert Caption in the References tab to display the Caption dialog box. Then add your caption.
If you created a floating image with one of the Wrap Text settings, your picture and your caption will be treated as two different objects on the page, which means you need to put them both into a text box if you want to be sure to keep them together. To add a text box, click the Insert tab and then click Text Box in the Text group. Choose Draw Text Box and draw a box over the picture on your page, with a little extra room at the bottom for the caption. (See Figure 7.)

Figure 7. If you want to add a caption to a floating image, put both the image and the caption into a text box.
Choose No Fill for the box (so that you can see the image through it) and then, after using Send Backward to move the box behind the picture, cut and paste the picture into the box. In the text box, click below the picture and type your caption, formatting it as you want it to appear.
You can hide the border of the text box, if you like, so that the text in your document appears to flow around the picture and caption. Simply click the text box and, in the Format/Drawing Tools/Shape Styles section, set Shape Outline to No Outline (see Figure 8.)

Figure 8. Hide the text box outline by choosing No Outline from the Shape Outline settings.
Word’s picture tools are improving in each incarnation, but it can still be a challenge getting Word to display, format, and print pictures just the way you want them seen. If you have other Office questions you’d like us to tackle, send them in and we’ll share what we find in a future issue.
Familiar computing products get new capabilities
By Michael Lasky
The era of the single-function device is over. Today, it’s all about versatility — including the option of operating without a connection to a PC.
A quartet of new products includes some novel — and unexpected — capabilities for home and office use.
Teaching old DVD drives some new tricks
External USB DVD burners were once the staple of any good computing workstation setup. They were necessary for duplicating optical discs, as portable backup devices, and as players for those ultra-thin notebooks and diminutive netbooks whose size precluded internal optical drives.
But with the rapid growth in the size of image files, videos, and system backups, the value of an external optical drive has been largely usurped by big and fast external hard drives and the unlimited capacity of the Cloud. Nevertheless, optical discs still make reliable, easy-to-store backups of important images and documents.
In the case of Plextor’s U.S. $150 PlexEasy (info page), staying relevant means unchaining itself from the PC and adding some new and useful capabilities. For example, it pushes the optical-drive envelope by directly transferring data to and from a host of mobile devices such as digital cameras, tablets (including the iPad), smart phones, and other devices that connect via USB. The drive even includes a built-in SD slot.
And it can do all these cool tricks with or without a PC.
Actually making use of the PlexEasy’s versatility is another matter. The slim box has a small LED display and three buttons for standalone operations. But with skimpy documentation and somewhat obtuse button labeling, the PlexEasy was initially confusing to operate. I thought my unit was defective until I blundered onto the correct key-press order. Fortunately, from then on it functioned flawlessly.

Figure 1. Plextor's svelte PlexEasy performs several clever tricks
When used without a computer, the drive automatically finalizes burning sessions cumulatively until a disc is full. Attached to a PC, the PlexEasy operates just like any other external drive, nicely performing tasks that need two optical drives (such as duplicating discs).
The PlexEasy’s versatility does come at a performance cost; its 8X write speed is tortoise-like compared to the 24X burners commonly available. That said, moving data from a completely full 32GB flash drive to a CD took less than a minute. That could come in handy for quickly offloading digital images from a camera while you’re on the road — as long as you can plug into power.
A couple of other limitations are noteworthy. If you connect it to an iPhone or iPad, you can only transfer photos and videos only from the current photo stream. You might have a few more options with Android-based devices, but it will depend on how they’re configured. And though the drive’s thin case makes it nicely portable, it has no internal battery — it comes with an AC adapter for standalone applications, or it gets power via its USB connector when attached to a computer. (You might be able to power it through a 12v/USB car adapter.)
Touch-screen label printer goes portable
One of the most valuable devices in my office is my simple label printer. “Simple” is the operative word. In this do-everything age of smartphones and other multifunction devices, the label printer seems quaintly one-dimensional.
That can’t be said for Dymo’s $200 LabelManager 500TS (info page), a label maker that works well either standalone or tethered to a computer. For standalone applications, it has a color touch screen, built-in QWERTY keyboard, and rechargeable lithium battery. When connected to a computer via USB, it lets you create and download custom labels for use when it’s untethered.
With my old label printer, changing to another label style meant opening up the printer, pulling out the old roll of labels, feeding in the new one, and then closing the whole thing up — a real pain when frequently switching between address and file-folder labels. LabelManager, however, uses insert-and-go cartridges filled with approximately 23 feet of durable, self-adhesive tapes. As you’d expect, they come in a variety of widths, backgrounds, and text colors. (The widest label offered is only one inch, however.)
Unlike most other tape-style label printers, the 500TS has an automatic label cutter. Once you hit the print button, the finished result pops out in about two seconds.
The printer’s 4-by-2–inch color touch screen probably accounts for a good portion of its relatively high $200 price tag. But it gives you the ability to edit and format labels by tapping and scrolling with your fingers.

Figure 2. The LabelManager 500TS color touch screen makes it easy to print labels when not connected to a PC.
Whether connected to a PC or run standalone, the 500TS gives you a font of fonts — as well as numerous font sizes, styles, and symbols/clip art. According to the information site, the 500TS can store over 500 custom labels.
The 500TS software (for Windows and Mac, downloaded from dymo.com; no software came in the box) integrates the printer with office apps such as Word, Excel, and Outlook for seamless batch printouts. It’s particularly handy for mass mailing.
My only quibble with the 500TS is the touch screen’s menu system, which takes a bit of digital dexterity in scrolling through drop-down options. Fortunately, a hardware navigator just below the screen helps when your finger-finesse can’t hit the target.
Boost the range of your Wi-Fi network
With the advent of 5GH, dual-band, 802.11n Wi-Fi routers, there’s plenty of wireless power to satisfy home/small-office needs. Or maybe not. Buildings with stone or adobe walls, for example, can soak up Wi-Fi signals like a sponge. In those cases, dual-band, Wi-Fi range extenders come to the rescue.
Ah, but Wi-Fi range extenders often have significant gotchas: they typically support only one band and often must be wired to one of the base router’s Ethernet ports. Fortunately, newer versions such as the $80 NETGEAR WN2500RP (info page) support common Wi-Fi bands and work standalone — no cables needed. They automatically pick up the primary router’s signal and re-broadcast it. There’s typically little configuration needed. The WN2599RP, for example, doesn’t even need setup software. (You do, of course, need to plug the extender into an electrical outlet.)
As a dual-band transmitter, the WN2500RP extends both 2.4GHz and 5GHz signals. It provides Wi-Fi coverage for devices such as iPhones, tablets, and gaming consoles that typically use 802.11 a/b/g signals. It also covers devices that work best with faster 5GHz, 802.11n signals — computers and video-streaming boxes such as Blu-ray players and Roku consoles.
Installing the WN2500RP can be a one-button process — no network name or password needed if your router is using Wi-Fi Protected Setup (WPS). With WEP or other Wi-Fi security, you connect to the WN2500 through your Web browser. When you find the extender’s unique SSID (NETGEAR_EXT), a setup guide pops up. Installation proved surprisingly straightforward and simple in my experience.
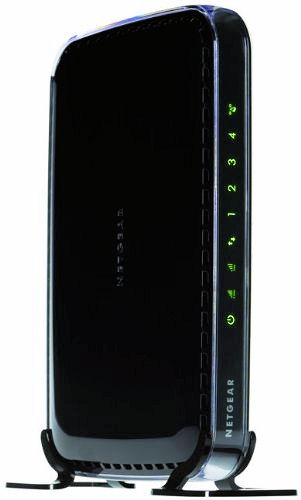
Figure 3. NETGEAR's dual-band Wi-Fi extender enhances both 2.4GHz and 5GHz signals.
To check out NETGEAR’s promise of “no more Wi-Fi dead spots” and maximum video performance via its FastLane Technology, I put the WN2500RP in my back bedroom — two rooms and three walls away from my home-office router. If it was my lucky day and no sunspots were flaring, the back room would have one to two bars of Wi-Fi signal strength. In other words, just enough to get a tolerable connection. Also, the Roku box, sitting in the living room (one wall away from the router), would benefit from a bit more pep.
NETGEAR kept its promise. In the back bedroom, my iPad no longer wimps along, taking forever to load a webpage. And loading Dr. Zhivago on the Roku is screamin’ quick.
Sticking with our versatility theme, the WN2500RP does more than extend Wi-Fi. It includes four Ethernet ports, so you can connect Ethernet-equipped devices that don’t have built-in Wi-Fi.
Manage documents with an intelligent scanner
At first glance, the $400 NeatDesk scanner (info page) looks like a weird desktop paper shredder. It’s not. But with multiple input trays and an intelligent digital filing system, it does get us a bit closer to the paperless office. This nimble scanner reads receipts, business cards, and letter-sized documents simultaneously.
Immediately after a scan, NETGEAR’s OCR software notes the type of document and places its scanned image automatically into specific folders on a PC or Mac. It then organizes the digitized docs within its versatile filing/database system, where you can search for documents in a Windows Explorer–like window. Want to find a particular receipt? Searching for a name or an item on that doc will usually locate it. Documents can be saved in Neat’s native format, as JPEG images, or as editable PDFs.
The scanner’s software also works nicely with common office products such as Microsoft Outlook and Excel and Intuit’s Quicken, QuickBooks and Turbo Tax — capabilities beyond those of a simple desktop scanner.
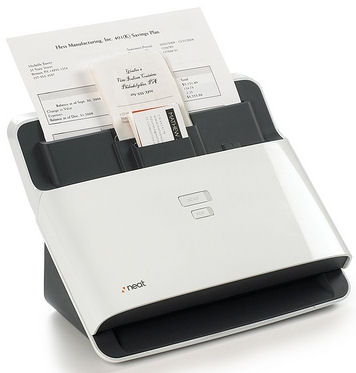
Figure 4. More than a desktop scanner, the NeatDesk is an automatic document filing system.
As you’d expect with a productivity device, NeatDesk is easy and efficient to use. It scans at 600dpi by default, which favors sharp reproduction. The paper-feeder trays and control buttons are clearly labeled, so there’s little to trip you up. In fact, the only time I encountered a paper jam was when I forgot to remove a staple. The removable paper tray and dual-sided scanning let you accommodate a 50-page document.
After you’ve scanned a document, you can add, delete, or otherwise edit the elements within it. The information is then easily managed within NeatDesk’s digital file system.
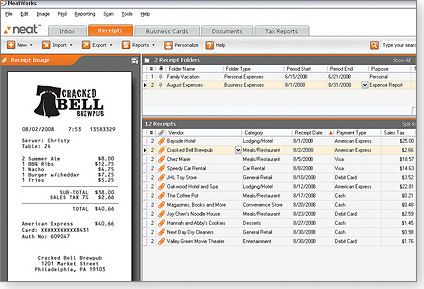
Figure 5. NeatDesk's software makes it easy to find and manage documents.
The NeatDesk scanner is sold as NeatDesk and NeatDesk for Mac. While the name is different, the hardware is the same — the only difference is the software. So if you’re ready to buy NeatDesk, find the least expensive version and download the appropriate software
It’s OCR isn’t perfect — particularly with logos — but given my experience, I have to say NeatDesk is neat (literally and figuratively).
Well-choreographed mayhem in a town square
 By Kathleen Atkins
Who wouldn’t want drama served up only when you asked for it? And if it were well executed, fast, stylish, and in the end funny, what more could you ask for on a quiet day in a calm country?
You’re in luck! And you don’t even have to be in Belgium to watch it. Play the video
Readers write about serious troubles
Windows Secrets readers — prompted by recent articles about Internet scams, Windows updates, and slow-moving computers — offer stories and suggestions of their own.
Regarding scams with proper skepticism
Re: Woody Leonhard’s Mar. 22 story, “New ‘419’ scam involves PayPal and Western Union”
![]() I received three similar e-mails in response to a rental ad. All three responses to the ad were the same: a single sentence asking whether the rental were still available. I replied “yes” to each, and in return got an e-mail from someone in the U.K. who claimed he was coming here to go to school. The story was filled with way too many holes and inconsistencies to be believed.
I received three similar e-mails in response to a rental ad. All three responses to the ad were the same: a single sentence asking whether the rental were still available. I replied “yes” to each, and in return got an e-mail from someone in the U.K. who claimed he was coming here to go to school. The story was filled with way too many holes and inconsistencies to be believed.
I checked two things: the source of the e-mail (IP was in Ghana) and the name in the e-mail, which I searched. That brought up lots of negative hits. I replied to each e-mail that I accepted cash only for the first month’s rent; I never heard back from any of them. —Richard Notari
![]() A friend of mine got a call from “Microsoft,” claiming that my friend’s computer had a large number of viruses and that they would fix it for her. She fell for this scam and gave the caller control of her computer. The caller then said that the computer was unusable and that they could fix it for $180. She balked at this and terminated the call. But they had really messed up the computer, and it would not work. I’m not sure how they did it, but a total reinstall was required. A general warning and suggestions for anti-malware/antivirus that could prevent this from happening to other people would be useful. —Arold Green
A friend of mine got a call from “Microsoft,” claiming that my friend’s computer had a large number of viruses and that they would fix it for her. She fell for this scam and gave the caller control of her computer. The caller then said that the computer was unusable and that they could fix it for $180. She balked at this and terminated the call. But they had really messed up the computer, and it would not work. I’m not sure how they did it, but a total reinstall was required. A general warning and suggestions for anti-malware/antivirus that could prevent this from happening to other people would be useful. —Arold Green
Reader reverses a Win7 update to get Money back
Re: Susan Bradley’s Mar. 29 story, “It’s springtime for Microsoft Service packs” Patch Watch article
![]() I use Microsoft Money Sunset edition. The most recent Windows automatic update (Windows 7) created a problem with the “Find & Replace” function — crucial for use in accounting. The update places the search box so far to the right on the screen that it cannot be filled out. It’s also immovable, which stops the whole program from continuing.
I use Microsoft Money Sunset edition. The most recent Windows automatic update (Windows 7) created a problem with the “Find & Replace” function — crucial for use in accounting. The update places the search box so far to the right on the screen that it cannot be filled out. It’s also immovable, which stops the whole program from continuing.
I restored my PC to the pre-updated condition, and the MS Money program works fine again. I’ve sent a message to Microsoft, but thought I’d mention this to you. —Elizabeth Cooksey
Reader suggests a remedy other than brute force
Re: Fred Langa’s April 12 story, “House Call 2012: Fixing a sluggish PC”
![]() I enjoyed reading Fred Langa’s “House Call” in the latest issue of Windows Secrets. (When I saw the headline, I thought it had something to do with Trend Micro’s online virus scanner.)
I enjoyed reading Fred Langa’s “House Call” in the latest issue of Windows Secrets. (When I saw the headline, I thought it had something to do with Trend Micro’s online virus scanner.)
Fred Langa describes how he uninstalled an application that did not have a native uninstaller. I’ve had success in these situations using the Revo Uninstaller. — Joshua Foreman
Windows reports file sizes two different ways
The amount of space a file occupies on your hard drive is different from — and almost always larger than — the actual/reported size of the file.
You have to allow for the difference when sizing a new hard drive.
Where are all those missing gigabytes?
Reader Bob Todd wants to add a new hard drive to his system, but he encountered a problem when trying to calculate the size of the drive he’d need.
- “I am considering putting a new solid-state drive (SSD) in my PC and making it my C: drive — containing all Windows and program files. Most of my data is on my D:drive. I think the SSD will boot my PC and run apps much faster.”I was looking at a 240GB SSD and thought I’d better check how much of my current 450GB C: drive was in use. I did this two different ways and got two very different answers.
“Windows Explorer reported 209GB of files on the C: drive — probably OK for the move but a bit closer to the SSD’s capacity than I’d like. Then I used WinDirStat [free; site] to have a look, and it showed only 139GB used!
“Why the difference?
“I am guessing that the used-space figure in Explorer is wrong, but I worry that during the conversion I’ll end up with a drive full notice about 90 percent of the way through the process.
“Any ideas or suggestions about which figure is correct or what I can do to determine the C: drive’s true used-space number?”
Believe it or not, both values are correct!
WinDirStat shows the aggregate size of the files — their true number of bytes. Windows Explorer shows how much space the files occupy on a hard drive. That might sound like a distinction without a difference, but they really are different measures. Here’s why.
When you format a drive, the operating system divvies up the drive into separately addressable allocation units. That’s how Windows knows where to find things on the drive.
For example, NTFS (the standard file system for Windows XP, Vista, and Win7) uses default allocation units of 4096 bytes each.
A 4096-byte file completely fills one NTFS allocation unit. A file twice as big (8192 bytes) fills two allocation units. And so on.
However, few files are exact multiples of an allocation-unit size. For example, a file that’s 4097 bytes would require two NTFS allocation units, with the first unit containing 4096 bytes and the second unit holding the leftover byte. The rest of the second allocation unit remains empty. (The system does not allow data from two files in the same allocation unit.) Unfortunately, it’s an unavoidable waste of disk space.
Typically, files fill many allocation units but have one last unit with unused space. On an average system containing thousands of files, that leftover space adds up.
That’s why, in your case, 139GB of files occupy 209GB of hard-drive space.
By the way, Windows can show you both numbers if you take a couple of extra steps: right-click any file or folder (or group of files and folders) and select Properties. Under the General tab, Windows reports both the actual size and the Size on disk — the amount of space the file or folder occupies on the hard drive (see Figure 1).
 The Size on disk numbers are the basis of the disk-use pie chart you see in Windows Explorer when you right-click on a drive and select Properties. The Used Space portion of the pie chart is the aggregate of all the files on that drive, including whatever extra space is required by the chunky nature of disk storage. That’s the number that tells you how much space you’re really using.
Just remember: “How large are my files?” and “How much space do my files occupy on my hard drive?” are two different questions!
Testing Win8 in Microsoft’s Virtual PC
After reading the March 14 Top Story, “Step by step: How to safely test-drive Win8,” Andrew Stein asked this entirely reasonable question:
- “I read with interest your piece on testing Windows 8 in a virtual PC. You recommend a particular app [VirtualBox; site]. I have XP Mode on my Win7 machine. Can I just use [Microsoft’s Virtual PC software] rather than installing another one?”
You’d think so, wouldn’t you? Both products are from Microsoft, so you’d assume that the two should work together.
They don’t.
In a Sept. 16, 2011, MSDN blog entry, Microsoft Windows Division President Steven Sinofsky listed the virtual machine products that will — and won’t — work with Windows 8 Developer Preview. But the list applies to Windows 8 Consumer Preview as well.
According Sinofsky’s post, Win8 previews work OK on:
- Hyper-V in Windows 8 Developer Preview
- Hyper-V in Windows Server 2008 R2
- VMware Workstation 8.0 for Windows
- VirtualBox 4.1.2 for Windows
Win8 previews don’t work on:
- Microsoft Virtual PC (all versions)
- Microsoft Virtual Server (all versions)
- Windows 7 XP Mode
- VMware Workstation 7.x or older
The reasons are technical, involving support for features such as Second Level Address Translation (Wikipedia article).
Bottom line: You can’t run the Win8 previews on Microsoft Virtual PC. (And now you know why I suggested VirtualBox!)
Code 39: A newly installed USB-driver problem
Adding new USB-based hardware messed up one or more of Peter R. Jensen’s system drivers:
- “I recently purchased a USB webcam which clagged my USB port. Neither my scanner nor the new webcam will work. When plugged in, the devices’ drivers report a Code 39 error.“I uninstalled [the drivers] and tried all the obvious reboot treatments — without success.”
Code 39 errors are disturbingly common. A web search on code 39 usb yielded 13 million hits!
In fact, the problem’s so common that Microsoft has provided extensive online help in MS Support article 310123. Vista and Win7 users visiting that page will be offered a free, click-to-run Fix it troubleshooter that might fix many Code 39 problems. XP users (and other Windows users) can use the extensive manual fixes referenced on that page.
If those options don’t work, there’s more help in pcsupport.about.com’s page, “How To Fix Code 39 Errors.”
Resolving a conflict between Excel and Skype
We received a tip from Eric Stork about a weird bug: Skype interferes with the cut-and-paste (and related) functions of Excel.
- “A friend sent me a report of a serious problem he encountered with Excel, along with a fix. Here’s an extract of the discussion.”‘Last week I began encountering degraded cut-copy-paste functions in Excel. [I] decided to put the problem to Google: cut-copy-paste in Excel 2010. Bingo. The solution (one of the first items listed, hence presumably among the most frequently visited) traced the problem to installing the phone number look-up option on Skype. Removing it restored the cut-copy-paste features of Excel 2010 in a trice.’ [read more.]”
Indeed, the culprit seems to be Skype’s Click to call function. It can cause a number of problems. For example, these are all Skype-related complaints:
- Microsoft Answers forum, “My Format Painter in Excel 2010 has stopped working …”
- Microsoft Answers forum, “Can’t empty clipboard using Excel 2007 in Windows 7”
- Skype Community post, “Installing Skype Click to call breaks Excel 2010 Paste feature.”
The solution is simple. Leave the main Skype application alone but uninstall the separate Click to call feature, via Windows’ Control Panel (shown in Figure 2).
 Once the Click to call software is gone, Excel — and any other affected apps — should operate normally once again. (Your main installation of Skype will be unaffected.)
Reader Eric Stork will receive a gift certificate for a book, CD, or DVD of his choice for sending the tip we printed above. Send us your tips via the Windows Secrets contact page. |
Publisher: AskWoody LLC (woody@askwoody.com); editor: Tracey Capen (editor@askwoody.com).
Trademarks: Microsoft and Windows are registered trademarks of Microsoft Corporation. AskWoody, Windows Secrets Newsletter, WindowsSecrets.com, WinFind, Windows Gizmos, Security Baseline, Perimeter Scan, Wacky Web Week, the Windows Secrets Logo Design (W, S or road, and Star), and the slogan Everything Microsoft Forgot to Mention all are trademarks and service marks of AskWoody LLC. All other marks are the trademarks or service marks of their respective owners.
Your email subscription:
- Subscription help: customersupport@askwoody.com
Copyright © 2025 AskWoody LLC, All rights reserved.

Plus Membership
Donations from Plus members keep this site going. You can identify the people who support AskWoody by the Plus badge on their avatars.
AskWoody Plus members not only get access to all of the contents of this site -- including Susan Bradley's frequently updated Patch Watch listing -- they also receive weekly AskWoody Plus Newsletters (formerly Windows Secrets Newsletter) and AskWoody Plus Alerts, emails when there are important breaking developments.
Get Plus!
Recent Topics
-
Where’s the cache today?
by 8 hours, 2 minutes ago
-
Ascension says recent data breach affects over 430,000 patients
by 48 minutes ago
-
Nintendo Switch 2 has a remote killing switch
by 2 hours, 33 minutes ago
-
Blocking Search (on task bar) from going to web
by 8 hours, 44 minutes ago
-
Windows 10: Microsoft 365 Apps will be supported up to Oct. 10 2028
by 1 day, 1 hour ago
-
Add or Remove “Ask Copilot” Context Menu in Windows 11 and 10
by 1 day, 1 hour ago
-
regarding april update and may update
by 1 day, 2 hours ago
-
MS Passkey
by 4 hours, 49 minutes ago
-
Can’t make Opera my default browser
by 1 day, 10 hours ago
-
*Some settings are managed by your organization
by 21 hours, 16 minutes ago
-
Formatting of “Forward”ed e-mails
by 1 day, 9 hours ago
-
SmartSwitch PC Updates will only be supported through the MS Store Going Forward
by 2 days, 5 hours ago
-
CISA warns of hackers targeting critical oil infrastructure
by 2 days, 14 hours ago
-
AI slop
by 8 hours, 4 minutes ago
-
Chrome : Using AI with Enhanced Protection mode
by 2 days, 15 hours ago
-
Two blank icons
by 1 day, 3 hours ago
-
Documents, Pictures, Desktop on OneDrive in Windows 11
by 1 hour, 34 minutes ago
-
End of 10
by 3 days, 3 hours ago
-
Single account cannot access printer’s automatic duplex functionality
by 2 days ago
-
test post
by 3 days, 9 hours ago
-
Privacy and the Real ID
by 2 days, 23 hours ago
-
MS-DEFCON 2: Deferring that upgrade
by 1 day, 1 hour ago
-
Cant log on to oldergeeks.Com
by 3 days, 13 hours ago
-
Upgrading from Win 10
by 2 days, 1 hour ago
-
USB webcam / microphone missing after KB5050009 update
by 2 days, 4 hours ago
-
TeleMessage, a modified Signal clone used by US government has been hacked
by 4 days, 5 hours ago
-
The story of Windows Longhorn
by 3 days, 16 hours ago
-
Red x next to folder on OneDrive iPadOS
by 4 days, 7 hours ago
-
Are manuals extinct?
by 1 day, 7 hours ago
-
Canonical ditching Sudo for Rust Sudo -rs starting with Ubuntu
by 4 days, 16 hours ago
Remembering Woody
