• Karen’s Replicator – Basic file/folder backup/replication for Win7 and Win8.1

    Home » Forums » Tools » Karen’s Replicator – Basic file/folder backup/replication for Win7 and Win8.1

    Author
    Topic
    #243752

    Part 1 – Introduction to Karen’s Replicator

    Karen’s Replicator, originally a part of Karen’s Power Tools, was released by Karen Kenworthy around the beginning of 2002. It has been my go-to for data backup for years. It provides basic file and folder transfer/backup for Win7 and Win8.1. The files in a backup are accessible without the software. This does not create an image and it is not encrypted. The program also provides scheduling and other options beside file/folder replication.

    If you copy/paste files to make a backup of your data, open or otherwise inaccessible files/folders can cause an error and terminate the copy process without a record of what’s been copied and what hasn’t. Karen’s Replicator handles those errors so the copy process doesn’t crash and provides a log to document the failures. NOTE: If you leave your files open, they will not get backed up. Close your work before you start a backup.
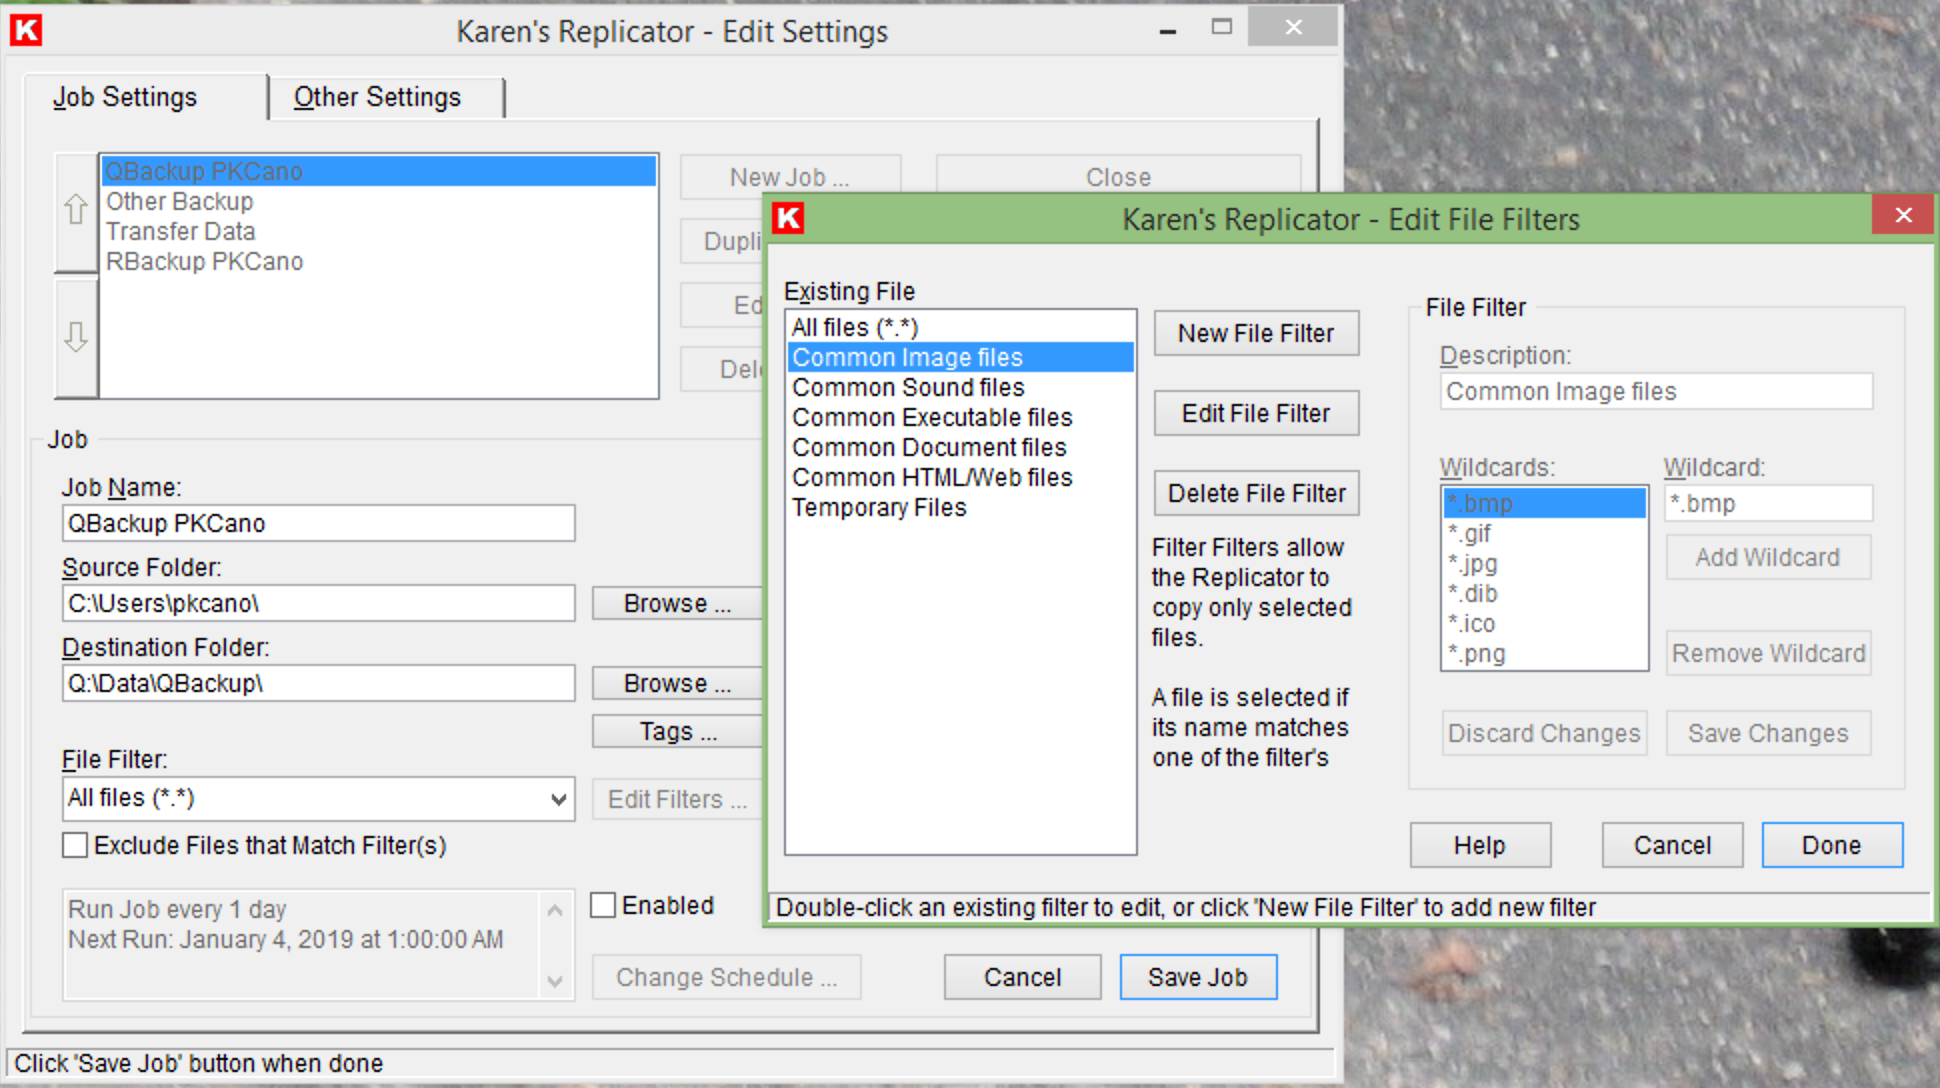
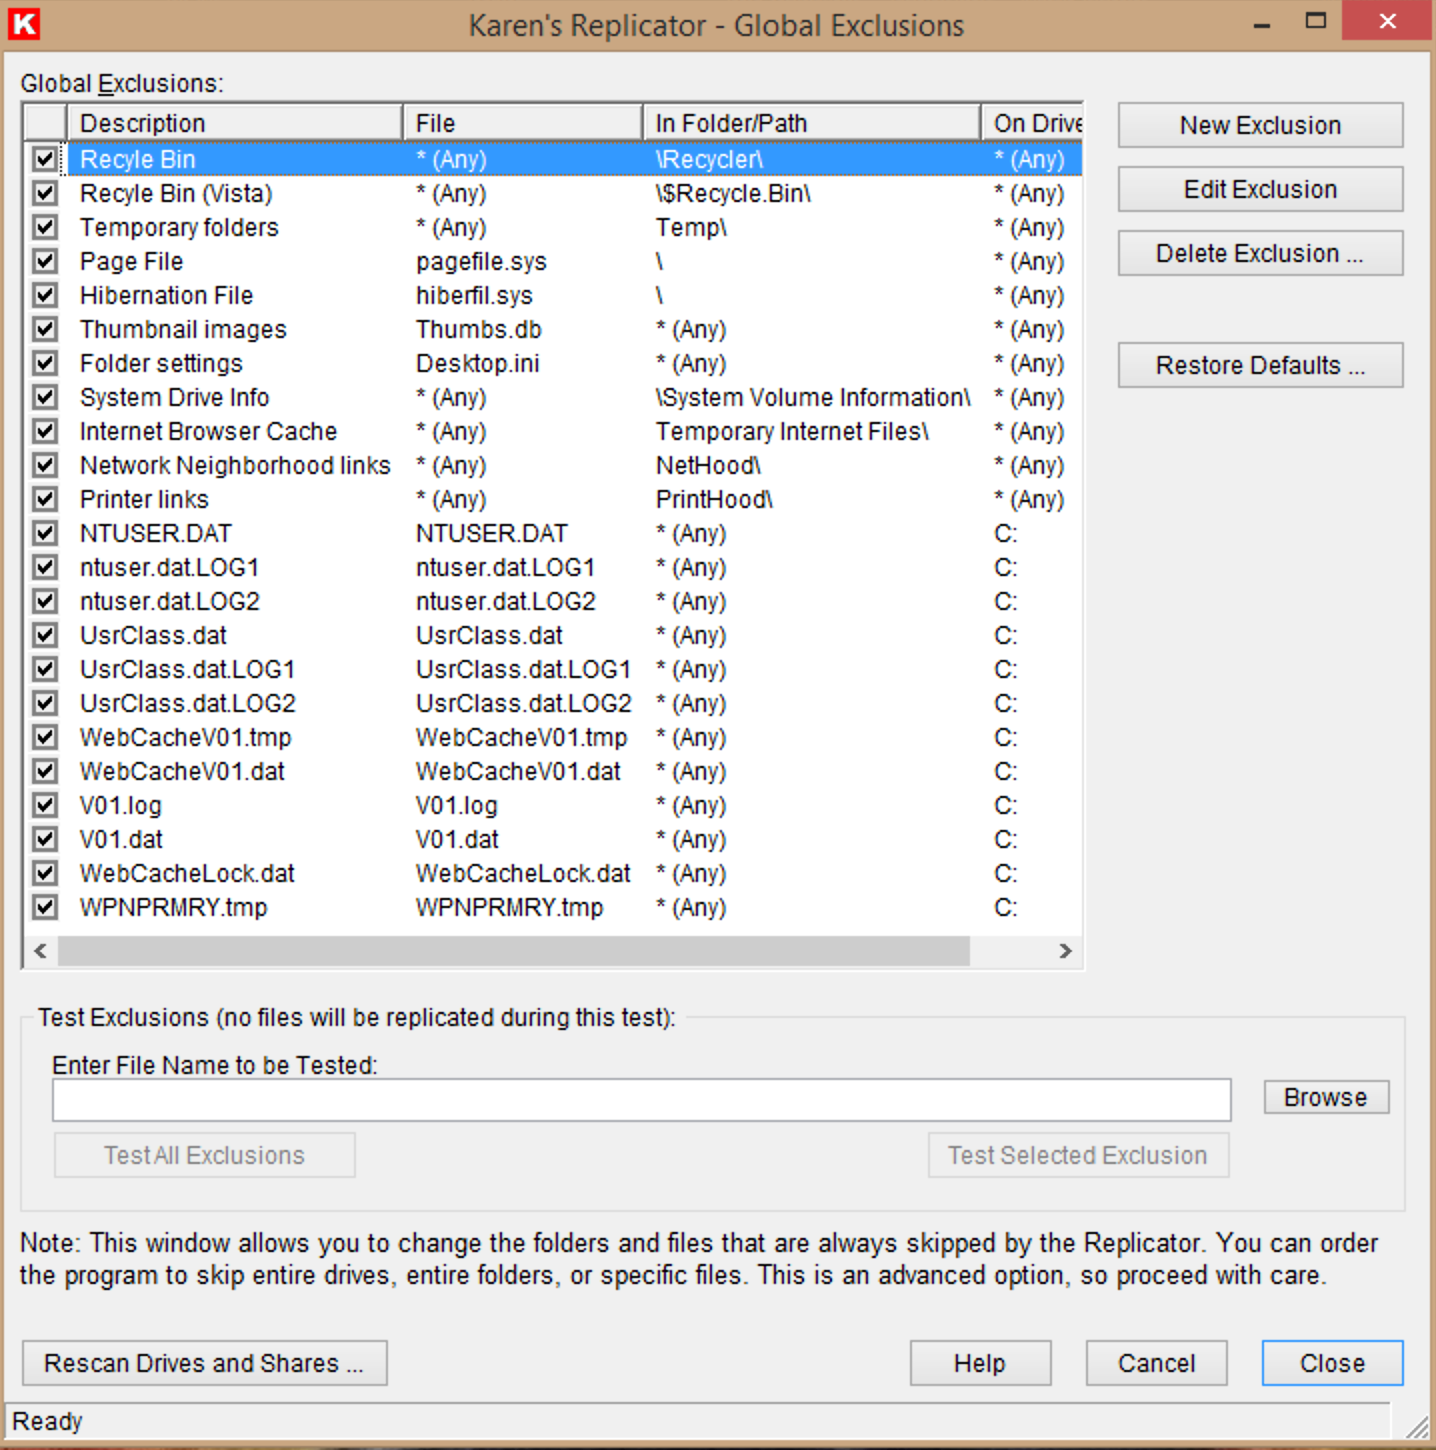
    You can also filter the types of files you want to copy, and exclude the ones you don’t want to copy.

    1-InitialScreen
    Figure 1. Karen’s Replicator

    When you open Karen’s Replicator, you see a list of existing Jobs. A job(s) can be run manually by checking/highlighting and clicking “Run Highlighted Jobs Now,” or the job(s) can run on a set schedule.
    Below the list of jobs, there is a description of the settings of the highlighted job. It shows source, destination, and what will and  will not be copied.

    Click the “Edit Settings” button:
    2EditSettings
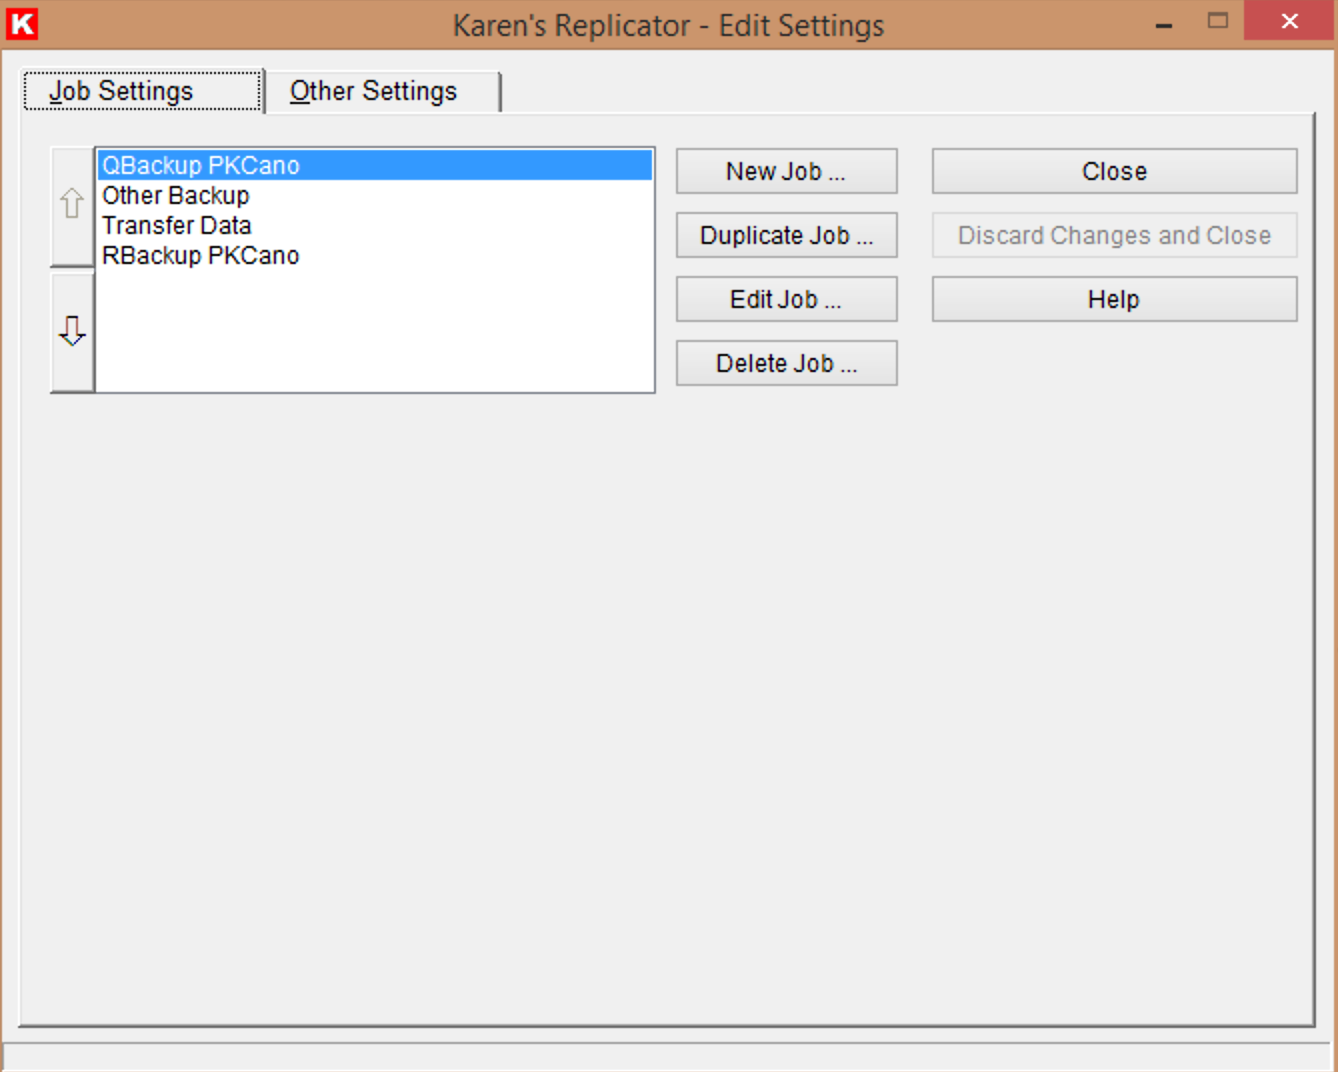
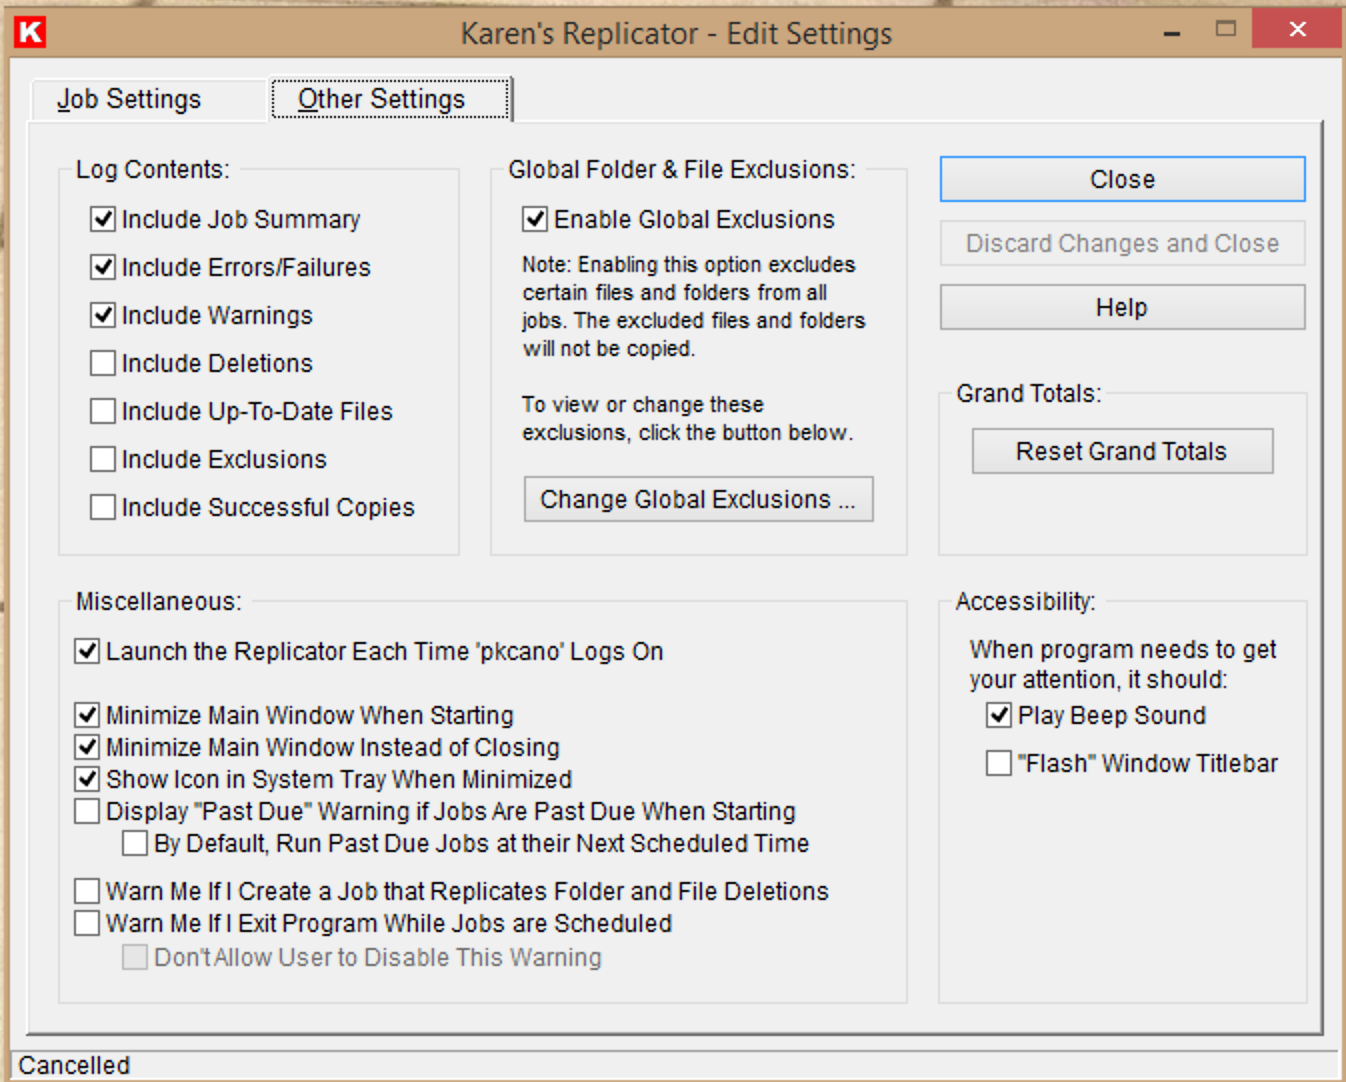
    Figure 2. Edit Settings

    If you want several jobs with the same settings (run the same job each day of the week, for example) you can easily “Duplicate Job” and set the schedule for different days.
    The “New Job” button gives a blank template. I am going to use “Edit Job” and explain how to set up a job to back up what you want and when you want it.

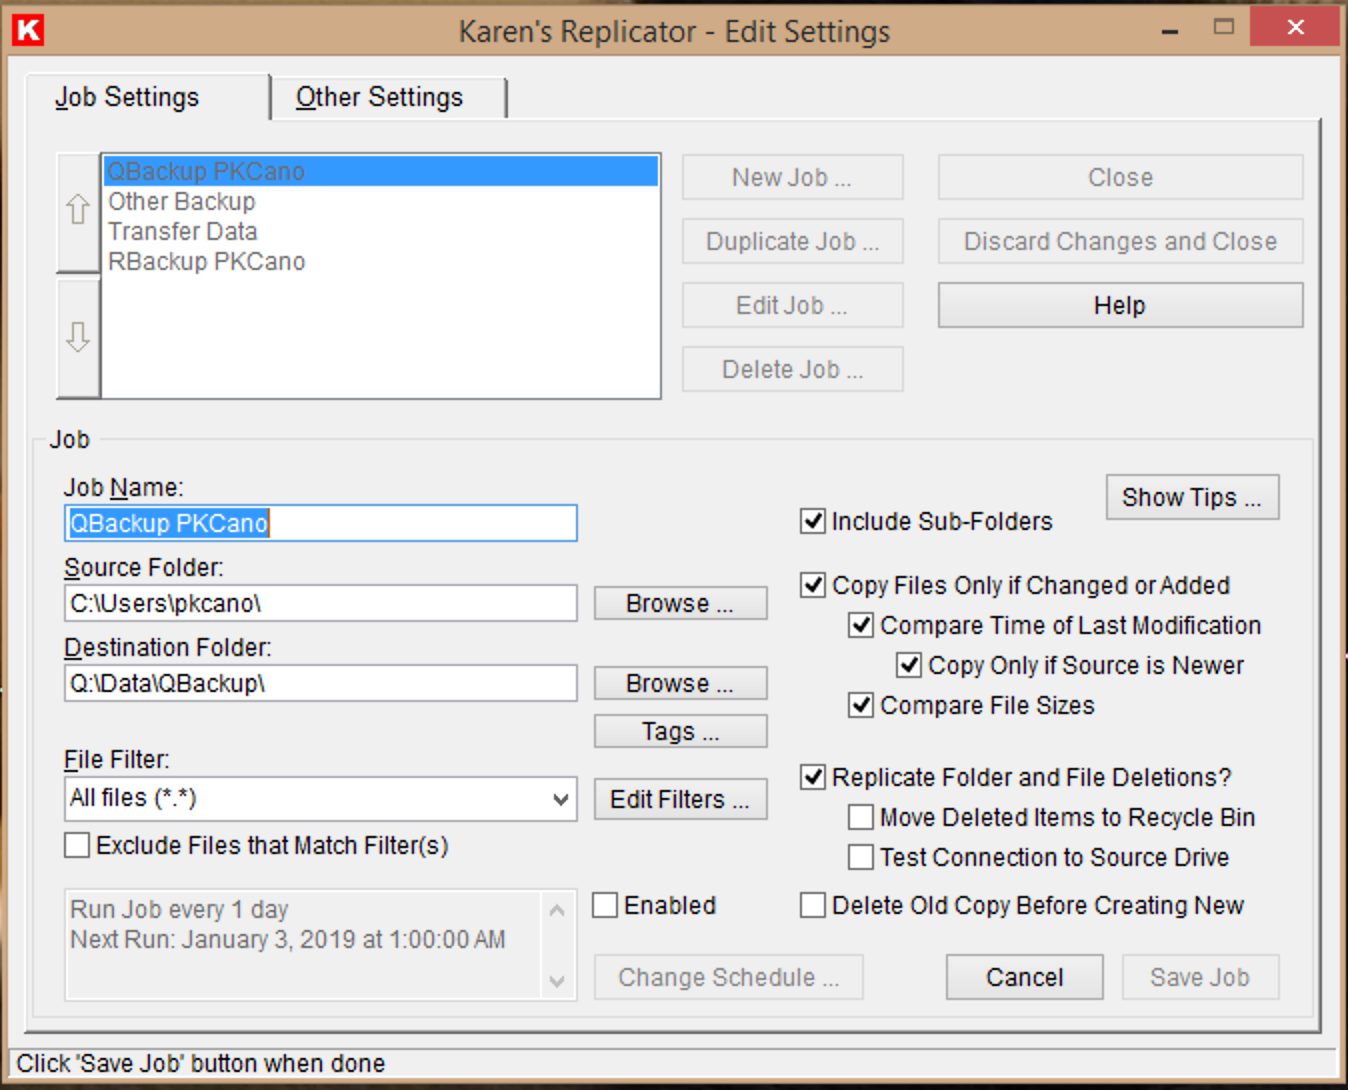
    On the “Job Settings” tab, highlight the job click “Edit Job.”
    3CreateEditJob
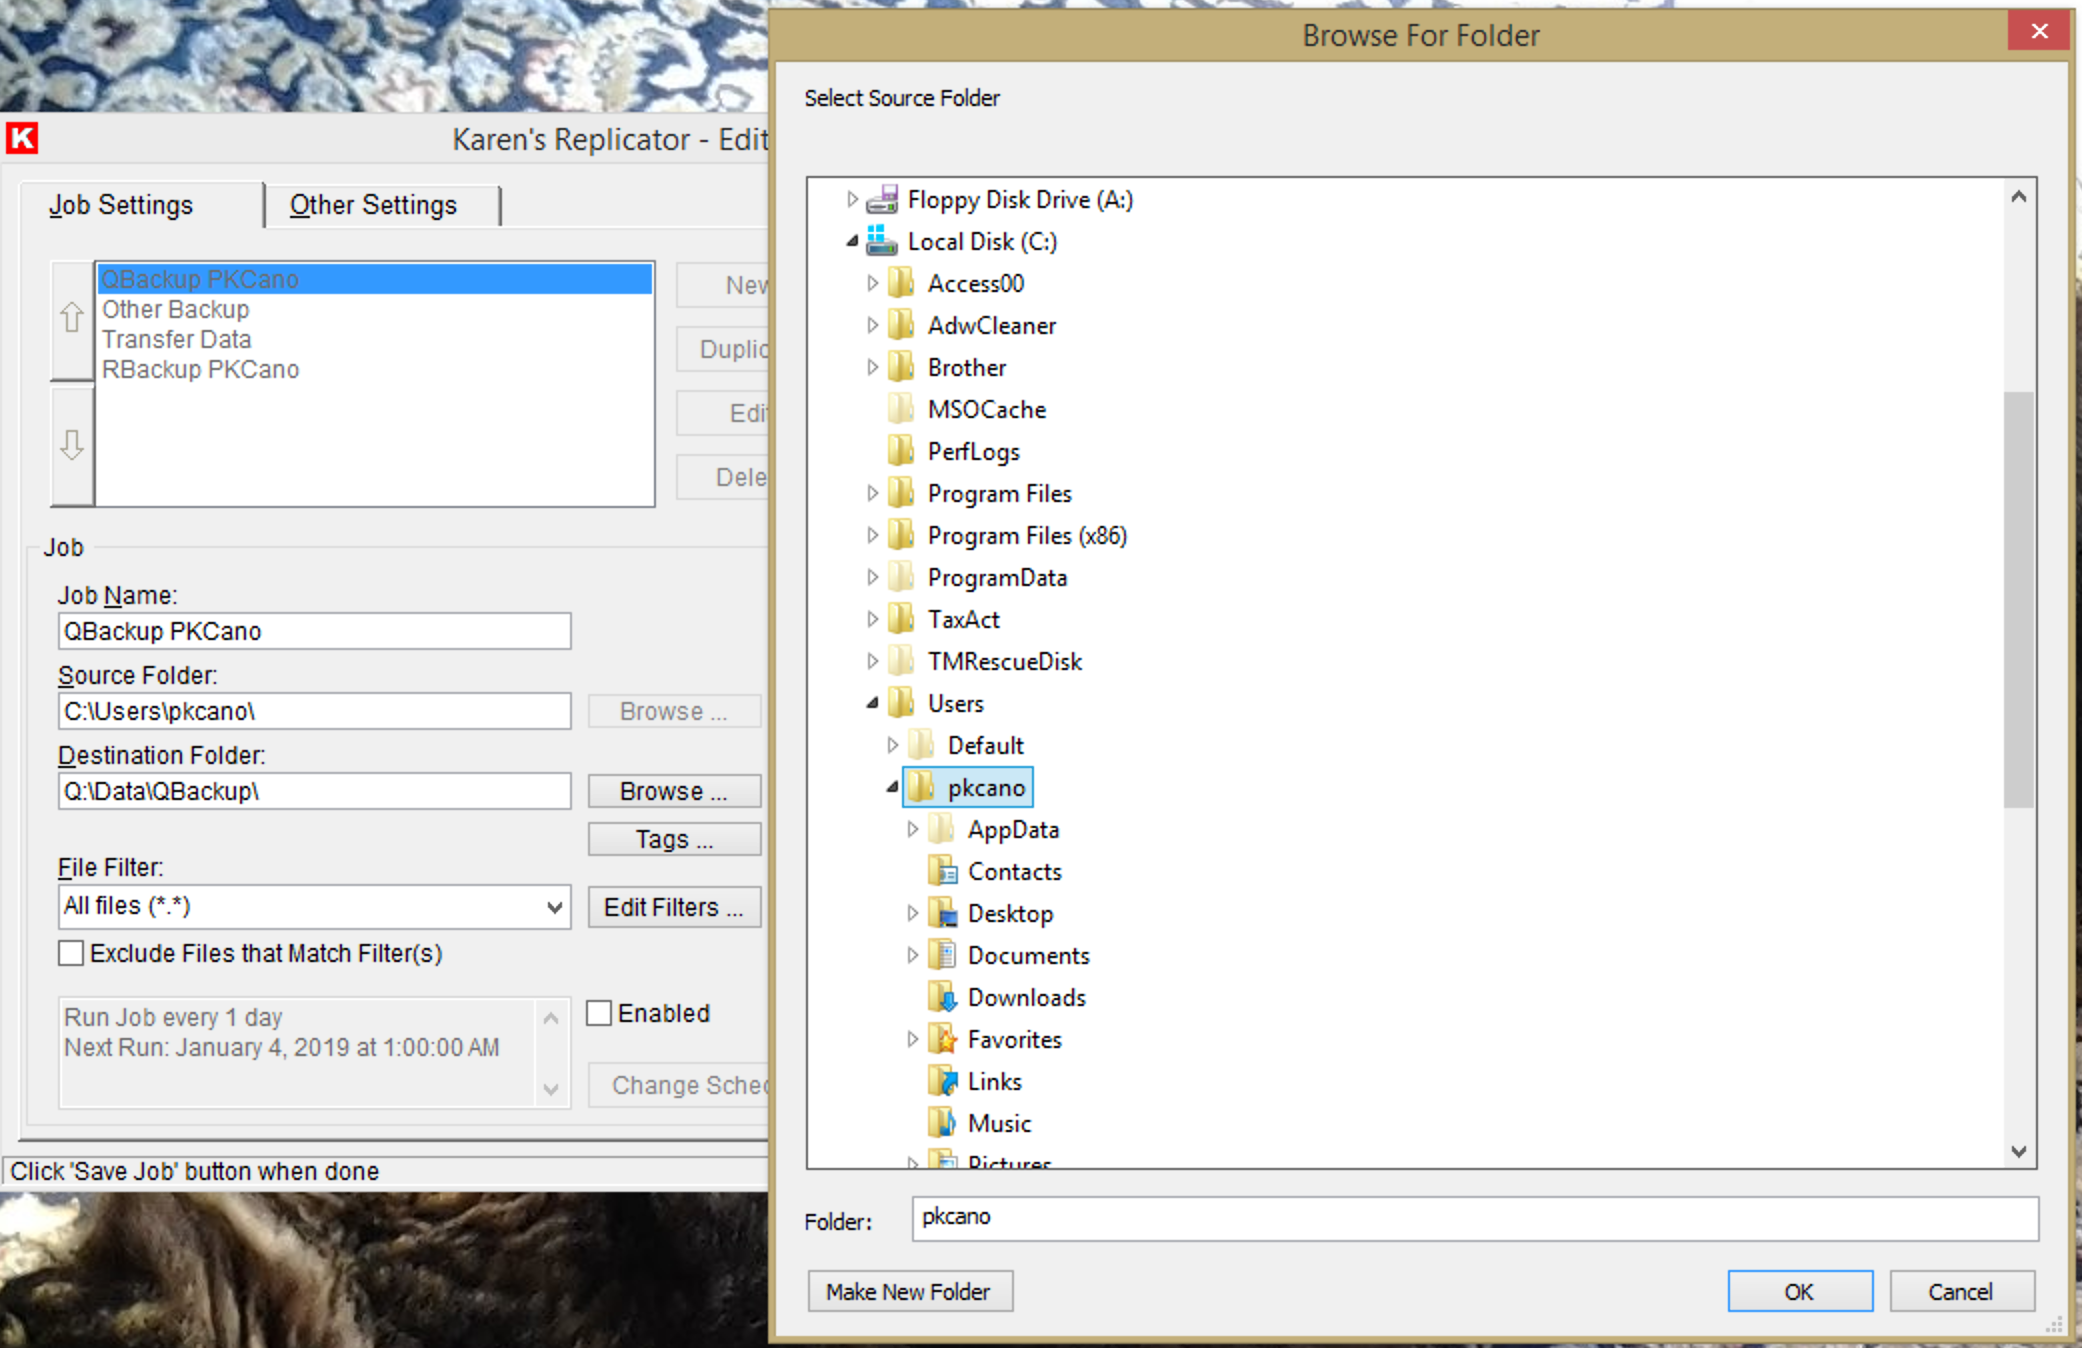
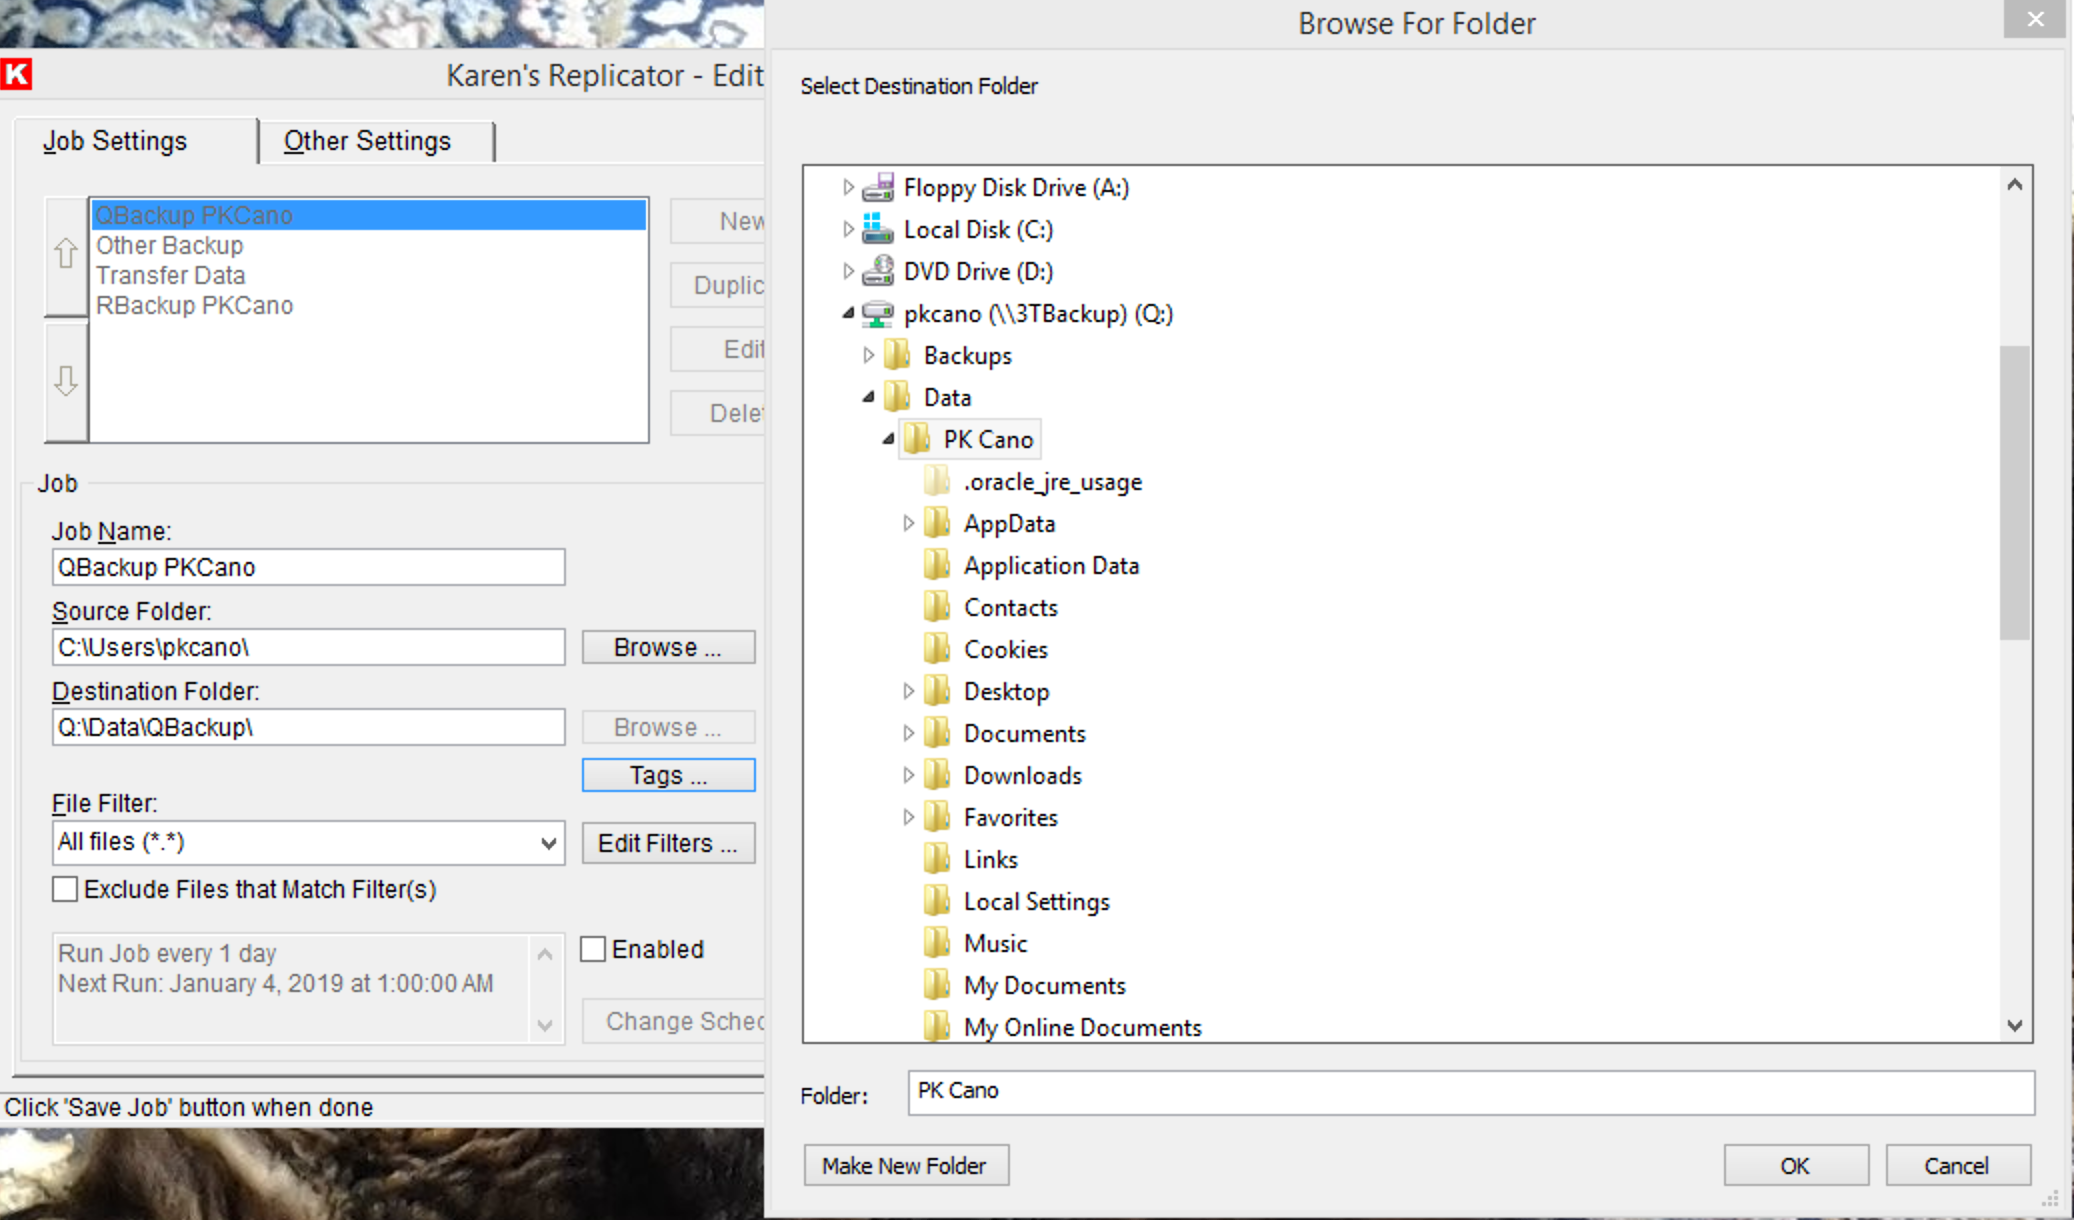
    Figure 3. Job Settings

    The job above is used to backup the personal data on my main Windows computer to an external drive, in this case a NAS (network attached storage) drive. I have mapped the NAS drive to the computer and given it the drive letter Q:. A USB attached external hard drive will appear in the same way with the drive letter assigned by the OS, usually the next available letter.
    The File Filter is set to *.*  The * is a “wildcard” meaning “any.” So I have chosen to backup all files. If you want to back up only certain files, you can set a filter to do so. For example, *.doc, *.xls would backup all files ending in .doc (Word) and .xls (Excel).
    This backup is intended to be run manually, so there is no schedule enabled (check box in the lower left), the reason being that I do not change my data significantly on a regular basis, so daily execution is not necessary.
    Also, this backup is intended to mirror the current data on the computer. The series of check boxes in the lower right quadrant determine how this is handled. It copies only the files/folders that have been added or changed (not all files and folders) by comparing file size or the modification date. It also deletes any file/folder that has been deleted from the computer.

    7 users thanked author for this post.
    Viewing 7 reply threads
    Author
    Replies
    • #244002

      Part 2 – Choosing Backup Job Options

      The Source Drive is the location of what you want to backup or copy. In this case, it is a data backup of my User files on my main Windows machine. For the Source Folder, click “Browse” and in Explorer, navigate to and highlight C:/Users (or whatever you want to backup/copy). This will copy the contents of that folder (and its subfolders, since I have that option checked) to the backup Destination.
      One note about Windows file structure: Microsoft has hidden some folders under the User ID and used Symbolic links to access them. An example of this is location of document, picture, and music storage. You may see “My Documents,” “My Pictures,” and “My Music” in Explorer when you look at the source drive. But those are links to the actual Storage locations (folders) “Documents,” “Pictures,” and “Music.” You will see both locations on the destination drive.

      4SourceFolder
      Figure 4. Source Folder

      To choose the Destination location, click “Browse” and in Explorer navigate to the drive under “This PC” where you plan to store the backup. The drive being used is a Network drive which has been mapped as the drive letter Q:. The drive letter the program uses is fixed. If you are using a USB external drive, it may not have the same drive letter every time. You either need to assign a drive letter to the drive, or check the setting to be sure it is pointing to the correct drive before you start. I have created the folder “Data” on the drive to hold several different backups and folder Q:/Data/PK Cano for this particular backup. Highlight the Destination Folder. All of the folders from the Source location will be copied into this location on Q:.

      5DestinationFolder
      Figure 5. Destination Folder

      The current Job will copy all files ( *.* ) to the Destination Folder. But you can choose to filter the files that are copied. Several categories are suggested as seen in the pulldown menu.

      6FileFilters
      Figure 6. File Filters

      You can narrow the files backed up by creating a new filter and adding the extensions for the files you choose. On the other hand, by checking the box to “Exclude the Files that Match Filter(s)” you create.

      7EditFileFilters
      Figure 7. Edit File Filters

      6 users thanked author for this post.
    • #244169

      Part 3 – Choosing What Is Copied and Setting Scheduled Backups

      Choosing What Is Copied

      The series of check boxes in the lower right quadrant determine what gets copied to the Destination Folder. The check boxes, as shown, will result in a mirror of the Source Folder. The previous choice was for all files ( *.* ).
      The first option is to Include Sub-Folders, in this case, all the folders under the C:/Users/<UserID> (the User’s personal data).
      The second option is Copy Files/folders Only if Changed or Added. The comparison is based on whether the time of the last modification is newer of the file size is different. By choosing these options, the time of the backup is greatly reduced since only new or changed files are copied. If you are copying from the same Source to the same Destination, you will get the same results as if you manually copy something – the newer/changed file with the same name from the Source will overwrite a file with the same name in the Destination. So this does not provide a “file history” with multiple versions of the same file. The first backup to a Destination will take a great deal of time since all the files have to be copied. But in subsequent backups to the same location, it takes a lot less time for the program just to check for “Up-to-date” and only copy changed data.
      The third option is Replicate Folder and File Deletion? If this is left unchecked, files and folders that have been deleted from the Source will be left in the Destination. Since I am looking to create a mirror of my current data, I do not want to retain anything that I have trashed from my data, so I have checked this box. You will get a warning asking if you really want to do this, because if you do not make other choices under this option, the files/folders will be GONE. If you think you may need to recover something you have deleted from the Source location (deleted in and emptied the Recycle Bin on your computer), you can choose to Move the Deleted Items to Recycle Bin. This will put them in the Recycle Bin on the Source location (like back on your computer) before they are deleted from the backup. (They can be retrieved from the Recycle Bin until it is emptied again). Along with this, it is a good idea to check the box let the program test whether it can connect to the Source location.
      If you are backing up to the same Destination, and you are sure you don’t need to preserve anything in the old backup, you can choose the Fourth option Delete Old Copy Before Creating New. I have never been so bold as to delete everything from a backup before creating a new one! But this might be useful if you have very limited storage space. or you were repurposing an old backup drive.

      3CreateEditJob-1
      Figure 8. Choosing What Is Copied

      Setting Scheduled Backups

      I did not set a scheduled backup for my computer. For one thing, I am not on the computer where I store my personal data and any regular set time. And if I only change three or four files in a day, I don’t feel the the need to run a backup except manually, on-demand.
      However, there are many instances where more rigorous backups are needed. If so, scheduled backups are available as often as needed.
      The schedule is actually set by exclusion in some cases. The example shows a recurring backup every Monday (not on the checked days) at 1:00am beginning with the set day (in this case, the current day).
      For small businesses, I have set up a series of backups to run on weekdays after business hours. In that case, the business retains a week’s worth of backups with all the changes made on each of the days. In the example, I would create a Job with the name “Monday Backup” to run like the example, then create identical Jobs to run for “Tuesday Backup,” “Wednesday Backup,” etc. By making multiple Jobs, the backup can be repeated as often as necessary on whatever schedule is required with whatever retention requirements that may exist.

      9SetScheduledBackup
      Figure 9. Setting Scheduled Backups

      4 users thanked author for this post.
    • #244184

      Part 4 – Other Settings

      Back on the “Edit Settings” screen (see Figure 2.), click on the “Other Settings” tab.
      Here you can choose what is recorded in the Log File, how you are notified, and “Global Exclusions.”

      Under “Log Contents,” I have chosen the Job Summary, Errors/Failures, and Warnings. I don’t care about Deletions (because, in my case, they are the same thing I deleted on my computer) or the long lists of up-to-dates and copies. However, those options are there if you need them depending on how and what you are backing up.

      Under “Miscellaneous,” I have set Karen’s Replicator to start when I log on and sit minimized in the Notification Area (System Tray). I’m not worried about the resource overhead, because it is doing nothing just sitting there. Also, since I have no schedule set, I don’t need “Past Due” warnings. And I don’t need a warning about Replicating Deletions, because that was intentional. If you are setting up a schedule to run automatically where it is important, you can set up a warning for a non-techie User if/when they try to Exit when there is a backup scheduled.

      10OtherSettings
      Figure 10. Logs and Warnings

      Enabling Global Exclusions

      There are files on every computer that don’t need to be backed up. For example, the temporary files that programs use during an install, the contents of the Recycle Bin, Browser cache, Page and Hibernation files. etc. There are other files that can’t be backed up because the System has them open/locked. Rather than take up a huge amount of space on a backup drive or fill the log with numerous errors, Karen’s Replicator has a default set of “Global Exclusions” that can be activated by checking the “Enable Global Exclusions” box then clicking on “Change Global Exclusions,” then added to for individual cases.
      The default list begins with the Recycle Bin and runs through Printer links. The rest have been added because they are locked by the system and cause errors in the log files because they are not accessible to be backed up. This listing makes my Win7/8.1 computers run with 0 Errors and 0 Failures.
      The added list may vary with individual computers depending on what is running in the background.

      11Global-Exclusions
      Figure 11. Global Exclusions

      3 users thanked author for this post.
    • #244193

      Part 5 – Creating Global Exclusions and Conclusion

      Creating Global Exclusions

      Global Exclusions apply to all the Jobs you have created.
      This is probably the hardest part of learning how to set up Karen’s Replicator. At times I have struggled with trying to get it to do what I wanted it to do. But here goes…….
      A file with the name NTUSER.DAT caused an error/failure to copy in the log file. It is a System file that is open/locked by the OS. This will create the Exclusion for the file NTUSER.DAT
      Click “New Exclusion

      12GlobalEx1
      Figure 12. Exclusion Screen 1

      Click “Next
      Click “Exclude File(s) with this Name:” and enter ntuser.dat

      13GlobalEx2
      Figure 13. Exclusion Screen 2

      Click “Next
      Since you don’t know/care where the file with that name is located, click “Exclude Selected Files Found in Any Folder.”

      14GlobalEx3
      Figure 14. Exclusion Screen 3

      Click “Next
      Since the User data being backed up is on the C: drive of the computer, the only place from which the file has to be Excluded is the C: drive. Choose “Exclude Only if Found on This Drive or Share” and C: from the pulldown menu.

      15GlobalEX4
      Figure 15. Exclusion Screen 4

      Click “Next
      For clarity, I like to name the Exclusion the same as the file name (I get confused easily these days, and this helps the memory).

      16GlobalEx5
      Figure 16 Exclusion Screen 5
      Click “Next” and your finished.

      Conclusions

      NOTE: If you leave your files open, they will not get backed up. Close your work before you start a backup.

      If you get lost trying to figure out “what’s next,” there are numerous “Help” and “Tips” buttons scattered throughout the screens where you can look for information and “how-to’s.”

      The lists of Jobs, File Filters and Exclusions are stored as plain text (.txt) files on the computer at
      C:/Users/<UserID>/AppData/Local/Karen’s Power Tools/Replicator
      The Log file is stored as a text file on the computer at
      C:/ProgramData/Karen’s Power Tools/Replicator

      The backed up data can be accessed without the use of the software. It is not an Image and not Encrypted.

      Karen’s Power Tools are Free for personal use.
      Karen’s Replicator can be downloaded from the original site KarenWare.com or from MajorGeeks.
      If you download from the author’s site, please consider a donation.

      7 users thanked author for this post.
    • #2397136

      My jobs.txt just got zeroed out upon reboot.


      Even when i restore it via system restore, every time i run ptreplicate.exe, the file gets zeroed out again.


      I don’t get it. This makes no sense.

      • #2397145

        Are you saving the job before you exit the “Job settings” screen and Saving the changes when you Exit the “Edit Settings” screen.
        My “Jobs” file in the AppData\Local\Karen’s Power Tools\Replicator is dated the last date and time I ran the job.

    • #2442287

      I also had the same problem although I don’t think it was every reboot and I had to restore from a backup job. This lead me to stop using it.

    • #2452213

      I’ve happily used Karen’s Replicator for years.

      We’ve been having such a problem with replicator lately.

      I am using the latest version.  Windows 10.  Backing up to a network drive, a usb drive attached to my router.

      Nothing has really changed, same router, same usb hard drive, same computers. But of course, windows has applied numerous updates.

      Note we have two matching Acer Aspire laptops, set up pretty much identically, both backing up to the same USB drive over the same wireless network.  We are experiencing these same symptoms on both computers.

      Here is what is going on.

      Replicator loads at startup.  When the backup starts, it runs for a while, then goes to “not responding”.  Even when it is the only program running after a fresh reboot. The program seems to hang for a long while but eventually will start copying again.

      On my wife’s laptop Task Manager shows the little green leaf and gives the message when mousing over, “UWP Process Group  is suspending process to improve performance”. I don’t know if that is related.

      As of right now it takes weeks to backup a 100gb folder, it used to take about several hours the first time, then about an hour or two only to check for new or changed files and only copy those.

      Anyone problem solve this?

      • #2452225

        I am running it frequently on Win8.1 with no problems.
        I haven’t use Win10 as my daily driver, only as test VMs to be able to help out/troubleshoot here. So no need for Karen’s on those.

        I would suggest you go through the settings carefully.
        I would also look at the logs and see what it’s hanging up on. Perhaps you don’t need to back those files up and can add them to the “Global Folder and File Exclusions.” I added a bunch of stuff there (things like WebCaches, LOGS, etc) for Win8.1 so it runs without errors.

      • #2452243

        Here is a copy of my Global Exclusion .txt file for Win8.1 as example.
        It will be in AppData\Local\KarensReplicator

    • #2452671

      It turned out it was my backup router. Thanks all. I did end up testing an open source program called freefilesync https://freefilesync.org/ which did a great job doing what replicator does. However the scheduling interface is much more intuitive with Replicator. And I’m going to use global exclusions to probably cut down many of my replicator backups by half. Thanks all.

    Viewing 7 reply threads
    Reply To: Karen’s Replicator – Basic file/folder backup/replication for Win7 and Win8.1

    You can use BBCodes to format your content.
    Your account can't use all available BBCodes, they will be stripped before saving.

    Your information: