• How to remove unwanted drives

    Home » Forums » AskWoody support » Windows » Windows 10 » Questions: Win10 » How to remove unwanted drives

    Author
    Topic
    #505386

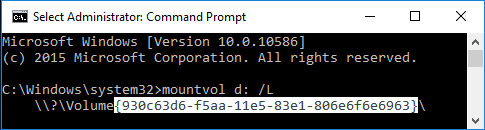
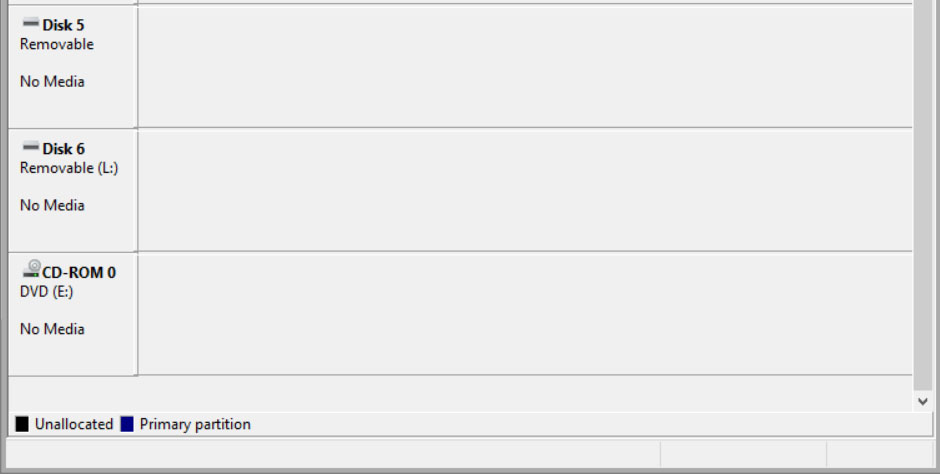
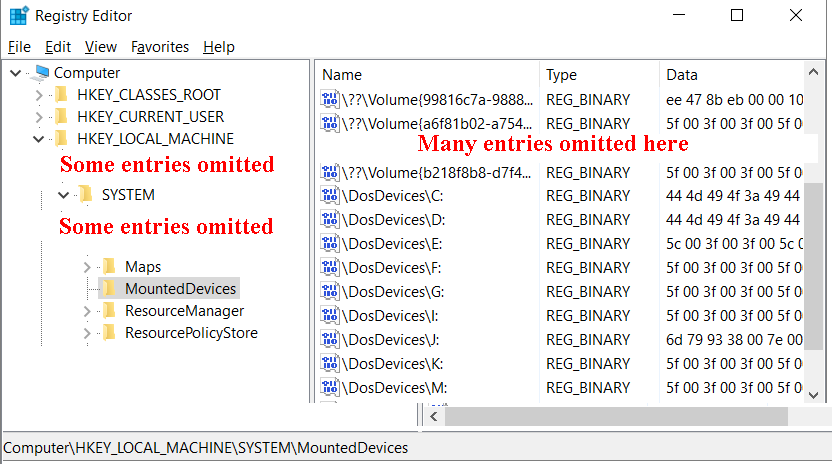
    I have four unwanted drives left over from an old HP Photosmart printer which is now gone. It “installed” drives for its various card readers; e.g. CF/MD card and Sm/xD Card. They show up as drives; F:, G:, etc. and as printers. If I remove them in Devices and Printers or Uninstall with Device Manager they come back on Restart. They are Zombies.

    My guess is that they are in the registry somewhere but that is just a guess.

    Any suggestions on how to get rid of them?

    Windows 10 Pro, Dell XPS 8700:confused:

    Viewing 24 reply threads
    Author
    Replies
    • #1561231

      Try Nir Sofer’s free/portable USBDeview (and make sure you download the right x32/64 version).

      It will show the drives as ‘Not connected’ and allow you (from the File menu or right-click context menu option) to Uninstall Selected Devices.

      Hope this helps…

    • #1561237

      Thank you for you interest. That is an interesting program. Unfortunately, it works the same as all the other attempts. It thinks the device is gone but it returns from the dead on restart.

      • #1561238

        Thank you for you interest. That is an interesting program. Unfortunately, it works the same as all the other attempts. It thinks the device is gone but it returns from the dead on restart.

        1. How did you run USBDeview? (i.e. once un-zipped, did you just double-click on the USBDeview executable or did you right-click on it and use ‘Run as Administrator’?)

        2. How did you get rid of the HP software when you got rid of the printer?

        3. Have you checked whether any software for the old printer is running from startup?

        Hope this helps…

        • #1561250

          1. Did both (ran from my account which has adm privilege and ran as adm)
          2. Uninstalled from control panel
          3. No HP printer software runs at startup
          (only hp software is hp scheduler)
          Zombie drives won’t go away.
          Thanks for your interest. Weird situation. HP, as usual, is no help.

    • #1561251

      Run the following commands in an elevated command prompt:

      SET DEVMGR_SHOW_NONPRESENT_DEVICES=1
      (enter)

      START DEVMGMT.MSC
      (enter)

      A “Device Manager” window will open, click “Show Hidden Devices” in the View menu.

      You can now uninstall any invalid/disconnected devices (right-click/Uninstall).

      Once you have finished uninstalling devices restart the computer; Windows should re-install any devices as necessary (but might prompt for driver software).

      WARNING: exercise caution, particularly with removal of sound, network, and non-plug’n’play devices; devices in these categories might be shown dimmed as if not present but are nevertheless needed for the parent device to function correctly.

    • #1561309

      Thanks for your suggestion. Unfortunately, this just repeats what I mentioned in my original post as an action which does not work. Your first 2 steps just open Device Manager which can be opened directly. I uninstalled the 4 “drives” and they reappear after a restart.

      As mentioned the original post, my guess is that there are registry entries somewhere that resurrects the zombies. No hard evidence.

    • #1561339

      Try using the mountvol command.

      1. Right-click on the Start button and open a Command Prompt (Admin).

      2. Type mountvol f: /L then press Enter. This should show the VolumeName including its GUID for the first of your zombie drives.

      For example:
      44275-mountvol
      Click to enlarge

      If mountvol shows a VolumeName for F: then you should be able to use mountvol f: /d to delete the mount point. This will be safer than searching for the GUID in the registry and deleting the found keys.

      Hope this helps…

    • #1561340

      Yeah! Cool! At least it worked on the one I tried. Probably will kill those others as well.
      This looks like DOS. God – I hated DOS. Thirty years ago I was a Mac guy, as were all but one of my co-workers. Glad DOS survived after all.

      Thanks:o

    • #1561371

      Someone suggested another solution using a Windows tool.
      Open Disk Management
      Select the Zombie Drive
      Choose Change Drive Letter and Path
      Click Remove

      Interestingly, both solution leave the Zombie drives as Disks (e.g. Disk 2, Disk 3, Disk 4, Disk 5) and start the remaining useful Disks as Disk 6, …. Strange but not a real problem in practice.

    • #1561377

      Can you post a screenshot?

    • #1561380

      Will try. Is there an easy way to post an image? This seems barbaric.

    • #1561381

      Did you have the ‘old’ printer installed prior to upgrading to Windows 10?

      Did you un-install the ‘old’ printer software before upgrading?

      Do you have any HP Photosmart software still visible in Control Panel > Programs and Features? If not, download/run Autoruns, wait until the scanning finishes then scroll down the list looking for entries that mention HP or Photosmart.

    • #1561389

      1) Yes “old” printer installed before upgrade to Win 10
      2) As I recall, I had to reinstall “old” printer after upgrade to Win 10
      3) Yes; I uninstalled “old” printer software from Control Panel before installing new printer.
      4) No Photosmart software shows in Control Panel>Programs and Features

      Autoruns.exe – neat program Seems to show interesting items in the registry. I suspected from the beginning that these zombies were in the registry somewhere. Apparently not but this seems to clear up that conjecture. There are a bunch of entries for HP but nothing even close to the old printer (HP Photosmart). Most I recognize such at the new printer (HP Officejet 5740), HP updates, HP Smart Print and some general HP support.

      I looked manually and then use the filter for HP so I don’t think I missed anything.

      Did you post your screen shot with ? There has to be a better way than uploading to a website and then downloading here.

      • #1561393

        If you want a second opinion on your Autoruns results, click on the Save button, save as a .ARN file and attach it to a post.

        Did you post your screen shot with [ img ] http:// something[ /img ]? There has to be a better way than uploading to a website and then downloading here.

        I use direct upload for any screenshots. Unfortunately the forum’s instructions (Attachments and Images) in the FAQ section are a bit inaccurate so here’s how to do it.

        1. Click on Insert Image:

        44279-sc1

        2. Click on the From Computer tab then on the Basic Uploader link:

        44280-sc2

        3. Click on the Browse button and select the screenshot you want to upload:

        44281-sc3

        4. Click on Upload (files):

        44282-sc5

        Result:

        44283-sc6

        Hope this helps…

    • #1561394

      Looks perfect. Thanks. This is just to make sure I understand.
      44284-DiskManagement2

      • #1561400

        Looks perfect. Thanks. This is just to make sure I understand.

        Yep, the uploaded screenshot looked good.

        Back to your zombie drives. In post #15 I mentioned about posting a .ARN file from Autoruns if you wanted a second opinon.

        As neither mountvol or removing in Disk Management worked, I suspect that removing the zombie drives may involve searching and editing the registry. What’s your thoughts on this? For example, “no way, not going there, will just live with it” or “yes, I’m comfortable with registry editing”, etc.

        Note: if the removable drive shown as L: in your screenshot is one of the zombie drives, don’t use mountvol or remove its drive letter for the moment (as it’s likely the next step will be searching for the zombie drive’s GUIDs in the registry and deleting the found keys… after first backing them up).

    • #1561397

      Long shot but worth a try, in Windows explorer right click one of the zombie drives and click Eject if it’s available.

    • #1561413

      http://meiere.com/FORRESTDESKTOP.arn1) Sorry I missed the suggestion about posting .arn file.
      2) I feel OK modifying the registry – did that successfully twice.
      Apparently can’t post the .arn file with you Insert Image procedure. Will try another way.

      Does not seem to work. Maybe this?
      http://meiere.com/FORRESTDESKTOP.arn

    • #1561417

      OK, nothing untoward in the .ARN file.

      I had another look at the documentation re: mountvol and I’m going to suggest a test before delving into the registry. In post #16 your screenshot of Disk Management shows Disk 5 now has no drive letter. Are you able to right-click on Disk 5 and give it a new drive letter, e.g. F: ?

    • #1561447

      Yes I assigned Disk 5 the letter F: (which was the default).
      When I started the process, I got this message (and clicked Yes)
      44286-AssignDisk5_letterF

      I feel guilty taking your time. Hope this is interesting to you. I can live with the current, sorta screwed up, situation.

      • #1561470

        Yes I assigned Disk 5 the letter F: (which was the default).
        When I started the process, I got this message (and clicked Yes)

        I feel guilty taking your time. Hope this is interesting to you. I can live with the current, sorta screwed up, situation.

        Looking on t’Internet, it doesn’t appear anyone has run into this before so, yes, it’s interesting. I almost wish I had an old Photosmart printer to experiment with. 🙂 Let me know if you run out of patience!

        Try this:
        1. Right-click on the Start button and open a Command Prompt (Admin) (like before).

        2. Type mountvol f: /L then press Enter (like before).

        3. Select the entire VolumeName (inc. GUID – see example screenshot below) then press Enter to save this to the clipboard.

        4. Type mountvol then a space then paste (CTRL+V) the VolumeName then type a space followed by /d as in example screenshot below.

        44288-mountvol_del
        Click to enlarge

        5. Press Enter. This should remove not only the drive letter but the zombie drive’s mount point as well.

        Check in Disk Management whether Drive 5 (F: ) has been removed.

    • #1561513

      Very interesting but unsuccessful. (At least I discovered how to screen copy from the cmd screen.)

      I followed your instructions. I think I did it correctly. Here are the steps.
      44289-26April2016_AttemptedKill
      The F: drive is still intact with its original name (surprise?)

      Actually I did it twice with the same result.

      STRANGE: A new drive DIAGS (G:) appeared.
      44290-26April2016_ZombieDrives
      Unlike the other Zombies which think they are removable, this one will open but report that is empty (the others say “Please insert a disk into …”)

      Upon restart, there is no DIAGS (G:)

      (I feel guilty taking so much of your time. I think the exercise is fascinating.)

    • #1561548

      Your F: drive now looks like it’s a Sony Memory Stick PRO Duo. What was the model no. of the HP Photosmart printer? I can find one with 2 memory card slots but not one with four.

    • #1561552

      1) The old printer was HP Photosmart D5360 (may she rest in peace). I never used the memory slots. The unique feature was that it printed on CDs. Apparently Epson has a patent on that and I can’t buy an HP printer that does that.
      2) Found what looks like a solution. So far the Zombie drives are gone forever:

      Disk Management: (I type “partition” into Cortana but there are other ways)
      Right Click on unwanted removable drive.
      Choose “Properties” from the pop-up window. This opens a new window with tabs.
      Click on “Driver” tab and click on “Disable”. Answer “Yes” to warning.

      So far, the Zombies are go after restart.

      My only dilemma is what to do about the removable drive L: which shows up as

      USB Drive (L:) I am afraid that removing this will prevent me from using flash drives.
      Will worry about that later

      Thanks for all your time. It was an interesting trip and I learned a lot. In college, I had to pay tuition. Long live the web.

    • #1561553

      Glad you found a solution and thanks for posting back.

      If it helps for future use, Disk Management is one of the options if you right-click on the Start button.

    • #1561555

      You have the patience of a saint. Wish I could do more than say thank you.

    • #1561560

      Not sure my family would agree with you but very happy to help. It was an interesting problem which I’ve never run into before.

    • #1561662

      I threw caution to the wind and modified the registry (not something I like to do).
      HKEY_LOCAL_MACHINE > SYSTEM > Mounted Devices
      This shows a lot of stuff I don’t understand but at the end were all the zombie drive letters. 44305-Regedit_DeleteDriveLetters
      I deleted the ones I didn’t want (G: through M:)
      Everything seems OK. Restarted; new flash drives are assigned the correct letters.

      Your USBDevice program (nice) doesn’t show any unwanted drive letters except it shows F: for both a USD Mass storage device and the USB removable for my printer. Not going to worry about that.s

      Thanks again for your patience.

      • #1561668

        I threw caution to the wind and modified the registry (not something I like to do).

        I’m pleased the results appear OK… thanks for posting back.

        PS – You live nearly 4000 miles away. I had no idea what ‘SC’ meant so I Googled ‘Pawleys Island’ (which looks idyllic) and now know it means ‘South Carolina’. As a result, I admit that I chickened out of suggesting that you amend the registry manually. Too risky if something had gone wrong, for example deleting the wrong mount point. I couldn’t have just jumped in my car… 🙂

        EDIT: G: through M:? Looking at the screenshot, isn’t that one more drive letter than the printer had memory slots?

    • #1561677

      Yes. Apparently some of my more misguided efforts added drive letters.
      Nothing ventured, nothing gained.

      • #1563914

        Amazing. Windows 10 updated automatically (don’t you just love Microsoft!!). The Zombie Drives are back again. I tried to repeat the earlier process but it does not work. I learned all sorts of stuff about GUID classes and USBSTOR… but nothing works. In the back of my mind I am praying for a complete computer failure so I can go back to Mac which I left 15 years ago. Wonder if I will recognize anything.

    • #1563922

      I have an XPS 8700. I have the same drives. I think the drives are the result of the media reader on the front panel of the machine. There seems to be one drive for each of the media reader slots.

      I have never had a printer with a media reader.

    Viewing 24 reply threads
    Reply To: How to remove unwanted drives

    You can use BBCodes to format your content.
    Your account can't use all available BBCodes, they will be stripped before saving.

    Your information: