
|
Patch reliability is unclear. Unless you have an immediate, pressing need to install a specific patch, don't do it. |
|
ISSUE 16.26.0 • 2019-07-15
The AskWoody Plus Newsletter
In this issue WINDOWS 10: Create an MS Family to share your computing resources BEST OF THE LOUNGE: Microsoft quietly adds new telemetry to Win7 patch LANGALIST: Win10’s 18-month ‘service life‘ complicates updates PATCH WATCH: July updates come with a few warts BEST UTILITIES: Freeware Spotlight — Eraser WINDOWS 10 Create an MS Family to share your computing resources
Setting up a Microsoft Family lets you easily give others access to your Windows computer, Office 365 subscription, and shared Outlook calendar. We tend to be very protective of our computers. We’re often reluctant to let others use our personal machines because, well, we each have things we want to keep private. But Microsoft and Windows give you an option have it both ways: privacy and sharing. Creating a Microsoft Family gives you more control over sharing a Win10 PC, Office subscription, calendar, and — most important — a child’s access to the Internet. MS Family members can be adults or children, relations or friends, but each person must have their own, separate Microsoft Account. To create an MS Family, start by browsing to the Microsoft Family website. Next, click the button to Create a family group (see Figure 1) and sign in with your Microsoft account.
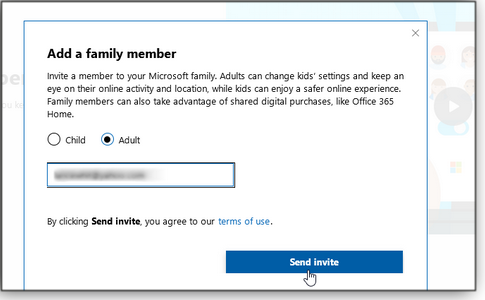
In the next screen, you add family members by choosing either Child or Adult and entering the person’s mobile phone number or email address. Click the Send invite button (see Figure 2); you can then invite another person or click Close to shut down the invitation window.
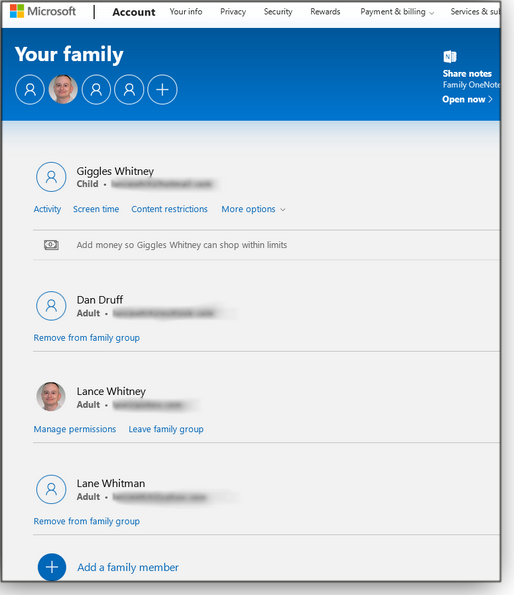
New members will be listed as “Pending” until they accept your invitation. If you change your mind about adding someone to your MS Family, you can easily remove them in the main Your family window; simply click the Remove link next to their name (or the “Remove from family group” link under their name). You can also resend an invite if you did not receive a response — or the person needs a friendly reminder. When the recipient receives the text message or email invitation, they simply click or tap the included Join button (link). The person has 14 days to respond before the invitation expires. Clicking Join opens a page in their browser, where they’ll be prompted to sign in to their Microsoft account and then click the Join the family button. (Note: You can be a member of only one MS Family at a time.) If notifications are enabled on your Win10 PC, you’ll receive a notification informing you that the person has joined your family. You’ll also receive an email alert. Or check the Microsoft Family page, where you should see a list of everyone who’s a member. Adding children to the MS Family lets you manage their activities on Microsoft sites and services. You can, for example, give them what amounts to an allowance for shopping in Windows and Xbox stores. You can also get reports on their online activity, set age limits for rated content, establish time limits for using devices, check the health and safety of their devices, help them participate in Skype calls, and find them on a map. Once you’ve completed your initial Family setup, head back to the main Your family webpage to see who’s listed and to check the status of open invitations (see Figure 3).
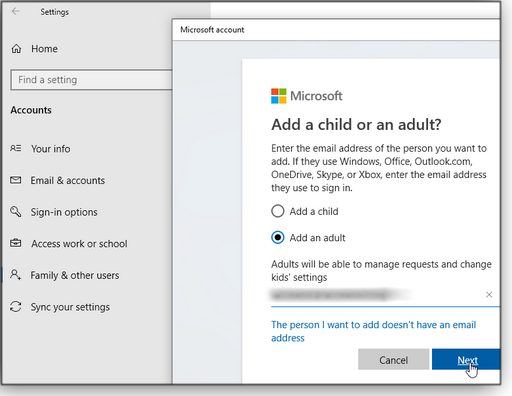
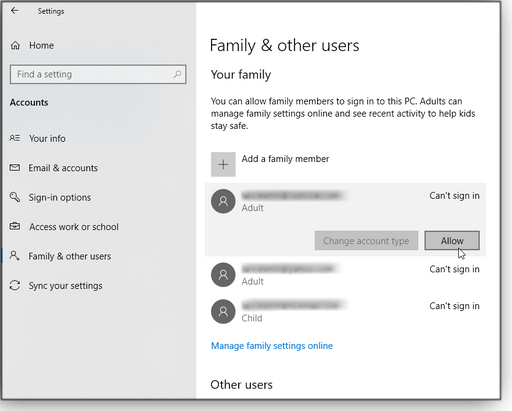
You can also add a family member in Windows 10. Open Settings and select Accounts. Next, select the subcategory Family & other users. Click Add a family member and select Child or Adult. Enter the person’s email address (see Figure 4); the rest of the process works the same as inviting a member from the Family website.
Sharing family resources
Now that you’ve created an MS Family, you can start sharing some resources with members. Let’s start with allowing others in your family access to your PC. On the Accounts/Family & other users screen, click the name of the person who will be given rights to the system and select Allow (see Figure 5). In the “Allow this person to sign in” popup, click Allow again.
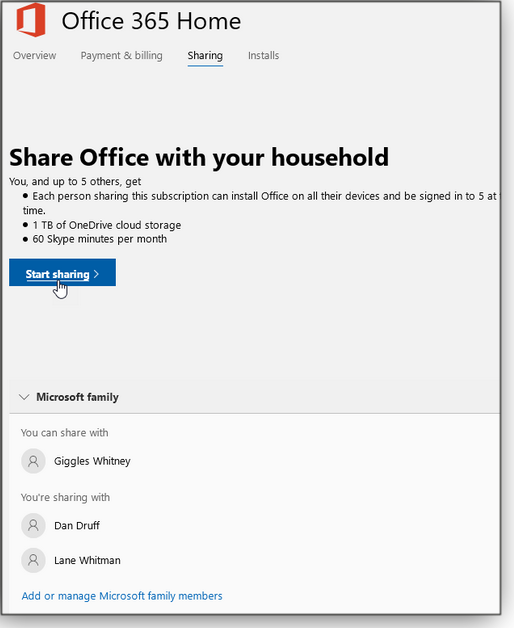
Restart or sign out of Windows 10. The sign-in screen will now display the account name of the person you added to your computer. (Note: The first time they sign in, Windows will take a few minutes to set up the new user. By default, they will not have administrator rights.) This is, of course, similar to simply adding another user to your PC. But using an MS Family adds a few extras. For example, if you use Office 365 Home, which allows up to six users, your subscription is automatically shared with other Family members. To check this, go to your online Microsoft account page and select Subscriptions. Under “Office 365 Home,” click the Sharing link. The next screen shows the people you’ve added to your MS Family. To enable sharing, simply click the Share Office link — or click the Start sharing button (see Figure 6) and send them an invitation. To disable Office 365 sharing with any member (which also removes the 60 free minutes of Skype per month and 1TB of OneDrive storage), click the Stop sharing link next to that person’s name.
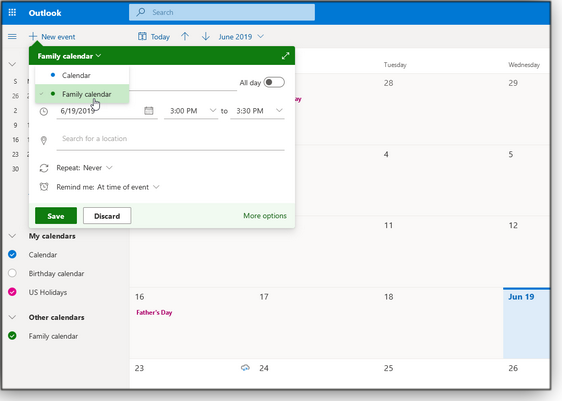
Microsoft automatically creates a single group calendar for all MS Family members. To use this feature, go to your Outlook.com calendar and click the New event button at the top. In the event-entry box, click Calendar and select Family calendar (see Figure 7). Add the details for the event and then save it. On the main calendar page, make sure Family calendar is selected in the left sidebar so you can see the event. Other MS Family members can sign in to the same page to view the calendar and create events.
Finally, any adult in your MS Family can manage the various safety settings for children. To do so, open the online Your family page. Under the child’s account will be links for Activity, Screen time, Content restrictions, and More options. Explore these different sections to set the desired rules and restrictions. While you’re at it, check out the other information and services on your online MS Account page. It can help you manage devices, subscriptions, privacy, security, and payments. It’s a good resource to review from time to time.
Lance Whitney is a freelance technology reporter and former IT professional. He’s written for CNET, TechRepublic, PC Magazine, and other publications. He’s authored a book on Windows and another about LinkedIn. Best of the Lounge Some might call it sneaky. For others, it’s no big deal. If you’re trying to avoid unwanted “features” in your Win7 patches, choosing security-only updates may no longer be the way forward. IOT A long time ago, you asked your teenager to reset the VCR. Today, you might need to call them to reset your lights. Windows 7 Have a problem with an administrator password? You aren’t alone. Share your solution with Bill. Windows 10 Have you tried Window’s System File Checker lately? It might just bark at you. Loungers have posted solutions! Windows 10 You’ve done your research. You’re installing Windows 10 Home, and you want to use it with a local account. But wait! Where has that option gone? Oldergeeks has a way to magically make it to appear again. Mac OS for windows wonks Yes, there are Windows users who also have Macs. A lot of changes are coming to Apple products, and Nathan Parker alerts us to what’s in store. Microsoft Partners It isn’t just long-time Win10 Home and Pro users that are being abused. Microsoft’s “worst move in 30 years” is the headline, and Microsoft Partner Network members need to prepare for what’s ahead. Microsoft Office Bmeacham wants to make sure he buys a legitimate copy — and stay away from scams! If you’re not already a Lounge member, use the quick registration form to sign up for free. LANGALIST Win10’s 18-month ‘service life‘ complicates updates
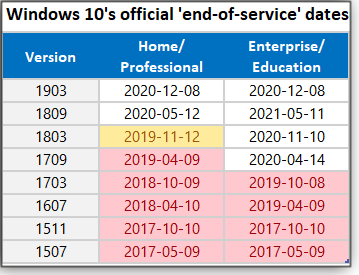
By Fred Langa All current versions of Windows 10 reach their official “end of service” just 18 months after their initial release. Once a version hits that sunset date, regular updates stop — which means you must successfully upgrade each Win10 version within that 18-month window or run the risk of operating without current, up-to-date security patches. Plus: Trouble finding disk-cache software? Blame Bing! A hardware issue totally blocks Win10 upgrades
Writing from Australia, AskWoody subscriber David Melville asks for help with a problem that’s preventing updates to newer Win10 versions. Here’s his note, sent in two parts. First, he touches on a little-understood element of Win10’s service life that affects literally every Win10 user, everywhere!
It’s not “eventually” — David, it’s now! Win10 Version 1709 and all prior Win10 versions have already reached their official “end of service.” Those versions are now unsafe to use! Here’s the thing: Microsoft says each Win10 version gets just 18 months of security updates, starting from that version’s original spring or fall release date. Figure 1 shows the current and official Win10 end-of-service dates taken from Microsoft’s “Windows lifecycle fact sheet” (site).
So, while your Win10 license won’t expire, Microsoft’s support for any given version sure does! You must successfully upgrade Win10 at least once every 18 months, or you’ll no longer receive security updates. Thus, a problem like David’s — where something is preventing Win10 from updating — really demands attention. It can’t be ignored; it must be fixed sometime within that 18-month span. Now for the second part of David’s note: What’s preventing his PC from updating?
That’s good detective work, David! You’ve already isolated the problem. Clearly, the add-on USB card or one of your other USB devices is doing something unexpected and messing up the upgrading process. The good news is that it should be a very easy fix: I just checked, and a basic, new, 4-port USB card is available in Australia for under A$10. Call me lazy, but if this were my PC, I’d simply pull and discard the USB board and replace it outright. If that solves the problem, you’re done! If not, try updating with just one USB device plugged in at a time — until you identify the device that’s causing the failure. You can then repair or replace that device. Take a victory lap, David, and reward yourself with a new and better USB hub — and a subsequently updated, current, and more-secure Windows 10! Trouble finding disk-cache software? Blame it on Bing!
Subscriber Ken Carter’s search for RAM-based disk-cache software ran into the weeds, through no fault of his! He writes:
I don’t think it’s you, Ken. I bet you were led astray by Bing, Microsoft’s default search engine. When you search for “disk cache software” on Google, the very first item displayed is PrimoCache, a general-purpose, RAM-based disk cache that can work with HDDs and SSDs (30-day free trial; U.S. $29.95 to keep; site). PrimoCache is exactly the kind of software I was talking about, but there are many others. However, while researching your question, Ken, I tried the same search on Bing. The top results were (as you say) mostly for software designed to turn small SSDs into Optane-like caches for conventional hard drives. Those results were followed by lots and lots of RAM-drive info — that’s not the type of software I was talking about! I generally prefer Google for tech-related searching. Bing isn’t horrible; it usually gets you in the same ballpark. But — as this search demonstrated — it strikes out often enough that I don’t rely on it. Sorry, Ken — and anyone else who had trouble finding disk-cache info! Give PrimoCache or similar tools a spin. PrimoCache is free for a month: plenty of time to find out whether RAM-based disk caching is worthwhile on your PC.
Fred Langa has been writing about tech — and, specifically, about personal computing — for as long as there have been PCs. And he is one of the founding members of the original Windows Secrets newsletter. Check out Langa.com for all Fred’s current projects. July updates come with a few warts
This month’s Windows and Office updates are settling in without raising any major alarms. But it’s still early, and caution dictates deferring the patches for another week or so. July’s updates do fix a couple of issues from previous months: the IE/Power BI conflict and the Event Viewer error message — both of which impacted just a small number of Windows users. Currently, the most significant issue with July updates is a detection problem with KB 4506161, a Visual Studio patch that won’t install on all systems. Microsoft will probably re-release this update sometime soon, so I recommend skipping it for now. Other known issues with July updates shouldn’t affect most Windows users — or they’ve been around for several months, indicating that they’re major pain points for only a very small number of MS customers. Not fixed is Version 1903’s failing Sandbox feature on systems with languages other than English. Another limited-issue bug impacts only those users who have set up “always on” VPN. There is a fix coming for Remote Access Connection Manager (the service stops working), but apparently we won’t see it until the end of the month. Until then, use the workaround described in KB 4507453.
Patch Watch Master Patch lists
We’ve been updating Master Patch List spreadsheets and PDFs about every two weeks — typically a few days after Patch Tuesday and then again later in the month, when we give the all-clear report on safe patches (the second monthly Patch Watch). Over the past few weeks, I’ve also back-filled patch information to the beginning of this year. There are three sets of Excel/PDF update files: Windows 10, pre-Windows 10, and Office/Exchange/SQL. Feel free to give us feedback on these tables by clicking the AskWoody.com forum link at the bottom of this article. You’ll also find our recommended rules for patching below, as a service to new Patch Watch readers. Windows 10 updates
Win10 1903 might be brand-new, but in July it joins older Win10 versions in receiving a solid batch of security patches. All versions also get a few non-security fixes, including one for a BitLocker issue that might put the encryption app into recovery mode. Another fix prevents system crashes when you use Win10 to capture photos and video (more info). Win10 users should also be aware of an issue that just cropped up. As reported in an AskWoody.com post, there is a problem with the OS’s System File Checker command: sfc /scannow. Running the command will pop up an error message about corrupted files (see Figure 1). However, it appears the problem isn’t caused by one of the following updates but rather by the latest virus-definition files dropped by Microsoft on July 10. Expect a fix soon.
Note to Win10 1803 users: That version will reach its end of service on November 12, 2019. Home and Pro editions will need to be upgraded to Versions 1809 or 1903 before that date to continue receiving security updates. July’s Windows 10 updates include:
July also included servicing-stack updates that need to be installed before the above cumulative updates. Apparently, their sole purpose is to fix the BitLocker/Secure Boot problem. (An update to Secure Boot could push BitLocker into recovery mode, forcing users to enter a BitLocker password in order to boot their systems.) Note: As with the rollups listed above, only the Enterprise and Education editions of Win10 Versions 1607 through 1709 will receive servicing-stack and .NET updates. July’s servicing-stack patches include: Finally, Microsoft released .NET Framework updates — mostly for Version 4.8. As noted below, .NET 4.8 is built into Win10 1903 and 1809. On all other versions, the update will be installed only if .NET 4.8 is on your system — either because you manually added it or because an application automatically installed it. Users running Version 1809 will see a separate security update for .NET 4.7. Yes, it’s very confusing, but the simple answer is to defer them all for now.
Windows 8.1/Server 2012 R2
Win8.1 also gets a July servicing-stack update to fix the BitLocker/Secure Boot problem. The cumulative and security updates fix many of the same vulnerabilities addressed in Windows 10. But July Win8.1 updates also include hold-over issues that mostly affect enterprise systems. See the “Known issues” section in the patch-information pages linked below. Also look for a rollup .NET update or a security-only patch for Versions 3.5, 4.5.2, 4.6, 4.6.1, 4.6.2, 4.7, 4.7.1, 4.7.2, and 4.8. Windows 7/Server 2008 R2 SP1
July’s update addresses new vulnerabilities, but its list of fixes is a mixed bag. Although it corrects the IE/Power BI and Event Viewer bugs, it still has issues with McAfee Endpoint Security plus the ongoing Preboot Execution Environment problem. But again, those are mostly of concern in enterprise settings. Another update wrinkle: PKCano reports in an AskWoody.com post that Microsoft included additional telemetry in the security-only patch. This appears to be a repeat of an earlier attempt by Microsoft to collect Win7-system information as an often unwanted precursor to pushing out Win10 upgrades. This time, however, Microsoft isn’t using the information to set you up for a Win10 upgrade — merely to review the capabilities of systems to accept an upgrade. The .NET Framework updates — both rollup and security-only — fix a remote-code-execution vulnerability in Versions 3.5, 4.5.2, 4.6, 4.6.1, 4.6.2, 4.7, 4.7.1, 4.7.2, and 4.8. July’s Windows 7 updates include: Windows Server 2012 updates
The updates for Server 2012 fix (and don’t fix) the same issues that impacted workstation versions of Windows. Windows Server 2008 SP2
The following updates were released for Server 2008 SP2: Office security and non-security updates
July’s Office security updates fix several remote-code-execution vulnerabilities that could be exploited in phishing attacks. Office 2016 Office 2013 SP1 Office 2010 SP2 The following Office non-security feature enhancements and fixes were released on July 2. Office 2016
Office 2013
Office 2010 Patch Watch rules for updating
Again, these are our current recommendations for patching Windows and Office. They may change as Microsoft evolves its updating process.
Stay safe out there.
In real life, Susan Bradley is a Microsoft Security MVP and IT wrangler at a California accounting firm, where she manages a fleet of servers, virtual machines, workstations, iPhones, and other digital devices. She also does forensic investigations of computer systems for the firm. Best Utilities Freeware Spotlight — Eraser
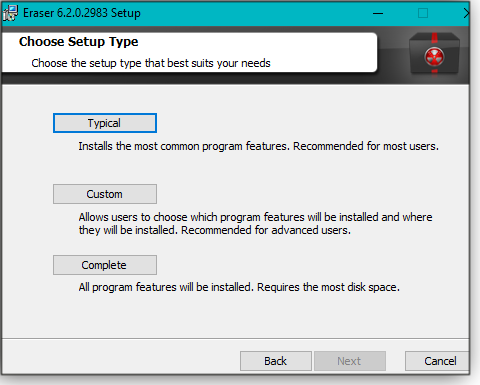
When you run a computer repair/IT business such as ours, you’re always looking for software to make your job easier. Recently, I was looking for a program that would securely wipe free space on refurbished computers without zapping Windows. I ran across Eraser (developed by Garrett Trant, Joel Low, and Dennis van Lith; more info) and decided to give it a try. I’m glad I did. Eraser is an open-source Windows program that has an interface similar to that of a backup program. But instead of saving your files, it securely removes them — or, more accurately, overwrites them. And when I say remove, I mean wiped clean! This is a serious utility designed for experienced Windows users. As always, I recommend downloading the app and following along with my demonstration. You can grab it from its download page on our OlderGeeks.com site. Note: Eraser is very efficient at wiping data — from single files to entire drives. Be sure you have a full system backup before using this app, especially as you’re becoming familiar with how it works. After downloading, click the Eraser .exe file to launch the setup wizard. Eraser needs Microsoft’s .NET Framework 4.0 or higher: the setup process will check whether it’s installed. And if needed, the setup wizard will add .NET for you. Once that’s done the Eraser setup will continue (see Figure 1).
The wizard gives three options during setup: Typical (recommended), Custom, or Complete. Custom lets you install just the features you need to minimize the use of drive space. For this review, I stuck with Typical (see Figure 2). Note that the install process will require a system reboot.
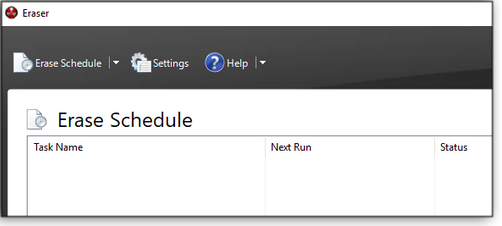
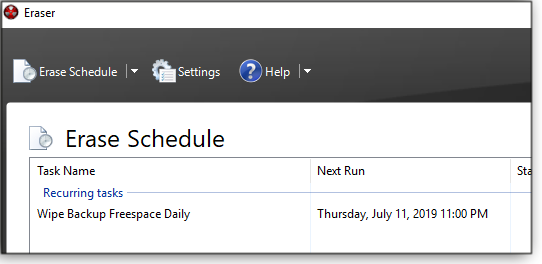
There are two ways to use Eraser, but both are based on the concept of tasks (see Figure 3). You can create tasks that run immediately — or set up scheduled tasks that run daily, weekly, monthly, or whenever.
Why do you need a secure wipe program to run on a schedule? Well, there are lots of reasons; here’s one example: Let’s say you’re doing incremental backups to an external drive. Your backup program is removing all but the most-recent five backups. Windows thinks the old files are gone because they’re marked as deleted in the Master File Table (in NTFS) or the File Allocation Table (FAT). But those files are still on the drive — untouched — until another file is written over them by Windows. Until that happens, the files can be easily recovered with simple and free recovery software. Eraser lets you wipe the “free” space on a drive or in designated folders; and it can do so on a set schedule, such as immediately after your backup software completes its scheduled work. This procedure can also work for automatic SQL-database backups. How to build file-wiping tasks
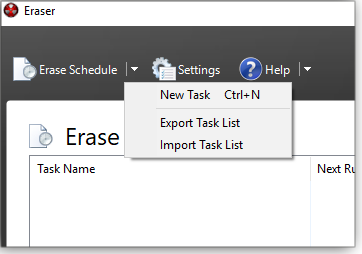
Okay, let’s create a task. Start by clicking the down arrow next to Erase Schedule and select New Task (see Figure 4).
The Task Properties dialog box will pop up with four options under the Task tab (see Figure 5). Give the new task a name and select one of the following:
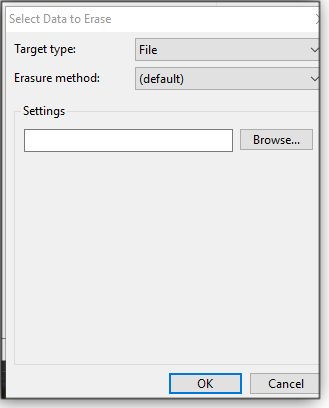
Note that the Schedule tab’s options are grayed out until you choose the “Recurring” option. Next, click Add Data to select what gets erased — the Select Data to Erase dialog box, shown in Figure 6, will pop up.
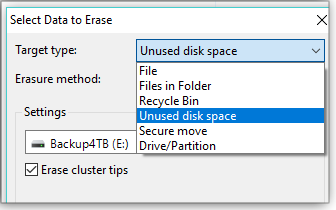
In the Target type field, you have the following choices (see Figure 7):
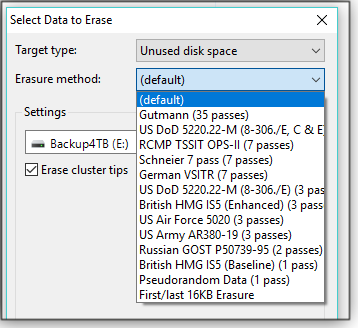
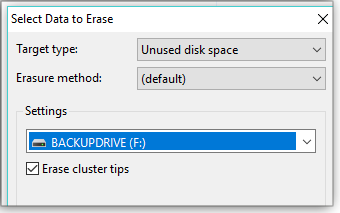
Erasure method defines how data will be wiped — or, again, how it will be overwritten. The default option (see Figure 8) will use the utility’s global default settings, though you can change those defaults in the main screen’s Settings menus. You can, of course, pick an alternate method from the list. If your Target type selection has further settings/options, they’ll appear in the Settings section. For example, if you select Secure move, “From” and “To” fields will appear. Note: Go ahead and keep “Erase cluster tips” checked. Some files overlap a little into additional clusters. This option ensures that even unused parts of a cluster that contained some file data get zapped, too. For this demonstration, I’m going to set a schedule that will erase the unused disk space of a backup drive (see Figure 9).
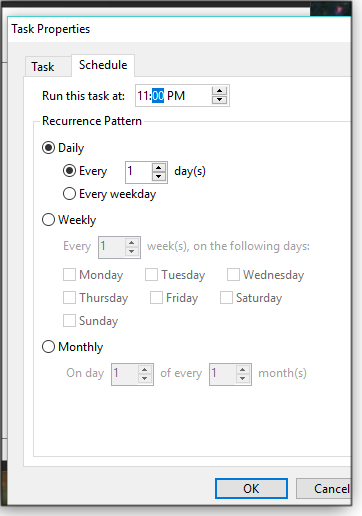
After defining what the new task will do, I then use the Task Properties/Schedule box to set when it will run (see Figure 10). Eraser gives you lots of flexibility when establishing a schedule.
I now have my schedule all set (see Figure 11). Using the above steps and the various options, I can build many different types of tasks and schedules. Eraser is an impressive piece of software for no cost — though donations are certainly appreciated.
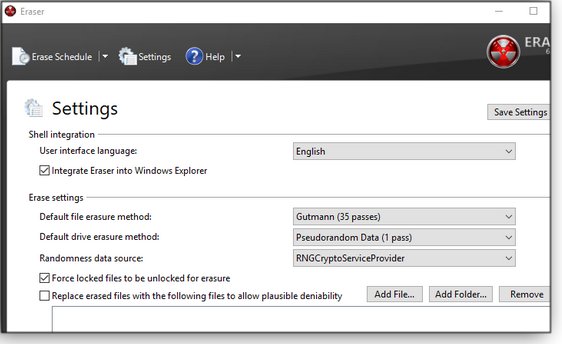
The program has some pretty cool features under Settings in the main window (see Figure 12). For example, you can:
Go ahead and play with Eraser but be sure you have a current system backup first. Check out the help menu for more details — and let us know how you make use of the app in the AskWoody.com comments. Maybe your experience will help someone else.
Deanna and Randy McElveen are celebrating 20 years in the computer business, seven years running OlderGeeks.com and 26 years of putting up with each other. Their computer store is in a small town in the Missouri Ozarks. Believing that happy customers are always the best advertisement, they hope to do it for another 20 years. Publisher: AskWoody LLC (woody@askwoody.com); editor: Tracey Capen (editor@askwoody.com). Trademarks: Microsoft and Windows are registered trademarks of Microsoft Corporation. AskWoody, Windows Secrets Newsletter, WindowsSecrets.com, WinFind, Windows Gizmos, Security Baseline, Perimeter Scan, Wacky Web Week, the Windows Secrets Logo Design (W, S or road, and Star), and the slogan Everything Microsoft Forgot to Mention all are trademarks and service marks of AskWoody LLC. All other marks are the trademarks or service marks of their respective owners. Your email subscription:
Copyright © 2019 AskWoody LLC, All rights reserved. |

 By Lance Whitney
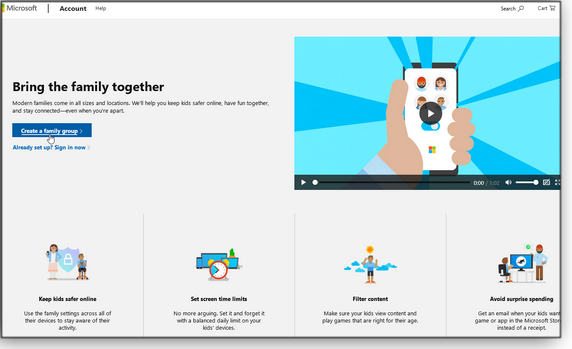

 By Susan Bradley
 What to do: July’s updates are looking fairly clean. However, unless noted below, I suggest deferring them for at least another week. The updates contain security fixes, but there are no reports of imminent threats.
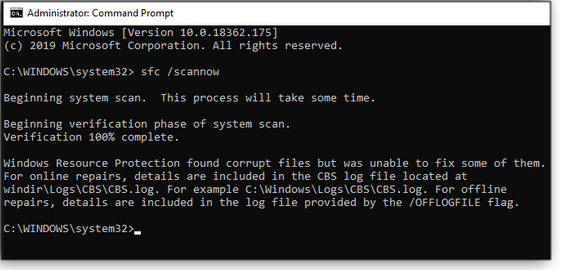
 By Deanna McElveen


Plus Membership
Donations from Plus members keep this site going. You can identify the people who support AskWoody by the Plus badge on their avatars.
AskWoody Plus members not only get access to all of the contents of this site -- including Susan Bradley's frequently updated Patch Watch listing -- they also receive weekly AskWoody Plus Newsletters (formerly Windows Secrets Newsletter) and AskWoody Plus Alerts, emails when there are important breaking developments.
Get Plus!
Recent Topics
-
Login screen icon
by 2 hours, 23 minutes ago
-
AI coming to everything
by 4 hours ago
-
Mozilla : Pocket shuts down July 8, 2025, Fakespot shuts down on July 1, 2025
by 6 hours, 10 minutes ago
-
No Screen TurnOff???
by 6 hours, 32 minutes ago
-
Identify a dynamic range to then be used in another formula
by 7 hours, 5 minutes ago
-
InfoStealer Malware Data Breach Exposed 184 Million Logins and Passwords
by 18 hours, 42 minutes ago
-
How well does your browser block trackers?
by 4 hours, 59 minutes ago
-
You can’t handle me
by 9 hours, 24 minutes ago
-
Chrome Can Now Change Your Weak Passwords for You
by 4 hours, 28 minutes ago
-
Microsoft: Over 394,000 Windows PCs infected by Lumma malware, affects Chrome..
by 1 day, 6 hours ago
-
Signal vs Microsoft’s Recall ; By Default, Signal Doesn’t Recall
by 9 hours, 34 minutes ago
-
Internet Archive : This is where all of The Internet is stored
by 1 day, 6 hours ago
-
iPhone 7 Plus and the iPhone 8 on Vantage list
by 1 day, 6 hours ago
-
Lumma malware takedown
by 18 hours, 49 minutes ago
-
“kill switches” found in Chinese made power inverters
by 1 day, 15 hours ago
-
Windows 11 – InControl vs pausing Windows updates
by 1 day, 15 hours ago
-
Meet Gemini in Chrome
by 1 day, 19 hours ago
-
DuckDuckGo’s Duck.ai added GPT-4o mini
by 1 day, 19 hours ago
-
Trump signs Take It Down Act
by 2 days, 3 hours ago
-
Do you have a maintenance window?
by 8 hours, 8 minutes ago
-
Freshly discovered bug in OpenPGP.js undermines whole point of encrypted comms
by 1 day, 5 hours ago
-
Cox Communications and Charter Communications to merge
by 2 days, 6 hours ago
-
Help with WD usb driver on Windows 11
by 15 hours, 10 minutes ago
-
hibernate activation
by 2 days, 15 hours ago
-
Red Hat Enterprise Linux 10 with AI assistant
by 2 days, 19 hours ago
-
Windows 11 Insider Preview build 26200.5603 released to DEV
by 2 days, 22 hours ago
-
Windows 11 Insider Preview build 26120.4151 (24H2) released to BETA
by 2 days, 22 hours ago
-
Fixing Windows 24H2 failed KB5058411 install
by 1 day, 18 hours ago
-
Out of band for Windows 10
by 3 days, 3 hours ago
-
Giving UniGetUi a test run.
by 3 days, 10 hours ago
Remembering Woody
