
|
Patch reliability is unclear, but widespread attacks make patching prudent. Go ahead and patch, but watch out for potential problems. |
|
In this issue EDITORIAL: A lifetime of achievement LANGALIST: New to “remote desktops?” Start here! LANGALIST: Readers speak: Remote Desktop options LANGALIST: Wait for Windows 11.1 LANGALIST: Can you fully delete the Edge browser? Should you?
EDITORIAL A lifetime of achievement
By Will Fastie We are pleased — and excited — to announce the creation of the TameYourTech Crystal award. We are even more pleased to present the inaugural award to Fred Langa for his lifetime of achievement in the field of personal computing journalism. We conceived the idea of the TameYourTech award program with only one goal in mind — to recognize excellence. That Fred meets this high standard goes without saying. But the very fact that we chose to honor Fred in this way is indicative of a greater truth. We will not issue this award lightly, casually, or often. Excellence can be elusive. The choice of honorees will be the exclusive province of our award committee. (That’s Susan and me.) We will not base our decisions on popularity, “trending,” polls, or any other amorphous quality. We will seek to recognize what we believe represents a significant contribution to the entirety of the personal computing world. We might honor a person, company, product, achievement, concept, or breakthrough. You can see why we probably won’t make an award very often. We intend to be thoughtful about this, to make the award mean something. It’s possible that the award program will expand, but the “Crystal” award (so named because that’s not just any chunk of glass you’re looking at) will always be the pinnacle. One more thing, also related to Fred. You probably noticed that our new tagline reads “Tame Your Tech!” The tagline did not come out of thin air. A small group of folks connected with the newsletter conducted a roundtable to kick around ideas. It was Fred who opened the door that eventually led us to the word “tame,” which Susan seized upon. We are grateful. My visit to Boston
Last week, it was my pleasure to pop up to Boston to deliver our first award to Fred in person. This sort of thing usually deserves some sort of gala event, with a dais filled with folks ready to roast an unwitting recipient in front of a large audience. Would that we had such a budget. Nonetheless, I was delighted to be able to present the first award to Fred and to spend a few minutes extolling his virtues and chewing the fat a bit about old times. I’m only sorry we didn’t have more time, for a longer reminiscence. There should also be some sort of official proclamation about the underlying reasons behind the award, but you are all well aware of Fred’s long career in journalism, his many contributions, his excellence, and his steady hand. Perhaps the “proclamations” in The Last LangaList (2022-04-11, available to all) will suffice. Fred made a telling remark about my visit, saying it was the first time in ten years that he had seen someone else connected to the newsletter in the flesh. It’s an insightful comment; Fred’s long collaboration with the newsletter has been very effective and entirely remote. It’s made me realize that both our staff and all our contributors are scattered not just around the United States but also around the world. It’s not a recent phenomenon — it’s been the newsletter’s modus operandi for a very long time. I’m sorry that a scheduling snafu prevented us from spending more time together. It was a very nice meeting; Fred is a pleasant man with a good sense of humor. I don’t get to Boston all that often, but I hope I can carve out some time on my next visit for a more relaxing encounter. As a further celebration of Fred’s career, we are very pleased to bring all our newsletter readers four of Fred’s LangaList columns, previously available only to Plus members. Read on! Congratulations, Fred!
Will Fastie is editor in chief of the AskWoody Plus Newsletter.
LANGALIST New to “remote desktops?” Start here!
By Fred Langa Previous columns discussed several remote desktops — software that lets you access and use a distant PC just as if you were sitting at its keyboard. Google’s Chrome Remote Desktop was the main focus because it’s much easier to configure and use than Windows’ built-in Remote Desktop Connection. However, if you’ve never used any remote-access tool before, some of the concepts and set-up steps may seem confusing at first. So, here’s additional information and a step-by-step guide to get you up and running with Chrome Remote Desktop! Swept up by my own enthusiasm
In A better remote desktop connection (AskWoody 2022-01-31) and Readers speak: Remote Desktop options (AskWoody 2022-02-07), you read about some of the limitations of Windows’ built-in Remote Desktop Connection and about the strengths of Google’s free Chrome Remote Desktop. Compared to Windows’ Remote Desktop Connection, Chrome Remote Desktop can be an absolute breeze to set up! But in my enthusiastic descriptions of Chrome Remote Desktop, I lost sight of the fact that many readers have never set up any remote connection! To them, some of the concepts, terminology, and procedures might be wholly unfamiliar. Take, for example, AskWoody subscriber Peter M’s note: ◼ Fred: Remote Desktop is all fine, except your instructions say, “… and now enter the PIN.” “What PIN?” I cry in frustration. I’m dead in the water! Peter, to you and anyone else I left in the dust with my too-fast explanations, my sincere apologies! But if you’ll bear with me for just 10 minutes or so, you’ll see exactly how to get your first Chrome Remote Desktop session up and running. Setting up a two-PC remote desktop session
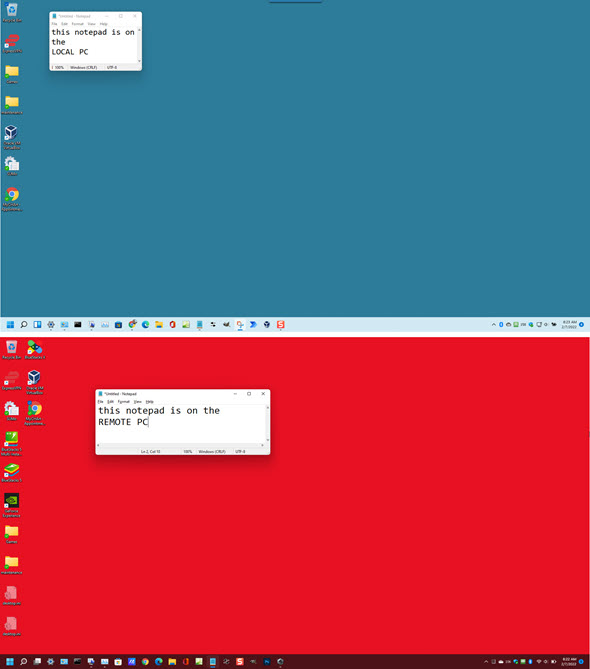
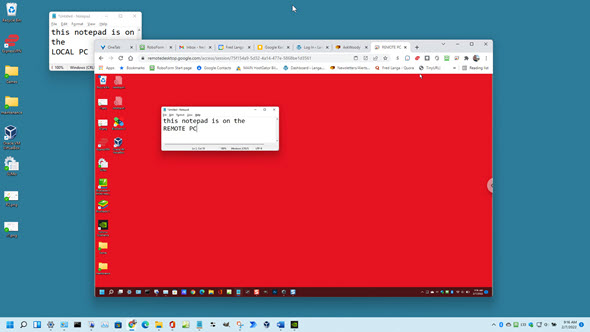
For this demo, I’ll set up a full, two-PC remote connection so that either PC can initiate an unattended remote-control connection to the other. There are many other connection options you can explore later, but it makes sense to start with the broadest, most general-purpose type of remote connection. I used two Windows 11 PCs for the demo, but the connection steps are the same for Win10 or even Win8.1. Figure 1 shows the before-connection desktops of the two separate demo PCs. To make the desktops easier to tell apart in these small images, I’ve temporarily made the desktop backgrounds garishly different — the local PC desktop is blue and the remote desktop is red. I’ve also opened a small notepad on each PC to help further differentiate which is which in an image you’ll see at the end of this text. (Again, these steps — changed backgrounds and on-screen notes — are just for clarity in the demo. You don’t have to change anything on or about your PC’s desktop to use Remote Desktop.)
Chrome Remote Desktop (I’ll mostly call it RD from here on out) requires the presence of a browser that supports the open-source Web Real-Time Communication (WebRTC) standard. That includes Chromium-based browsers such as Microsoft Edge, Google Chrome, Opera, and many others. If you don’t already have a free Chromium-based browser installed, please install one now on both PCs you’ll be connecting. (Both of my demo PCs already had the current Chrome browser installed, so that’s what I used.) For security, RD also requires that anyone using it be signed in to their Google account; if you don’t already have a free Google login (e.g., a Gmail account), sign up for one here. Start on the LOCAL PC
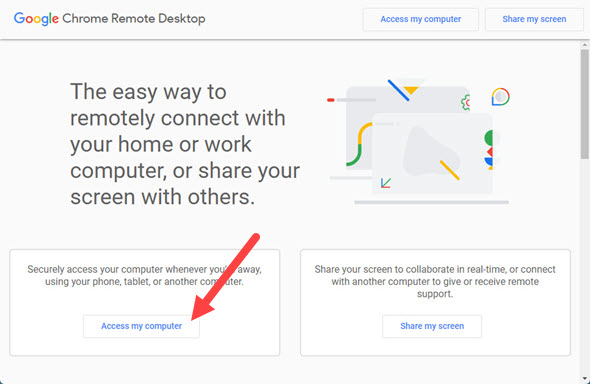
In your Chromium-based browser, click to https://remotedesktop.google.com/. You’ll see something like Figure 2.
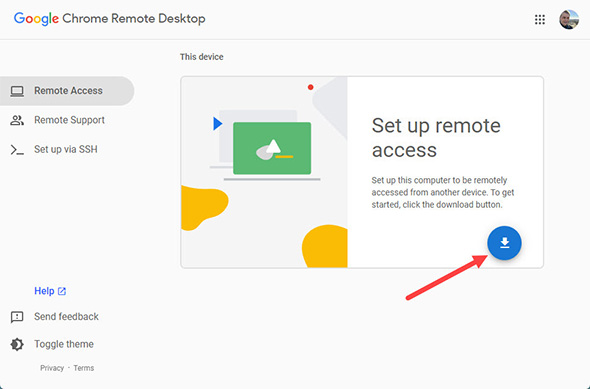
Click Access my computer. RD’s on-screen language — e.g., “Access my computer” — is worded with the assumption that it’s your own PC that you’re trying to connect to. But don’t be confused by the “my”; RD works the same, whether you own the PCs involved or are simply working with the owner’s consent and permission. A screen similar to Figure 3 will open; click the download button to start the process.
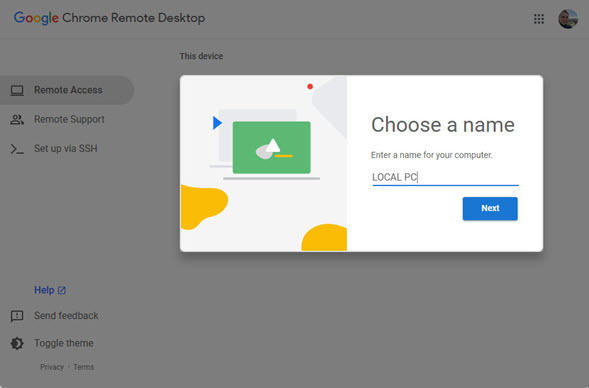
RD will usually then perform two downloads: a small Remote Desktop Host app (around 50MB), and a separate browser extension. You can use RD with either alone, but downloading and installing both gives full access to all RD features. Just follow the on-screen instructions to download and install the app and extension. When the RD software is fully installed, you’ll be prompted to name the local RD PC and its connection; see Figure 4. The name can be anything you want and doesn’t have to match the official Windows name of the PC. In this case, for total clarity, I gave the local PC the blindingly obvious name LOCAL PC.
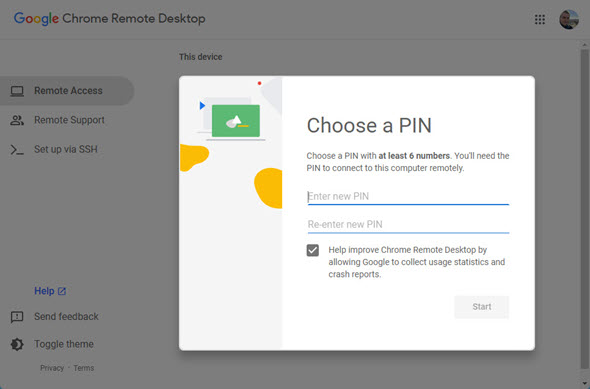
After choosing a name, you’ll be asked to set up a six-digit PIN that can later be used to access this PC. (See Figure 5.) Make sure you save the PIN in a safe place, such as your password manager.
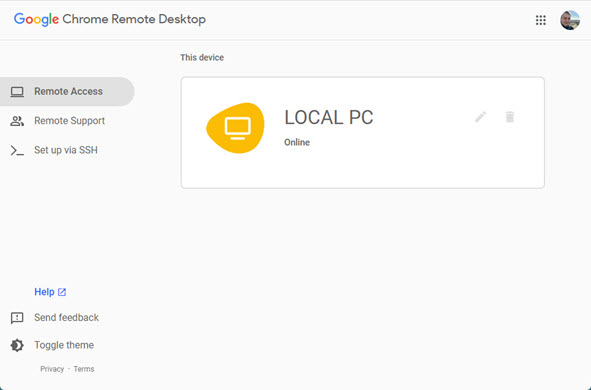
That’s all it takes to set up the local PC for access. When you’re done, you’ll see something like Figure 6, with the local PC’s name shown (in my case, “LOCAL PC”).
Now it’s time to set up the remote On the REMOTE PC
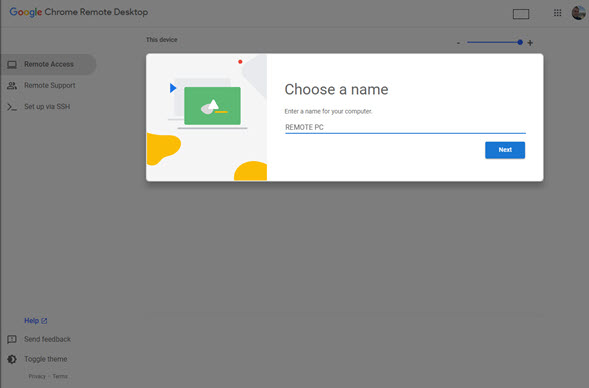
For safety, RD’s initial connection must be enabled by authorized persons physically present at both PCs. Unattended access is possible after the initial setup; however, live, authorized, human intervention is required to establish the first RD connection. Because of this, it’s sometimes useful to have a helper for the initial setup of the remote PC — you can coach them through the process by phone, Zoom, email, text, or whatever. (Or, ahem, send them a link to this article!) But in other cases (such as two PCs in your own home or office), you might be able to temporarily go to the remote PC and set it up yourself — or have the remote PC brought to you. In fact, if you’re just getting started with remote-access, I recommend that your first, practice sessions be with two nearby PCs — side by side is ideal — so you can see what’s going on at both ends of the connection. (This removes some of the inherent difficulty of “working blind” on a remote PC.) After you’ve mastered setting up a basic connection, such as the one I’m about to show you, you can then move on to truly remote sessions. But either way, the remote PC’s setup is easy. Perform exactly the same steps as you did on the local PC. Naturally, give the remote PC its own, different RD name (I used REMOTE PC; Figure 7) and, when asked, set up a different PIN. Save both in your password manager.
When you’re done, with RD set up and running on both PCs, you’ll see something like Figure 8. My setup shows the REMOTE PC and LOCAL PC names that I used; of course, yours will show whatever PC names you entered.
Making your first connection
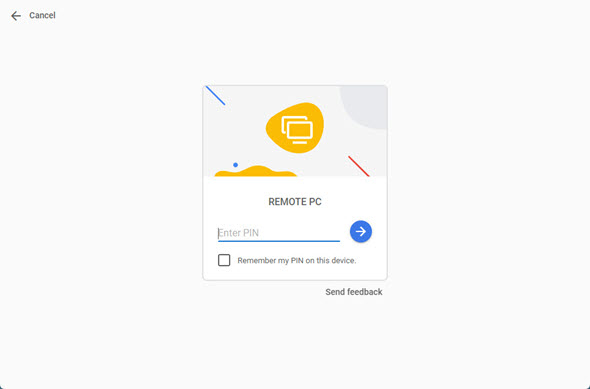
When things are set up as above, you can connect to either PC from the other — a full, live connection is available in both directions. But let’s keep it simple for now. Working at the local PC, click the RD connection to the remote PC. In my case, sitting at my local PC, I’d simply click REMOTE PC, as shown in Figure 8. RD will usually churn for a moment as it sets things up between the local and remote PCs, and then you’ll be asked to enter the remote PC’s PIN (Figure 9).
When you enter the PIN, RD will churn for a few more seconds and then present the full, live, working remote PC desktop in a resizable window on the local PC’s desktop (Figure 10).
When the remote window first opens, you may also see an RD sidebar with various operational options, such as whether control-key combinations (e.g., CTRL+ALT+DEL) and clipboard contents should be passed to the remote PC or processed locally, and so on. Set these options any way you wish. Working in the RD window, you can now access and use the remote PC exactly as if you were seated in front of it. You can also move the RD window around and make it any size. The RD software will automatically resize and scale the remote desktop accordingly. When you’re done, simply close the RD window, and the remote-control session will end. Now that the connection has been set up, you can reconnect at any time, even if no one’s physically present at the remote PC. As long as the remote PC is powered on and still has the RD software installed, all you need to do is fire up RD on the local PC, click to connect to the remote PC, and re-enter the remote PC’s correct PIN when prompted. If you want to break access and/or prevent ongoing connections, change the PIN on the PC that you want to protect, delete that specific connection (via the trash-can icon next to the connection name in the RD window), or uninstall the RD host app and the browser extension from that PC. No one’s getting in without the software and/or the PIN! And that’s all it takes — you now know the RD basics! In many cases, the above is all you’ll need. For example, the setup that I use for remote PC maintenance is almost exactly as you see above but (of course) with different names and PINs that I change frequently. But if you want or need to dig in deeper and try different connection types, there are plenty available. For example, see:
Fred Langa has been writing about tech — and, specifically, about personal computing — for as long as there have been PCs. And he is one of the founding members of the original Windows Secrets newsletter. Check out Langa.com for all of Fred’s current projects.
LANGALIST Readers speak: Remote Desktop options
By Fred Langa A remote desktop connection lets you access and use a distant PC just as if you were sitting at its keyboard. It’s a great way to access your files and apps from anywhere, or to provide long-distance assistance to others. Last week’s column focused on the limitations of Windows’ built-in Remote Desktop Connection and on the strengths of Google’s free Remote Desktop. This week, your fellow AskWoody subscribers respond. Here’s a selection of their Remote Desktop–related tips, advice, and suggested alternatives! Chrome Remote Desktop may need manual updating
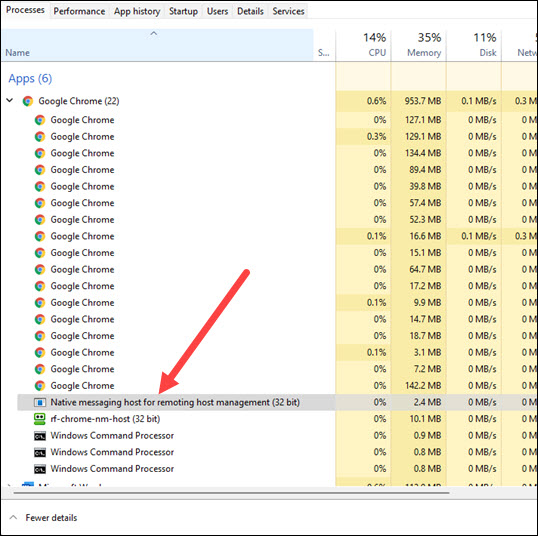
In A better remote desktop connection (AskWoody 2022-01-31), you read about my contrasting experiences with two different remote-desktop products: a frustrating, time-wasting failure with Windows’ Remote Desktop Connection; and an easy-as-pie, first-try success with Google’s free Chrome Remote Desktop. Then the emails started! I wouldn’t have guessed that Remote Desktops would punch so many readers’ buttons, but it did! Here’s a sampling. “Georgea” wrote: ◼ Fred, thanks for the Chrome Remote Desktop piece — been using it for a few years and it works well for my needs. The host executable does not auto-update. In the last two years, I’ve had to use this link to manually download the newest .MSI [installation] file every few months. I have not found where you can get info on the latest version without downloading it. Finally, for situations where reliable unattended remote access is important, I also install TeamViewer Free on the host, as a “plan B” backup if Chrome Remote Desktop won’t connect. The occasional use of TeamViewer doesn’t trigger their “excessive use — must upgrade” warning. Thanks, Georgea! Yes, the Remote Desktop Host app is an odd duck. Although it’s a separate app, it ends up being treated as an internal browser element. For example, Figure 1 shows a screen grab of my current Task Manager. My PC is running Chrome (the browser), and I’ve expanded the Task Manager listing for Chrome to show its major components (mostly Tab instances and browser helpers). Note that the Remote Desktop Host app is (awkwardly) listed there as “Native messaging host for remoting host management (32 bit).”
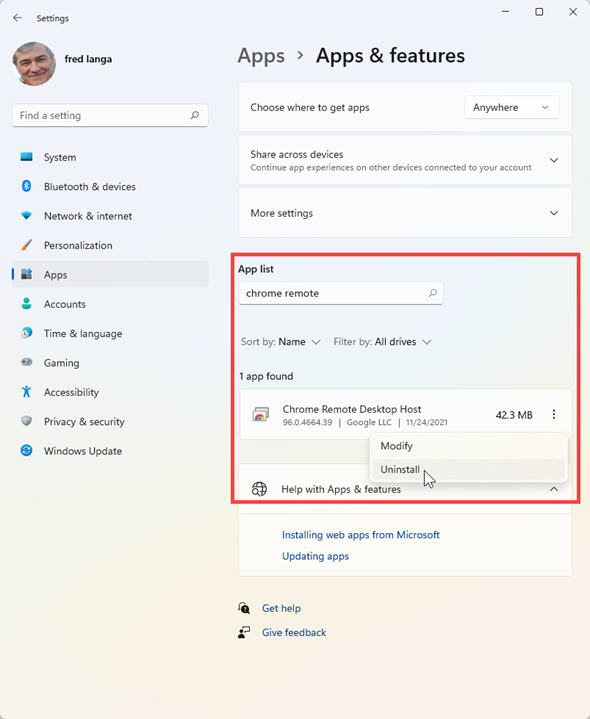
This means that neither Windows Update nor various third-party software updaters will normally “see” the Remote Desktop Host app as a separate item in need of its own updating. And although one might reasonably expect that routine browser updates would also update the associated Remote Desktop Host app, Georgea’s experience suggests otherwise. So, the next time your Chromium-based browser updates, it’s safest to assume that the Chrome Remote Desktop app also might need a refresh. It’ll take only a sec using Georgea’s excellent tip about grabbing the download directly from Google; alternatively, you could uninstall the old version (see Figure 2) and grab a new copy from the normal Remote Desktop site at https://remotedesktop.google.com/.
Either way, the whole manual update process takes only a minute or two every month or so. Truly a minor task! Thanks again, Georgea! Good tips! Reader-suggested RD alternative: TeamViewer
◼ Fred: In your column about RDC, you did not even mention any of the other very easy-to-use RDC applications. TeamViewer (free/paid) is my favorite of them all, works every time that I need it. I always use the Free Version, as my needs for it are just the occasional checking and help support for family and friends. I try to install it myself while I am in front of their PCs, so that I can install the Admin password (mine) that always works in the background … AnyDesk (free/paid) is not reliable; the times it works for me, is below the 25% mark; discarded it. That goes with most of the other RDC utilities that I have seen … always fall back to TeamViewer. I won’t mess with RDC. Too cumbersome to make it work. Thank you and the whole AskWoody team! — John Craig Yes, John, there are many excellent remote-access alternatives. As the original text said, “… if [Remote Desktop] doesn’t work for you for any reason, or if you want more features and security, there are many alternative remote-connection apps available, both free and paid, as this example Google search shows.” Like you, I’ve also used TeamViewer (free/paid) and found it robust and reliable. If I needed frequent or ongoing remote-desktop access and collaboration, that might well be the one I’d choose. But TeamViewer feels like overkill to me for the occasional basic remote-access maintenance, diagnostic, and file-retrieval tasks that I typically do. The free version also has internal limits to deter its use in commercial settings; heavy use of TeamViewer Free may trigger a “you gotta upgrade” warning. In contrast, Google’s Remote Desktop is tiny, free, easy to use, and has no usage caps of any kind. Overall, it just fits my way of working a little better. But alternatives are good! Thanks for writing! Unfair to Windows’ Remote Desktop Connection?
Remote Desktop Connection (RDC) is a specific application of a more general Microsoft technology called Remote Desktop Protocol (RDP). Sometimes, the terms are used more or less interchangeably. ◼ I won’t argue that “RD” is or is not better than RDP, but I think you are bad-mouthing the Remote Desktop Protocol more than it may deserve. 99.99% of the time that I cannot connect using RDP (given network connectivity/visibility between machines, etc.), it’s because I did not enable RDP in the receiving PC and make sure the account(s) I want to use to connect are in fact allowed to use it. The next (and really only) other bump is getting the Network Level Authentication setting set right. As for security, I use RDP only on a LAN or over a point-to-point VPN. As for Remote Assistance, it works just fine. I have yet to have it fail, either locally or 1,000 miles away. The only things I don’t like about it are (1) I can’t copy-and-paste between the two machines, and (2) it does not support dual monitors (switching between two monitors is not “support”). And I do NOT have to put, or coach someone else to put, another piece of software on their computer. — “MHCLV941” You’re luckier than I am. In my experience, first-time Windows’ RDC setups (not reconnects of previous setups) succeed something like 70-80% of the time. And that happy majority then goes on to work smoothly more or less forever. It’s the 20-30% of setups that fail the initial connection that are the problem. Yes, sometimes it’s due to a simple thing — like not enabling RDC in the first place. But many times, there’s simply no end-user-accessible way to see exactly what the problem is, or how to fix it. In my most-recent case of RDC failure, the rest of the peer network worked fine. I could see and access the remote PC’s password-protected shared files and folders, for example. That shows that the connections, permissions, and logins all were OK. I set and reset every relevant user-accessible control, but RDC simply would not connect. Sure, with enough time, I could have figured out what was wrong. But I wasn’t seeking a tech problem to solve — I was just trying to get my work done! At some point, it feels silly to keep investing time chasing down an obscure problem when an instantly available, working, alternative solution exists. There’s almost always more than one way to do things in Windows, which is both a strength (choices!) and a liability (confusion!). Remote desktops are just another example of something that works great for one person but may not work much at all for another. By all means, use whatever works best for you! Reader-suggested RD alternative: RealVNC
◼ Fred: I want professional-grade software on my extensive home network. I’ve found myself using RealVNC (free trial, then paid) more and more these past two years. Costs about $3 per machine per month which is not horrible, pricewise. Yeah, there are free alternatives. But for me, RealVNC is simple to use, with plenty of data encryption options and integration capabilities. To each their own, they say! — “Paladium” Indeed! Thanks for the tip — and thanks to all who wrote in!
Fred Langa has been writing about tech — and, specifically, about personal computing — for as long as there have been PCs. And he is one of the founding members of the original Windows Secrets newsletter. Check out Langa.com for all of Fred’s current projects.
LANGALIST Wait for Windows 11.1
By Fred Langa Microsoft’s incremental rollout of Win11 is continuing — newer, more-compatible PCs are receiving the upgrade now, while older PCs will receive it in the weeks to come. You also can manually upgrade eligible PCs at any time, but note: Microsoft has changed the manual-upgrade methods, including a new Media Creation Tool and new ISO direct-download options. Today’s column covers that and more, including Fred’s very mixed early reactions to the final, shipping version of Win11. Win11: Off to a bumpy start
It’s early days, but after installing (and re-installing, and re-re-installing …) the final, shipping version of Win11, my three initial takeaways are:
And I guess there’s a fourth takeaway, too: Don’t rush into Win11! The improvements are real but mostly minor, while the downsides are also real and maybe not so minor. I think many users might be better served by sticking with Windows 10 until Microsoft releases an improved Windows 11 at some point in the future. Allow me to explain. New hardware, but the upgrade stumbles anyway
I’d previously tried the Win11 Preview builds on my older, daily-driver PC, a more-than-two-years-old, major-brand laptop. (See It’s way too soon to panic about Windows 11, AskWoody Plus, 2021-08-09.) The preview Win11 was promising, but nothing in it seemed “must-have” so I reverted the system back to Win10, to await the final version of Win11. Windows Update still hasn’t offered Win11 to that PC yet — Microsoft stages its automatic upgrade rollouts, starting with the newest and most compatible (and therefore least likely to cause trouble) PCs. My two-to-three-year-old system hasn’t made it to the top of the list yet. But my newer laptop, just a few months old, was recently offered an automatic upgrade via the normal Windows Update process. This Win10 Pro PC is almost brand-new, solid, fast, fully updated, and error-free. Except for the normal superficial personalizations, user files, and such, the PC is unmodified: the core system software is exactly as the OEM and Microsoft set it up to be. As such, this system is just about as close to an ideal test upgrade case as I think you’ll find in real life. So when the Win11 upgrade was offered, I didn’t hesitate: I saved my work, made a full just-in-case system image, and then let Update do its thing. Upgrade attempts #1 and #2
The upgrade process started normally, just like a Win10 upgrade. But the PC seemed to hang when it went to restart itself: I got one of those “This app is preventing shutdown …” notices, but the unclosed app had no name or identifying information; it showed only a generic icon. I couldn’t tell what was causing the problem. After a while, the system did reboot itself but almost immediately generated a “Something went wrong …” blue error screen saying that the upgrade had failed. I certainly wasn’t expecting that — it’d been years since one of my PCs had failed a standard upgrade — so I wasn’t ready to jot down the error code. (Yes, I know: that was dumb of me.) I grabbed my phone to photograph the error message, but the screen cleared before I could snap the shot. While I stood there, feeling foolish, the PC rebooted itself and immediately began automatically rolling back to the previous Win10 setup. Oy. The fully automatic rollback went fine, and the PC was rapidly returned to its pre-upgrade, Win10 state without further incident. But what caused the problem? To investigate, I ran CHKDSK, DISM, and SFC; checked System Health, used the Update Troubleshooter; and ran a full suite of OEM hardware diagnostics. All came up clean. I was flummoxed. With no clues to go on, I had no idea what had caused the upgrade failure — or what to do to prevent it from happening again. Unable to think of a better approach, I made no changes and instead simply reran the Upgrade from within Windows Update. This time, it worked fine. After about 30 minutes, the system was up and running Win11, with my apps and personalizations correctly picked up and carried over. But I couldn’t bring myself to trust the new setup, which had now produced two totally opposite results — an upgrade success and an upgrade failure — despite my changing nothing in between. Something was funky, but what? Rather than roll the dice on a maybe-unstable setup, I decided to take the longer, but more certain route — a full, from-scratch, manual installation. I’d done that many times with Win10, but things have changed with Win11. Changes with ISO downloads, the Media Creation Tool, and live upgrades
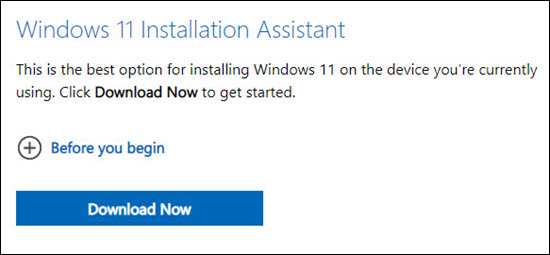
Win10 and Win11 have their own, separate, download pages. Win11’s offers three primary upgrade/download options, compared to the two offered on the current Win10 download page. Here are the three major Win11 options: 1) The Windows 11 Installation Assistant is a small front end that you can download and run locally, on your PC. Once launched, it will attempt to upgrade the PC it’s running on, much like the upgrade option offered through Windows Update (Figure 1).
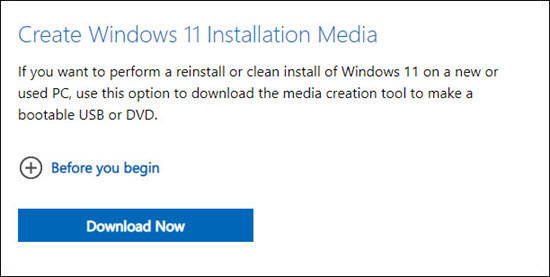
2) The Create Windows 11 Installation Media option lets you download a new, Win11-specific version of the classic Media Creation Tool (MCT). Once launched locally on your PC, the MCT gives you the option of performing an in-place upgrade (much like Installation Assistant, above) or lets you download a bootable ISO file of a Windows setup disc/drive. You can save the ISO file in a safe place; mount it from within your current Windows and run setup from there; or burn the ISO file to a flash drive or DVD to create self-contained, bootable installation/recovery media. See Figure 2.
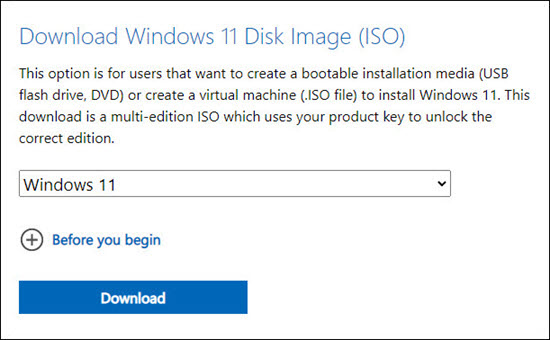
By default, the MCT produces relatively compact ISOs that include only the files your specific PC needs to setup Windows again. 3) A wholly new option, Download Windows 11 Disk Image (ISO), lets you directly download a master ISO of Win11 in one step, without having to first download the Media Creation Tool mentioned above. See Figure 3.
These ISOs are typically larger than the MCT ISOs because they can include all the major Win11 editions (Home, Pro, N, etc.) in one bundled package. Figure 4 shows the file-size difference between two Win11 ISOs I downloaded on the same PC. The file I labeled MCT was produced by the Win11 Media Creation Tool, and the one I labeled DIRECT was produced by the Download Windows 11 Disk Image (ISO) option. As you can see, the latter — which contains multiple editions of Win11 — is about a full gigabyte larger than the PC-specific MCT version.
Despite the size difference, both ISOs work identically. You can save them, mount them, or burn them to a bootable flash drive or DVD. However, in a major departure from past practice, these ISOs now require a product key in order to complete installation. (Previously, you could install keyless, unactivated Windows setups for testing, say, in virtual PCs.) Because these ISOs now require a full, normal, paid-for product key, their use in test, diagnostic, exploratory, and demo setups is limited. But if you want to proceed with the Download Windows 11 Disk Image (ISO) option, click the Before you begin link (Figure 3) for additional good advice and instruction. Once you press Download to trigger this operation, you’ll be presented with several additional menus and buttons toward the bottom of the page; use these to select your language of choice, and to actually begin the download. Upgrade attempt #3 — this time, from scratch
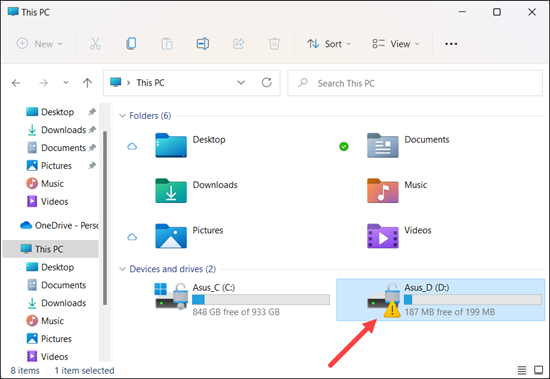
I ended up using the MCT (option 2, above) to reinstall Win11 on the new PC, mainly because that was the most familiar option to me. And indeed, it operated in the utterly familiar fashion, just like the Win10 MCT. When it was done, a fresh and unmodified Win11 was running — but with new problems. Here’s the one that first jumped out at me. My laptop has a 1TB SSD, split mainly between C: and D: partitions, plus the usual assortment of Recovery/Restore and other mandatory partitions. After the upgrade, all partitions were fine except D:, which now appeared with a yellow exclamation-point warning icon to inform me that something’s wrong (Figure 5). But what?
Once again, I ran extensive diagnostics; once again, they showed nothing. Win11’s built-in CHKDSK and drive Error checking (right-click a drive, select Properties/Tools/Error checking) both say the drive/partition D: is OK. The disk has been properly TRIMmed. Win11’s built-in Disk Management tool reports D: as Healthy. The Windows error logs show nothing involving that partition. Various third-party disk health and SMART-monitoring tools all show the disk as fine. The actual files on the disk are all intact and work fine. Jeebus. Is it a false negative — an indication of a problem that’s not really there? Or is there some subtle problem that part of the OS can detect, but that no user-accessible tool or app can find and fix? And if so, what’s the use of that? That brings us up to the present, and I have to say I’m feeling rather frustrated with Win11. I’m not going to trust a setup that’s reporting a drive error from the get-go, so I’ll probably take the short way out — wipe out the partition, let Win11 set it up again, and see what happens. And if that doesn’t work, I’ll completely strip the SSD of all partitions and files, letting Win11 set up everything from the bare metal upward. That would be install attempt #4. I can’t recall the last time a new Windows version took that many tries just to get itself initially installed and error-free on my hardware. But wait! There’s … less?
Although the D: drive issue is bad enough, there are other problematic items, including things that I thought were broken but which turn out to be strange, user-hostile choices made by Microsoft. It’s baffling. One small example: In Win10, changing the size of the taskbar icons takes three clicks. Right-click the Taskbar, select Taskbar settings, and then click Use small taskbar buttons on or off. Click, click, click; you’re done. You can’t do that in Win 11. To change Taskbar icon size, you have to fire up the Registry editor, manually create a new Dword, save the change, and then reboot the PC. After the restart, the taskbar icons will have changed size, but if you want to change them back, you’ll need to manually re-edit the Registry and reboot the PC again. To me, that feels like user-unfriendliness! Or, how about Win11’s truncated context menus? Unlike Win10, which will show you all available right-click options for a given file or folder, Win11 delivers only a subset of options. You have to select a new menu item to reveal the missing options, but that works only on a one-time basis. If you’d prefer to have complete, Win10-style context menus all the time (i.e., as the default), you again have to hack the Registry. Yikes. (I’ll publish the details on these Registry edits in the next newsletter. Meanwhile, check out Lance Whitney’s How Windows 11 changes File Explorer — for better or for worse article in this issue.) With this many issues in the early going, I have to say that Win11 doesn’t feel like progress. Why is setup bumpy on what should be nearly best-case hardware? How is moving from graphical UI tools to manual Registry hacks a step forward? What good does it do to flag supposed drive errors but then provide no way for the user to discover what the error actually is — or what to do about it? This is stuff you might expect in beta versions — not in shipping software. In the next column, I’ll go into more detail on these and other problems (including workarounds, where known), and I’ll also talk a bit more about Microsoft’s strange interface choices for Win11 — a gorgeous, polished graphical UI that seems to deliver less functionality than Win10’s! But until then, please let me restate “takeaway #4” from the top of this column: Don’t rush into Win11! There’s simply no need for haste. The end-user improvements are mostly minor, and the downsides may be not so minor.
Fred Langa has been writing about tech — and, specifically, about personal computing — for as long as there have been PCs. And he is one of the founding members of the original Windows Secrets newsletter. Check out Langa.com for all of Fred’s current projects.
LANGALIST Can you fully delete the Edge browser? Should you?
By Fred Langa The answer is yes, no, and maybe, depending on exactly what you’re trying to do and what risks you’re willing to take. You’ll find the how-to information below. However, because Fred thinks removing Edge is a bad idea, this column also suggests a better, safer way to suppress Edge — a way guaranteed not to cause new problems with other Windows apps and services. But if you understand the risks and still want to remove Edge, here are the background and links you need! Subscriber wants to wipe Edge off his PC
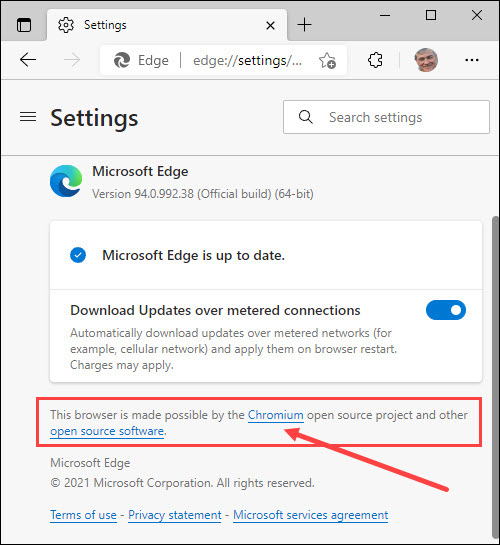
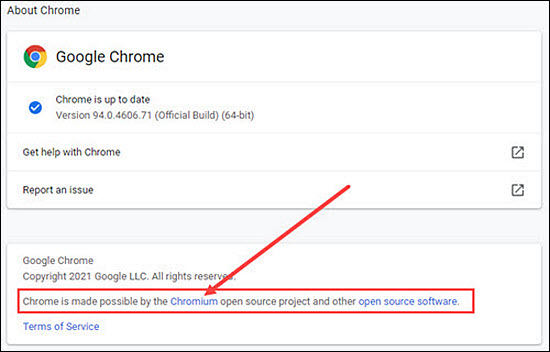
After reading Share browsers without sharing their stored passwords (AskWoody Plus 2021-09-27), a subscriber wrote: ◼ Hi Fred. Thanks for your advice on managing passwords in Edge. I have something Edge-related. I am sick and tired of Edge sticking its nose in where it has not been asked. I have tried to uninstall Edge, but all I seem to be able to accomplish is stuff like removing its icon from the desktop. Can I just get rid of Edge entirely? I have heard it can’t be done. Well, it can be done, kinda-sorta, with varying degrees of risk and efficacy. But before we go there, let’s look at the reasons why you want to remove it. Like you, I’m not a big fan of Edge. But I’m not aware of any independent, third-party assessments that conclude that Edge poses extra or unusual security or privacy risks. Consider: Microsoft Edge is based on exactly the same open-source Chromium project code as Chrome, Opera, and about two dozen other browsers. (See Figures 1 and 2.)
This common, shared codebase is one of the reasons why Edge, Chrome, Opera, and the others are all pretty good browsers. It’s also why it’s hard for me to accept that Edge carries some unique or fundamental security or privacy risks that are absent from all the other Chromium-based browsers. But as I said, I’m not a big fan of Edge. It’s not that I think it’s evil or poor-performing (I don’t; it’s not), but Edge doesn’t offer me enough that’s different or better to make it worthwhile to churn my entire browsing setup. It’s the same reason why I don’t switch to Opera or Firefox or any of the dozens of other perfectly good browsers out there. Minor, incremental differences just don’t justify the hassle of switching, for me. Here’s why you’re not supposed to remove Edge
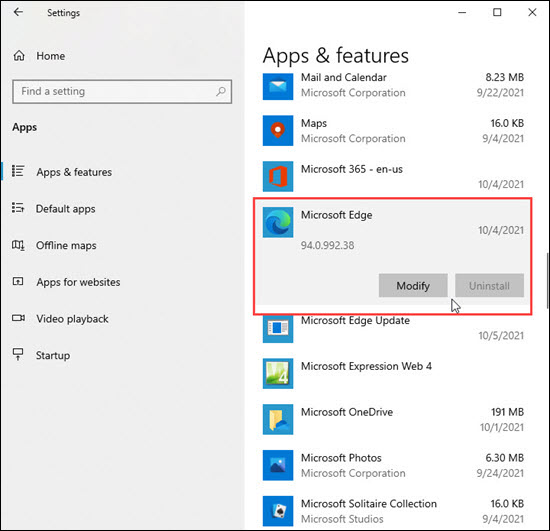
Although I don’t use Edge much, I don’t uninstall it because — although there’s some dispute on this — Microsoft explicitly says not to: Because Windows supports applications that rely on the web platform, our default web browser is an essential component of our operating system and can’t be uninstalled. See the MS support article Why can’t I uninstall Microsoft Edge?. Maybe that’s overstated a bit, but there’s truth to it as well. For example, Edge’s main HTML rendering engine, MSHTML.DLL, is part of the core OS (it’s installed at C:\Windows\System32). That DLL can be called upon by a number of apps, including Office. Those apps may malfunction if, in trying to remove Edge, you also strip out MSHTML and its related OS-level components. Microsoft reinforces this by graying out the Uninstall option in Settings, Apps, Apps & features, Microsoft Edge (Figure 3). All that’s offered there is a Modify button, which simply launches an Edge repair tool. There is no uninstall and no official way to meaningfully alter Edge’s fundamentals.
Yet you’ll see many sites claiming various manual methods of successful Edge removal. What’s going on? Waitaminit — it can be removed?
Part of the confusion about Edge’s uninstall-ability lies in its origins. Recall that Edge began life in 2015 as a completely proprietary browser, designed to replace the fragile house of cards known as Internet Explorer (IE). Like IE, the original Edge was a mix of OS-level Web access, HTML, scripting, and graphics-display functions; plus higher-level browser functions; all written in-house, and all proprietary. This version of Edge was originally made available as an optional, stand-alone package that you could download and install separately from the OS. As such, it could be uninstalled — much like other non-OS-level apps. Some sites (too many, actually) that talk about “how easy Edge is to remove” are still referring to this old, now discontinued version. In 2020, Microsoft moved some of the deeply enmeshed components of the previous Edge into the OS itself and released the new, Chromium-based Edge to handle most of the high-level browsing functions. This latter, current Edge is now bundled as part of the base Windows 10 operating system. Today, the better “how to remove Edge” instructions focus on neutering, disabling, or removing those high-level elements, while trying to leave the shared code alone. That’s not easy, because Edge’s components are scattered far and wide throughout the system. For example, even a brand-new Win10 setup, fresh from the box, will usually contain multiple copies of the current MSHTML engine and its related files — as well as multiple copies of the old EDGEHTML and its related files, distributed among the …\Windows\system32, …\Windows\Servicing, …\Windows\WinSxS, and …Windows\SysWOW64\ folders, and maybe elsewhere. (The old EDGEHTML components are included even in new setups, for backward compatibility.) And I’m not talking about a few files. My fully current, well-maintained, daily driver Win10 PC contains, by actual manual count, 99 copies of the current MSHTML.DLL and its related files; and 30 copies of the old EDGEHTML.DLL and variants! Other PCs I’ve examined show similar counts. I don’t see how anyone outside of Microsoft — and maybe not even them, anymore — can definitively say “removing this or that specific piece of Edge will have no effect on anything else.” And, in fact, as we saw earlier, Microsoft explicitly says just the opposite! To me, trying to deeply mess with Edge is the kind of unauthorized alteration that might seem to work initially or on the surface but will come back to bite you at some future point when an app or update or upgrade mysteriously fails due to the absence of some expected component. That’s why I don’t uninstall Edge, and I recommend that you don’t, either — who needs an extra, unknown variable in their system software mix? The better, safer way to neuter Edge
OK, this will seem like a non sequitur but will become relevant in a sec. Recall that all current versions of Win10, including the one you’re using right now, still ship with a copy of Internet Explorer (IE) built in. (See Use Internet Explorer in Windows 10.) I hope you don’t use IE — it’s notorious for its myriad security and privacy issues. But despite that, odds are good IE has never caused your Win10 setup any trouble at all — because you likely never set it up or used it! (Only about 1% of users still use IE.) And here’s the point: Inert, un-set up software can’t do you much harm. You don’t have to rip it out by the roots! So, similarly, if you distrust or dislike Edge, the best andsafest approach is to treat it the same way you’re already treating your copy of Internet Explorer: don’t set it up (or, if it’s already set up, un-set it up — you’ll see how in a sec), and then just ignore it. That way, any shared Edge components will still be there if some app or update ever needs or expects them, but the browser will otherwise be inert, unused, and harmless — just like your built-in copy of IE is right now! Here’s one way to neuter your current copy of Edge in Win10:
At this point, Edge will still be on your system, but it’s now out of the way and can be accessed only by indirect means (e.g., typing Edge into the search box). It will remain inert unless you specifically go looking for it and click to run it. And again, this is more or less how you’ve successfully lived for years with the copy of Internet Explorer built into Win10. It’s there if needed but is otherwise inert and harmless. No need to rip it out by the roots! So, you feelin’ lucky …?
OK, my conscience is clear. I tried to talk you out of it. But if you still want more aggressive options, and are OK with rolling the dice in performing an operation that Microsoft explicitly says not to do, here you go:
If you prefer not to rely on luck …
If you don’t like Edge and also don’t want the potential problems caused by its removal, simply ignore it! Following the steps outlined above, return Edge to its original, never-used state, remove its easy access links, and then simply forget about it, just as you already (successfully! harmlessly!) have been doing for years with Internet Explorer!
Fred Langa has been writing about tech — and, specifically, about personal computing — for as long as there have been PCs. And he is one of the founding members of the original Windows Secrets newsletter. Check out Langa.com for all of Fred’s current projects.
The AskWoody Newsletters are published by AskWoody Tech LLC, Fresno, CA USA.
Your subscription:
Microsoft and Windows are registered trademarks of Microsoft Corporation. AskWoody, AskWoody.com, Windows Secrets Newsletter, WindowsSecrets.com, WinFind, Windows Gizmos, Security Baseline, Perimeter Scan, Wacky Web Week, the Windows Secrets Logo Design (W, S or road, and Star), and the slogan Everything Microsoft Forgot to Mention all are trademarks and service marks of AskWoody Tech LLC. All other marks are the trademarks or service marks of their respective owners. Copyright ©2022 AskWoody Tech LLC. All rights reserved. |
||||||||||||||||||||||||||||||||||||||


Plus Membership
Donations from Plus members keep this site going. You can identify the people who support AskWoody by the Plus badge on their avatars.
AskWoody Plus members not only get access to all of the contents of this site -- including Susan Bradley's frequently updated Patch Watch listing -- they also receive weekly AskWoody Plus Newsletters (formerly Windows Secrets Newsletter) and AskWoody Plus Alerts, emails when there are important breaking developments.
Get Plus!
Recent Topics
-
We live in a simulation
by 3 hours, 26 minutes ago
-
Netplwiz not working
by 2 hours, 48 minutes ago
-
Windows 11 24H2 is broadly available
by 15 hours, 54 minutes ago
-
Microsoft is killing Authenticator
by 14 hours, 28 minutes ago
-
Downloads folder location
by 22 hours, 21 minutes ago
-
Remove a User from Login screen
by 1 hour, 32 minutes ago
-
TikTok fined €530 million for sending European user data to China
by 13 hours, 27 minutes ago
-
Microsoft Speech Recognition Service Error Code 1002
by 13 hours, 29 minutes ago
-
Is it a bug or is it expected?
by 18 hours, 7 minutes ago
-
Image for Windows TBwinRE image not enough space on target location
by 12 hours, 37 minutes ago
-
Start menu jump lists for some apps might not work as expected on Windows 10
by 1 day, 12 hours ago
-
Malicious Go Modules disk-wiping malware
by 1 day, 2 hours ago
-
Multiple Partitions?
by 1 day, 2 hours ago
-
World Passkey Day 2025
by 1 day, 20 hours ago
-
Add serial device in Windows 11
by 2 days, 11 hours ago
-
Windows 11 users reportedly losing data due forced BitLocker encryption
by 12 hours, 20 minutes ago
-
Cached credentials is not a new bug
by 2 days, 16 hours ago
-
Win11 24H4 Slow!
by 2 days, 16 hours ago
-
Microsoft hiking XBox prices starting today due to Trump’s tariffs
by 2 days, 13 hours ago
-
Asus adds “movement sensor” to their Graphics cards
by 2 days, 18 hours ago
-
‘Minority Report’ coming to NYC
by 2 days, 14 hours ago
-
Apple notifies new victims of spyware attacks across the world
by 3 days, 3 hours ago
-
Tracking content block list GONE in Firefox 138
by 3 days, 2 hours ago
-
How do I migrate Password Managers
by 2 days, 10 hours ago
-
Orb : how fast is my Internet connection
by 2 days, 12 hours ago
-
Solid color background slows Windows 7 login
by 3 days, 14 hours ago
-
Windows 11, version 24H2 might not download via Windows Server Updates Services
by 3 days, 13 hours ago
-
Security fixes for Firefox
by 14 hours, 29 minutes ago
-
Notice on termination of services of LG Mobile Phone Software Updates
by 4 days, 1 hour ago
-
Update your Apple Devices Wormable Zero-Click Remote Code Execution in AirPlay..
by 4 days, 10 hours ago
Remembering Woody
