
|
Patch reliability is unclear, but widespread attacks make patching prudent. Go ahead and patch, but watch out for potential problems. |
|
ISSUE 16.21.0 • 2019-06-10
The AskWoody Plus Newsletter
In this issue WINDOWS 10 1903: How to work and play in Win10’s new Sandbox BEST OF THE LOUNGE: The new Windows Update explained LANGALIST: Test-driving Intel’s Optane in a new PC BEST UTILITIES: Freeware Spotlight — Graph Paper Printer CLOUD STORAGE: Finding your photos in the cloud Windows 10 1903 How to work and play in Win10’s new Sandbox
First offered with the Windows 10 May 2019 Update (aka Version 1903), the new Sandbox feature provides users a safe, protected area to install and run untested programs. Trying out new software is great, but installing and running unknown, untested, or possibly unsafe applications could present a significant risk to your Windows environment. One of the better safeguards is sandboxing (Wikipedia), which isolates apps from the rest of your system. Various types of software use some sort of sandboxing — for example, virtual machines are “sandboxed” (i.e., kept separate) from the core host OS. (Sandbox is in essence a virtual machine.) Now, with Win10 Version 1903, you can play in your own sandbox. One caveat: Win10 Sandbox is available only in Professional, Enterprise, and Education editions — Win10 Home users are out of luck. Sandboxing is ideal for testing applications you might not want to keep around. When you’re done using an app, you simply close Sandbox — and it all goes away. Note: if you haven’t upgraded to Win10 1903, you can grab it in a couple of ways. First, open Settings/Update & Security/Windows Update. Next, click Check for updates and then keep an eye out for the update. (Microsoft is slowly rolling out Version 1903, so it may not be available for your PC just yet.) The alternative path is to open your browser and head to Microsoft’s Windows Update page. Once there, click the Update now button to manually download and install the May release. For Sandbox to work, Win10 virtualization must be enabled. To check, right-click the Taskbar and select Task Manager. Next, click on the Performance tab. (If you don’t see the tabs, click Task Manager’s More details link.) In the list of system stats, make sure the entry for Virtualization shows “Enabled.” If virtualization is off, you’ll have to shut down your system, enter BIOS, and change it in the CPU settings. Next, you’ll need to add Sandbox as a Windows feature. Enter “turn windows features on or off” in the search box and pick the app from the search results. (Or open Control Panel and click the “Turn Windows features on or off” link.) Scroll down the list in the Window Features box that pops up and check Windows Sandbox (see Figure 1). Click OK. In order to complete the Sandbox-setup process, you’ll now have to reboot your PC.
To run Sandbox, simply type Windows Sandbox in the Search field, or open the Start menu and scroll down the Apps list to Windows Sandbox. In either case, right-click the entry and select the option to Run as administrator (see Figure 2).
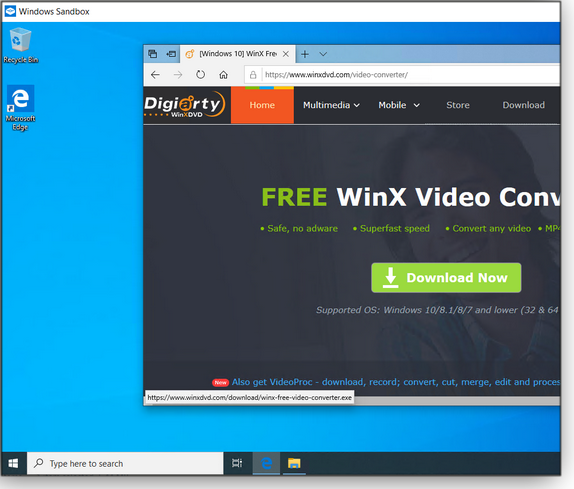
When Sandbox opens, you’ll see a bare-bones virtual installation of Windows. Remember: What happens in Sandbox stays in Sandbox — it won’t affect the rest of your system. Now, let’s say there’s a particular application you want to use in Sandbox. If you’ve already downloaded the install file for that software, you can simply copy-and-paste it from your host Windows environment to Sandbox via File Manager. Otherwise, open Microsoft Edge in Sandbox and download the application (see Figure 3).
Next, install and run the application, just as you would with any standard Windows program (see Figure 4).
Remember that a sandbox session isn’t completely isolated from the rest of your Windows environment — you can copy files back and forth, between Sandbox and your host Windows. Moreover, Sandbox acts like any other Windows application; you can maximize its window, minimize it to the taskbar, and restore it. Moreover, the Sandbox environment has its own Start menu, so you can restart or shut down a Sandbox session via the usual controls. Just remember: If you do a reboot or end a session, any applications you installed or changes you made will be lost. That’s the whole point of Sandbox! The next time you launch Sandbox, you’ll have another clean and pristine virtual session in which to work and play.
Lance Whitney is a freelance technology reporter and former IT professional. He’s written for CNET, TechRepublic, PC Magazine, and other publications. He’s authored a book on Windows and another about LinkedIn. Best of the Lounge The new Windows Update explained
AskWoody MVP Joe summarizes the changes to Windows Update in Win10 Version 1903 for Home, Pro, Enterprise, and Education editions. For a more in-depth explanation, Joe recommends reading Ed Bott’s ZDNet article. And be sure to join the discussion in the AskWoody Lounge. Code Red — Security/Privacy advisories Billing details for 11.9M Quest Diagnostics clients exposed
Plus — Warning: Win10 apps open banner ads with fraudulent webpages Check out these two important security postings: @Nibbled To Death By Ducks alerts us to a massive data breach, and @gborn reports on a new way that malware could find its way onto our Win10 PCs. Be aware and follow the second rule of online browsing: “Don’t click on that!” (What’s the first rule? Use robust passwords, of course.) Firefox @Charlie posted a question about the new Firefox 67.0.1 — and gets firsthand feedback from those who have already installed it. Responses also include information on Tracking Protection, Facebook Container 2.0, and where to look for additional security settings. Rants AskWoody MVP @Bluetrix’s rant has a personal take on just how those three topics interconnect — and gives us all a laugh. Well worth a read — or re-read — any time we start to take our computers and Windows updating too seriously. Anyone else having jealousy issues when referring to Susan? Office 365 Upon seeing a new dialogue window open in Word, @richardbarret questions how and why the change occurred … and gets some great answers. Now, what’s he going to do about OneCloud? Mac OS for Windows Wonks @Nathan Parker summarizes the many announcements made at the recent Apple developers conference, and @Alex5723 zeros in on a news feature for locating lost or stolen Apple devices. PC Hardware Had a hurricane, tornado, flood, fire, or earthquake leave you feeling powerless? An uninterruptible power supply (UPS) is fine for power fluctuations or brief outages, but @MrJimPhillips decided that a gas generator is the best option for keeping his work computer connected through longer disruptions. Join those discussions and many others on AskWoody.com. If you’re not already a Lounge member, use the quick registration form to sign up for free. LANGALIST Test-driving Intel’s Optane in a new PC
By Fred Langa Can Optane really deliver on Intel’s claim of “SSD-like responsiveness from a conventional spinning-platter drive?” A brand-new PC with a factory-installed Optane system presented a great opportunity to find out — and to discover how benchmark tests can vastly differ from real-life use! Taking the new-PC plunge – Part 2
I admit it: I was nervous! It had been quite a while since I last researched PC specifications and picked out a new machine. But I really had no choice; my old system was becoming an impediment to getting work done. It would periodically bog down and become slow responding to commands — and sometimes it was even sluggish registering keystrokes! In last week’s LangaList column I told you why: Although my old notebook PC’s SSD and graphics were OK, its 8GB of RAM was maxed out and not practical to upgrade. Also, its fixed CPU was showing some serious strain. Even if RAM and CPU upgrades had been feasible, it was likely some other part might soon fail on the aging machine. So the obvious solution was to bite the bullet and purchase a new PC. I won’t dwell on my choice of brand or model; your needs and preferences might be wildly different from mine. Moreover, by the time you read this, the mix of available system options could be quite different from what I found. That said, when buying a new machine, some factors are universal — and relatively well known. See, for example, PCWorld’s “The top 10 things to consider when buying a new laptop” article, CNET’s “How to buy a desktop computer” story, Komando.com’s “Things you need to look for when buying a new computer” post, and so on. Taking into account those general factors plus the system-specific issues discussed in part one of this series, I started shopping. The initial rough specs
The broad strokes were easy: To ensure the new PC could comfortably support my most intensive tasks (running multiple virtual machines at the same time), I’d want between 16GB and 32GB of system RAM, at least an eighth-generation Intel Core i7 CPU (e.g., i7-8xxxx), and a large SSD. Naturally, I’d want a fully up-to-date mainboard and ancillary hardware — at least 802.11ac Wi-Fi, Bluetooth 4 or 5, USB 3+, and so forth. I focused on notebooks/laptops because they tend to be more energy-efficient than desktop systems. They also have their own built-in uninterruptible power supply (UPS) — the system battery. I prefer large laptops: models with a 17-inch screen for lots of visual elbow room, without having to jump between virtual desktops. I use my laptop mostly for office-type tasks that don’t really require ultra-high graphics resolution. I assumed quad or wide quad resolution (i.e., 2560 by 1440 pixels) and a standard graphics engine would be fine for routine, 2D office-app use. I’m not a big gamer, but I’d also want at least some decent 3D capability as a means of delaying the new system’s future obsolescence — if or when 3D becomes more central to what I do. And of course I wanted a Win10 system that’s fully current. I confined my search to major hardware brands to help ensure ongoing warranty coverage and support (for example, timely software-driver updates). And, I’m not embarrassed to say, I wanted something that wouldn’t cost a fortune. Again, your choices might be completely different, but now you know what influenced my decision. A last-minute curve ball: Intel Optane for free?
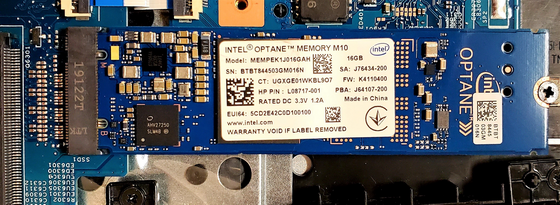
After hours of comparison shopping, I found a fully current, 16GB, 17-inch laptop that seemed to meet my requirements. It also offered something unexpected: The vendor was running a sale that, in essence, offered a free hard-drive bundle comprising an Intel Optane board and a conventional 1TB Seagate HDD. I didn’t know much about Optane, but it sure sounded intriguing (Intel info): It’s essentially a large, fast, aggressive, and non-volatile disk cache Intel claims can yield “SSD-like responsiveness” from an ordinary, spinning-platter hard drive. Hmmm — a 1TB SSD might add a lot to the price of my new machine. The speed comes from Optane’s proprietary “3D XPoint” chips (info), where memory cells are literally stacked in layers inside each chip, yielding a memory package that’s faster than a classic SSD but slower than RAM chips. Most important, Optane’s chips retain data when powered off. Those chips (mostly in 16GB and 32GB configurations), along with some other proprietary firmware, fit on a single, compact PCIe board. Configuration and management of the whole Optane setup is handled by additional drivers and software (e.g., Intel’s “Rapid Storage Technology”; info). Here are the weird parts about Optane
The first major weirdness is this: Optane acts as a software-coupled front end to the system’s hard drive, completely taking over the drive’s routine operations. To the OS, Optane and the hard drive appear as a single device. This tight logical coupling helps improve Optane/HDD performance, but it also raises maintenance issues. For example, an Optane-fronted HDD cannot be serviced by Windows Disk Optimizer. (I’ll come back to this point in the next article in this series.) In use, Optane initially acts like any other cache: When you launch a program or call for a file, Optane loads the data from the HDD and delivers it to the OS, while retaining a copy of the data in memory. The next time you request the same program or file or data, Optane delivers the bits from its almost-RAM-speed chips, skipping the relatively slow hard drive completely. Thus, repeated data-read accesses are hugely sped up. But unlike a normal cache, Optane memory is non-volatile. In theory, your most-frequently used apps and data can remain in Optane’s high-speed cache indefinitely, even surviving reboots and power-offs. That’s interesting tech, I thought — so I took the plunge. My new Optane-equipped laptop arrived a few days later. Of course, I just had to peek inside the new machine. Figures 1 and 2 show the Optane board and its location.
Benchmarking Optane in the new PC
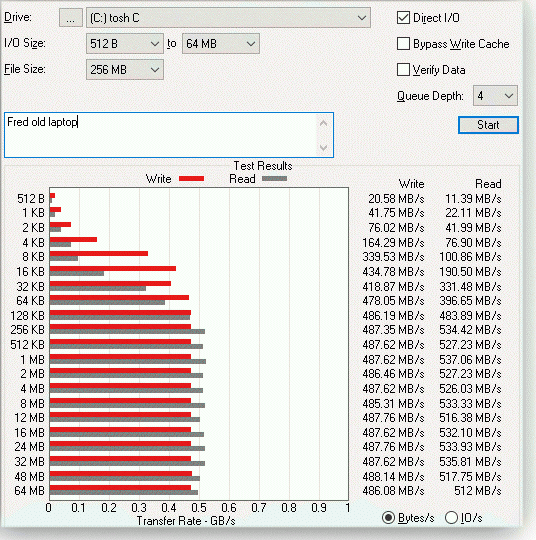
To make sure the PC was working properly, I let the HP and Windows out-of-the-box software set up and update the system. I held off loading my own software or making any changes to the factory-equipped hardware configuration. When the digital dust settled, I ran the first of what would eventually total over two dozen benchmark tests. I generally prefer whole-system tests such as PassMark (info) because no PC subsystem truly exists in isolation. You’ll see the PassMark results later in this series, but for quickly comparing the general performance of drive systems, I used a more-focused tool: the Atto disk benchmark (info). The initial Optane tests appear below. To have a basis for comparison, I first benchmarked my old laptop’s SSD system. As Figure 3 shows, it’s pretty speedy, with typical read/write speeds around half a gig per second across a wide range of test-file sizes.
I then benchmarked the new PC’s Optane system. The results were impressive — and very odd! See Figure 4.
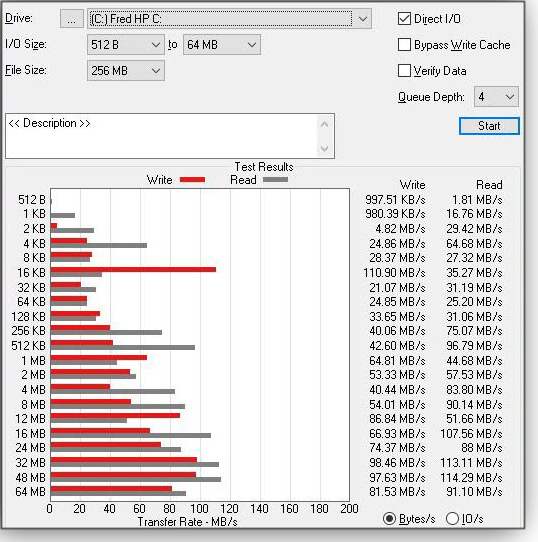
To better understand what I was seeing, I disabled the Optane system and re-ran the disk benchmarks just on the new PC’s HDD. Without the Optane speed-up, HDD performance dropped by an order of magnitude! See Figure 5. (Note that the scale changed from gigabytes in Figures 3 and 4 to megabytes in Figure 5!)
Clearly, Optane was a huge help for the HDD. I re-enabled Optane, verified it was working, and then followed Intel’s suggestions for wringing out a bit more speed. A Windows tweak for better drive performance
Intel suggests a classic Windows speed-up trick: disabling write buffer flushing. That trick works on any type of drive — Optane, HDD, SSD, or whatever. But there’s a big catch. Write-buffer flushing normally helps protect your data by preventing it from sitting in a cache/buffer too long, where it’s vulnerable to problems. For example, if your PC loses power during a disk-write operation, when the data is in a write cache/buffer but before it’s written to the drive’s platters or cells, the data will be lost. So write-buffer flushing is generally a good thing — except that it’s an extra step that exacts a noticeable drive-performance penalty. Some PCs don’t really need write-buffer flushing. For example, laptops (whose always-present battery acts like a UPS) and desktop systems with an attached UPS device are inherently protected from sudden, external power loss. On systems such as those — and only those systems — you can turn off or disable write-buffer flushing to gain some extra speed with little extra risk (TechNet discussion). Because my new system is a battery-equipped laptop, I elected to disable write-buffer flushing. It’s easy: Open Device Manager (e.g., type device manager in the search box), click to open the Disk drives listing, and then right-click the drive whose settings you wish to modify. Select Properties, click the Policies tab, and then click to enable Turn off Windows write-cache buffer flushing … (see Figure 6).
When I re-ran the Atto benchmarks with write-buffer flushing disabled, the drive’s performance increased by around 10 percent in many of the tests (see Figure 7).
Unfortunately, because Optane operates as a proprietary black box, there’s no way to know how much of that increase was due to persistent-cache effects, and how much was from the disabled buffer-flushing. Still, a 10 percent increase was a nice little boost. It really seemed that the Optane system could deliver read speeds about twice as fast as my old SSD! I was pumped — and eager to start using the new PC in my normal work. With twice the RAM of my old system, a faster CPU, and Optane’s blistering read speeds, I expected the new system to be bottleneck-free and a pleasure to use. I was wrong — very wrong! For my usage patterns, Optane’s excellent benchmarks bore scant relation to its real-world performance. In fact, the Optane system was actually the new PC’s single worst performance bottleneck, causing major slowdowns during my peak workloads. What the heck was going on? Figuring that out and correcting the problems took some doing. But it was deeply instructive. I believe that Optane can work in many configurations and situations. Sadly, I now know it’s absolutely the wrong technology for my needs. You’ll see the details, and my “Plan B” solution, in the next installment of this series. Stay tuned!
Fred Langa has been writing about tech — and, specifically, about personal computing — for as long as there have been PCs. And he is one of the founding members of the original Windows Secrets newsletter. Check out Langa.com for all Fred’s current projects. Best Utilities Freeware Spotlight — Graph Paper Printer
Everyone knows a teacher. Some of you do IT for schools. Today we’re going to make some teachers very happy! Graph Paper Printer (GPP) is a freeware tool written by French developer Philippe Marquis. This tiny and portable program lets you print all sorts of graph-paper styles, from simple squares to music manuscripts to … well, I have no idea what some of the styles are used for. Sure, there are probably dozens of similar utilities out on the Web — but GPP is quick, easy, and very flexible. The app works on every version of Windows from Win95 to Win10. When you first run GPP’s executable, it simply asks where you want to place its extracted files, such as on the default C:\ or on a flash drive. It’ll also ask whether you want to create a desktop shortcut or a Start Menu item (see Figure 1).
I found the next screen to be very cool. Some people remember how freeware is supposed to be — a way to broadly share creative work.
Once the program loads, simply choose the type of paper you want to print (see Figure 3). I’ll be very impressed if you know what all these styles are used for.
In a moment of nostalgia, I tried dot paper. When I was an elementary-school teacher, my students loved the make-a-square game — you know, where each player adds a line to try and make a square? And when all the dots are connected, the player with the most squares wins? At the bottom of the utility are numerous settings for customizing your graph paper. Note that the settings will change with different graph styles. Figure 4 shows the options for dot paper — vertical and horizontal spacing of dots, dot size, and color. Once you set these, you can click “Keep as personal paper” to save it for future projects.
Figure 5 shows other settings, such as Margins, Printer setup, and Configuration for global settings (see Figure 6). And be sure to check out the Help button for instructions on using the app.
All these options should give GPP broad appeal. One of my kids, a chemistry grad student, might find the log sheets useful, while my musicology grad should like the music sheets (Figure 7).
I hope you find Graph Paper Printer useful — most of my teacher friends did. Head over to our OlderGeeks.com page to download a copy.
Deanna and Randy McElveen are celebrating 20 years in the computer business, seven years running OlderGeeks.com and 26 years of putting up with each other. Their computer store is in a small town in the Missouri Ozarks. Believing that happy customers are always the best advertisement, they hope to do it for another 20 years. CLOUD STORAGE Finding your photos in the cloud
Have you ever wanted to bring up a particular photo or two (or eight) on your smartphone? Maybe you want to revisit your last vacation or your child’s wedding. Or perhaps you want to show off photos of your grandchildren — but not too many … you don’t want to annoy people. Problem is, your photos are mostly on your PC — and, to keep them safe, in some form of cloud storage. Undoubtedly you have hundreds, perhaps thousands of images. How do you find the ones you want? In a previous Windows Secrets article, I explained how to organize and find photos with tools that come with Windows. Today, I’ll explain how to find photos in three of the most popular cloud-storage services: OneDrive, Google Drive, and Dropbox Android. If you’ve bothered to organize your photos at all, you might have simply placed them into folders. For example, a folder containing all your pictures from last year’s vacation should be easy to find. On the other hand, if you want to find photos of particular people or pets, possibly scattered across dozens of folders, that’s considerably more complicated. A few words of warning: Searching through pictures online via your phone can not only be time-consuming, it can also push you over your phone’s data cap. You may want to do your searching only where you have Wi-Fi. You might notice that many of the photos in this story feature cats. Human members of my family don’t always enjoy having their faces published. Cats never quibble — at least about being photographed. Here’s how to make locating images in the cloud a bit easier. Playing tag with OneDrive
In the aforementioned article on using Win10’s photo tools, I discussed the use of tags to quickly and easily find photos on a PC. Surprisingly, of the three cloud-storage services covered here, only OneDrive lets you search via tags. In fact, OneDrive is tag-crazy. It looks at every photo and generates tags such as #Sky, #Buildings, #Color, and #People. If you leave OneDrive to its own devices, you could end up with hundreds of useless tags. Figure 1, for example, shows some I really didn’t want.
So I recommend turning off OneDrive’s automatic tagging — preferably before you’ve uploaded a single photo. (Yes, I know: too late!) This is a problem you want to correct in Windows, not on your phone. Here’s how:
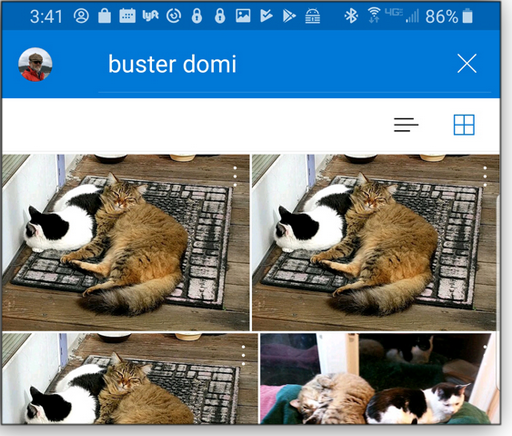
You now have full control over tags attached to your images. But to make tags really useful, you’ll have to be diligent about adding them as you upload pictures to the cloud. (Note: The following instructions assume you’re using an Android phone. The steps on an iPhone can be slightly different, and some options are missing.) Ready to find specific OneDrive-stored images through your phone? Open the app and tap the Photos icon at the bottom, then the Tags tab at the top. (On the iPhone, click See More and then Tags.) Don’t bother to scroll through all those assigned tags; instead, tap the search icon in the upper-right corner and type your desired tag. You can even type two or more tags to find the photos that include only those tags. For instance, I could type “buster domi” to get photos of two cats (see Figure 3).
OneDrive also creates albums on its own that are about as useless as the auto-created tags. Luckily, OneDrive doesn’t make hundreds of them — I found only three. The better approach is to create your own albums on the PC and then view them on your phone. On the OneDrive website, select Files and then any folder of pictures. Right-click the folder and select Create album from folder. Back on your phone, open OneDrive and tap Albums, then select the album you want to view. Note that you can right-click any image in Photos and add it to an existing album. (You can also edit tags.) Recognition in one of two Google apps
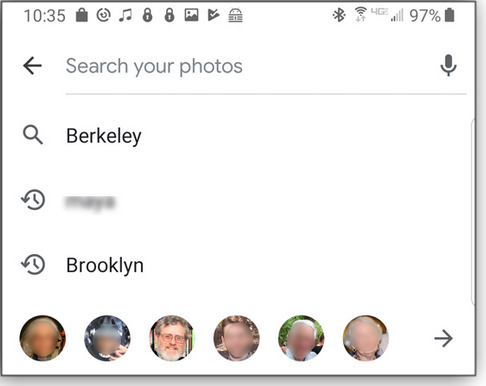
The Google app known simply as “Drive” is a handy place to store images (and other files), but it doesn’t do much when it comes to finding photographs. You can open your “Photos” folder and find … more folders. You can search for someone’s name, but you’ll get only photos where the name is part of the filename. That’s not very useful. Search for something like “Brooklyn,” and you might get photos taken in Brooklyn. My search turned up three pictures from Manhattan (two of them had the word “Brooklyn” in the photo), four that were actually shot in Brooklyn, and three taken in my California backyard. In short, if you want to find photos on your phone, don’t bother with the Drive app. Use the vastly more powerful Google Photos app, which uses facial recognition and other tools to easily help you find your photos. It may already be on your phone. No surprise: On my Android it’s the default photo app. Google Photos has its own cloud-based storage site, separate from Google Drive. You can upload an infinite number of photos for free, but there’s a catch — Google reduces the resolutions considerably. You get inferior versions of your photos. The good news: If you’re paying for enough storage in Google Drive, you can connect the two services. You can have your full-resolution photos and Google Photos’ powerful searching tools. Here’s how: Open Google Photos in a browser on your PC, click the three-bar menu icon in the upper-left corner, and select Settings. The first option is Upload size for photos & videos; select Original, as shown in Figure 4. Also, note the warning that the images will now count against your Google Drive cap.
So what makes Google Photos such a useful tool? Let’s start with its ability to recognize faces. On your phone, tap the Search your photos field at the top of the screen. Along with other options, you’ll see a row of very tiny facial close-ups. Tap one, and you’ll get photos of that person (see Figure 5).
Better yet, tap the arrow to the right of the row of people: you’ll get a screen full of close-ups — all in decent-sized thumbnails. Tap one, and you’ll get not only photos of that person (or pet) but also an option to give that face a name. There’s also an Improve search results option that lets you correct any errors made by Google (see Figure 6).
How good is Google’s facial recognition? Without coaching, Google Photos recognized all of the following as me.
But not this one:
It also recognizes particular dogs and cats. Google Photos does more than recognize a single face. Search for two names such as “Lincoln” and “Buster,” and you’ll get only photos that have both. And Google’s recognition skills aren’t limited to people and pets. Search for NYC, for example, and your photos of New York City come up. You can find photos by searching for categories such as hiking, dancing, and even costume. The results aren’t always accurate; among other mistakes, it thought I was wearing a costume at my daughter’s bat mitzvah. Google Photos has other potentially significant flaws. It ignores your Windows folders entirely and creates its own. And you can’t create albums. It also removes your tags and doesn’t create new ones based on the service’s recognition tools. If your photos are organized in Google Photos, you’re stuck with Google Photos. Dropbox simply isn’t the right tool
Compared to OneDrive and Google Drive, Dropbox (more info) doesn’t cut it when it comes to searching for specific photos on your phone — or on your PC, either. Once you open the Dropbox app on a phone, you tap the menu icon in the upper-left corner and select Photos. From there, you get two tabs: Photos and Albums (see Figure 9). The default Photos view shows every image file in Dropbox, in chronological order, grouped by month. Folders are ignored. And there’s no search feature of any sort.
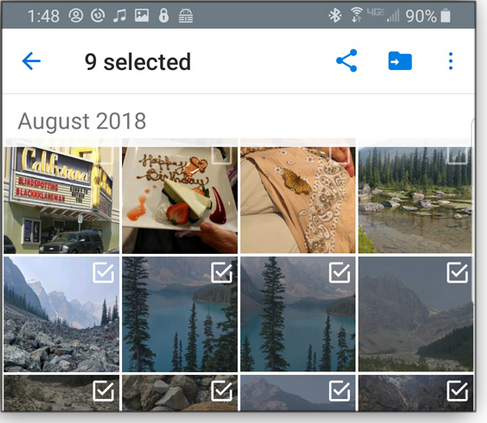
The Album tag will probably be empty. You can create albums on your phone, but they’re only on the phone; the website knows no albums. To create an album on your phone, tap the checkmark icon in the upper-right corner. That will provide an empty checkbox in each photo thumbnail. Check the photos you want in the album, as shown in Figure 10. Next, tap the three-dot menu icon in the upper-right corner and select Add to album. You can choose an existing album or create a new one.
You can search for an image by filename. Tap the menu icon in the upper-left corner and select Files. Enter a search string, and you’ll receive a list of files with that string in their filenames. You can search within a particular folder, but like Google Photos, Dropbox ignores tags. Unlike Google, Dropbox doesn’t care about the contents of files — again, it looks only at filenames. And really, how often do you rename your files to something usefully descriptive? Dropbox is focused on storage and synching (and trying to upgrade you to the business version). It’s not really built for finding and showing photographs. If you’re an advanced photographer, you might use it in conjunction with another app such as Adobe Lightroom because it doesn’t mess with your folders or the resolution of your images. To Dropbox, they’re just files. Bottom line: For searching and viewing cloud-stored photos on an Android phone, both OneDrive and Google Drive offer much better tools for the job than Dropbox. And if you use an iPhone, you’ll probably want to stick with the native Photos app and iCloud.
Lincoln Spector writes about computers, home theater, and film and maintains the blog Bayflicks.net. His articles have appeared in CNET, InfoWorld, The New York Times, The Washington Post, and other publications. Publisher: AskWoody LLC (woody@askwoody.com); editor: Tracey Capen (editor@askwoody.com). Trademarks: Microsoft and Windows are registered trademarks of Microsoft Corporation. AskWoody, Windows Secrets Newsletter, WindowsSecrets.com, WinFind, Windows Gizmos, Security Baseline, Perimeter Scan, Wacky Web Week, the Windows Secrets Logo Design (W, S or road, and Star), and the slogan Everything Microsoft Forgot to Mention all are trademarks and service marks of AskWoody LLC. All other marks are the trademarks or service marks of their respective owners. Your email subscription:
Copyright © 2019 AskWoody LLC, All rights reserved. |

 By Lance Whitney
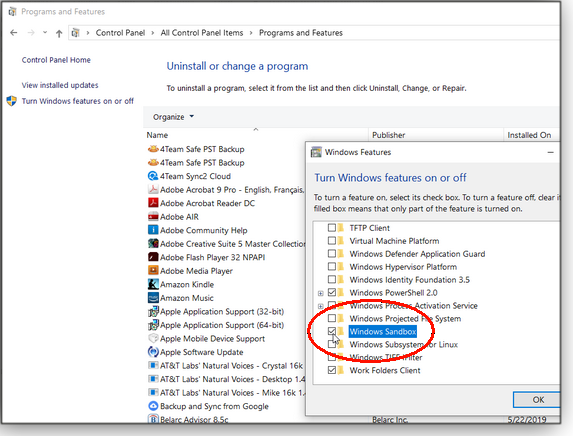


 By Deanna McElveen
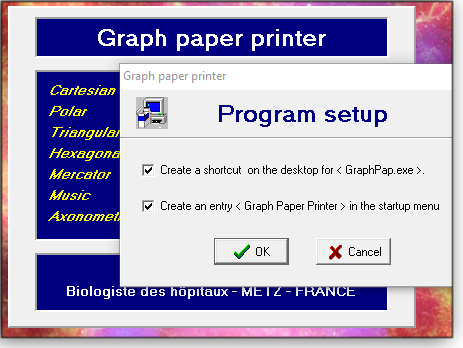


 By Lincoln Spector
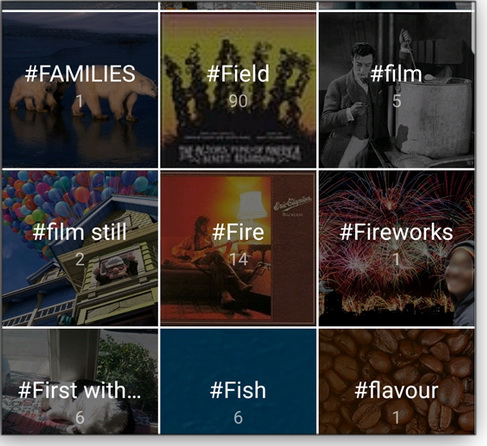


Plus Membership
Donations from Plus members keep this site going. You can identify the people who support AskWoody by the Plus badge on their avatars.
AskWoody Plus members not only get access to all of the contents of this site -- including Susan Bradley's frequently updated Patch Watch listing -- they also receive weekly AskWoody Plus Newsletters (formerly Windows Secrets Newsletter) and AskWoody Plus Alerts, emails when there are important breaking developments.
Get Plus!
Recent Topics
-
Network Issue
by 5 hours, 20 minutes ago
-
Fedora Linux is now an official WSL distro
by 10 hours, 48 minutes ago
-
May 2025 Office non-Security updates
by 11 hours, 15 minutes ago
-
Windows 10 filehistory including onedrive folder
by 13 hours, 10 minutes ago
-
pages print on restart (Win 11 23H2)
by 12 hours, 26 minutes ago
-
Windows 11 Insider Preview build 26200.5581 released to DEV
by 15 hours, 22 minutes ago
-
Windows 11 Insider Preview build 26120.3950 (24H2) released to BETA
by 15 hours, 23 minutes ago
-
Proton to drop prices after ruling against “Apple tax”
by 22 hours, 44 minutes ago
-
24H2 Installer – don’t see Option for non destructive install
by 7 hours, 7 minutes ago
-
Asking Again here (New User and Fast change only backups)
by 1 day, 10 hours ago
-
How much I spent on the Mac mini
by 9 hours, 30 minutes ago
-
How to get rid of Copilot in Microsoft 365
by 4 hours, 41 minutes ago
-
Spring cleanup — 2025
by 1 day, 15 hours ago
-
Setting up Windows 11
by 11 hours, 1 minute ago
-
VLC Introduces Cutting-Edge AI Subtitling and Translation Capabilities
by 1 day, 11 hours ago
-
Powershell version?
by 1 day, 12 hours ago
-
SendTom Toys
by 8 hours, 51 minutes ago
-
Add shortcut to taskbar?
by 1 day, 16 hours ago
-
Sycophancy in GPT-4o: What happened
by 2 days, 8 hours ago
-
How can I install Skype on Windows 7?
by 2 days, 7 hours ago
-
Logitech MK850 Keyboard issues
by 1 day, 14 hours ago
-
We live in a simulation
by 2 days, 22 hours ago
-
Netplwiz not working
by 2 days, 9 hours ago
-
Windows 11 24H2 is broadly available
by 3 days, 11 hours ago
-
Microsoft is killing Authenticator
by 13 hours ago
-
Downloads folder location
by 3 days, 17 hours ago
-
Remove a User from Login screen
by 2 days, 13 hours ago
-
TikTok fined €530 million for sending European user data to China
by 3 days, 8 hours ago
-
Microsoft Speech Recognition Service Error Code 1002
by 3 days, 8 hours ago
-
Is it a bug or is it expected?
by 1 day, 10 hours ago
Remembering Woody
